Today we have a guest post from Aidan Chopra, friend of SparkFun and dad extraordinaire. Aidan built an absolutely brilliant Grumman F4F-4 costume for his son. The real art of the costume is in the laser-cut body of the plane, but Aidan also uses a motor and mount, an RC wheel, and some other bits and pieces from SparkFun to bring the costume to life. Aidan used SketchUp to build this great design. Thanks to Aidan for sharing this incredible project with us.
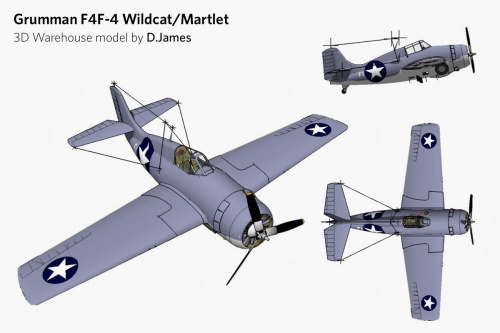
October is the time of year that all of my creative energy is focused into a single, solitary purpose: the design and making of an unreasonably complicated Halloween costume for my son. This year, I was determined to reflect his outsized interest in aviation by building him his very own airplane. Something with an open cockpit. Something with a propeller. Something vintage. I started by touring the 3D Warehouse, collecting models of airplanes that might be good candidates. I settled on a WWII-era F4F-4 U.S. Navy fighter because I liked its shape, and because the model I found (by D.James) was beautifully executed.
I found this Grumman F4F-4 on the 3D Warehouse. It was modeled by D.James.
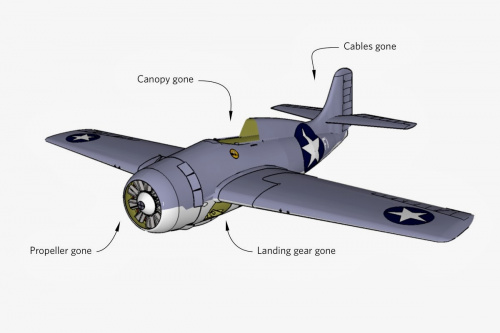
Opening it in SketchUp, I began the process of simplifying the plane down to its most basic forms by hiding or deleting stuff I didn't need. The landing gear and propeller went. So did the wire-looking thing (I'm not much of an engineering buff) that connected the tail to the cockpit canopy. Eventually, I grouped the remaining bits of airplane together and put them on a single layer that I called "Reference."
The first step was to strip away the details that I didn’t think I’d need.
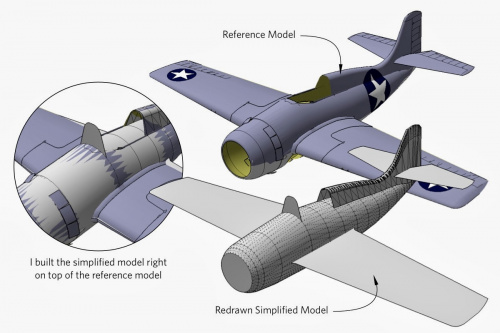
Next, I set about creating a brand-new model of the fuselage and tail by using the Circle, Push/Pull and Scale tools to create a form that (more or less) matched the existing model. I worked right on top, using the original geometry as a snapping guide for the new. This didn't take as long as you'd think, and it resulted in a simple form that I could easily manipulate later on. For the wings and stabilizers (the smaller wings on either side of the tail) I traced basic, flat shapes; I knew I wouldn't end up making them aerodynamically correct, so I didn't bother giving them a realistic thickness. It is, after all, illegal for a two-year-old to pilot aircraft in the state of Colorado.
D.James’ model is very complex, so I made myself a simpler version (grey) by modeling directly over the original (blue). The wings and the horizontal stabilizers are just flat faces.
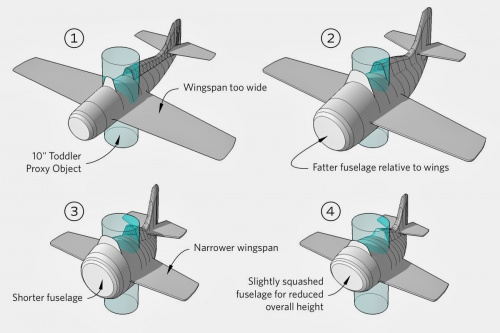
Not being able to find a decent model of a small child anywhere online, I used a toddler-sized cylinder as a scale reference as I scaled down the entire vehicle to fit him. "Rough" doesn't begin to describe the level of accuracy I employed at this stage of the engineering process; I basically held a ruler next to his waist and decided that he could squeeze into a ten inch tube. I did NOT at any time actually squeeze him into a ten inch tube. Mostly because I didn't have one handy. At this point, I set about changing the proportions to increase the airplane's overall level of adorableness. To do this, I grouped together the body, wings and tail bits, made a copy off to the side, and used the Scale tool to stretch and squish the whole thing.
Starting with a squashed cylinder to represent a toddler, I used the Move tool to change the proportions of the airplane until it looked wearable.
At this point, I'd pretty much decided that the airplane would be made out of laser-cut cardboard (more on that later), so I continued modeling with the assumption that the wings and stabilizers would be 2D shapes, and the body would be a more organic, 3D form. This part of the process was the most time-consuming and fiddly—it was just a matter of tweaking the shape of each element until I was happy with the overall proportions of the plane.
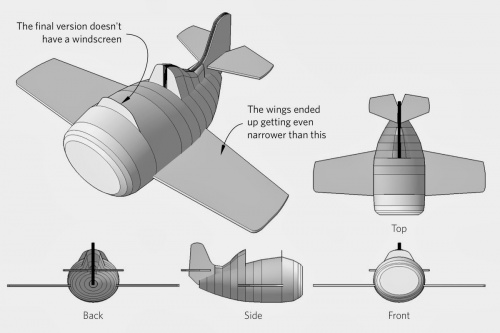
The intermediate state of the airplane is actually very basic.
As I settled on a material and construction method, I spent a lot of time on the website of a New Zealand and US-based company called Ponoko. They offer laser-cutting and 3D printing services, and their material selection is terrific. Ponoko has also been a good friend of SketchUp since they launched several years ago. Frankly, I'd been waiting for an excuse to try them out; their offering seemed really slick.
Before I could go any further on the airplane project, I needed to know more about the material I'd be using: its precise thickness, what sheet sizes are available, and its cost. Weight and budget were my major concerns, so I settled on double-layer corrugated cardboard with a thickness of 0.264 inches (6.7mm) and a maximum sheet size of 31.1 x 15.1 inches (790mm x 384mm). Sheets that size cost $3.50 apiece, which is cheap, plus file setup and cutting, which is decidedly less so. When I uploaded a test file to Ponoko to see what this undertaking might cost, the average price per sheet of cut parts was about $25.00. I figured I'd need about ten. This was turning out to be a very expensive cardboard airplane.
The double-layer corrugated cardboard page on Ponoko’s website. Make note of the material thickness for accurate modeling.
Back in SketchUp, I set about figuring out how to build the project out of interconnected, flat pieces. I started with the easy parts: the horizontal section of the body, which included the wings, and the vertical section, which included the tail. These two components were the structural parts of the plane, so I made them out of three layers of cardboard, laminated together for stiffness and durability.
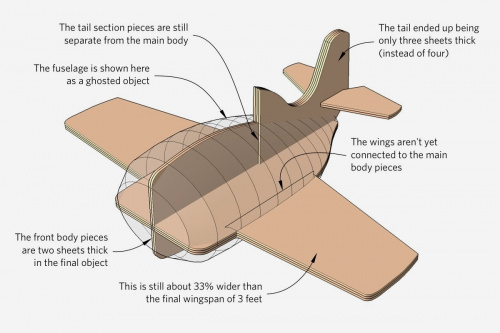
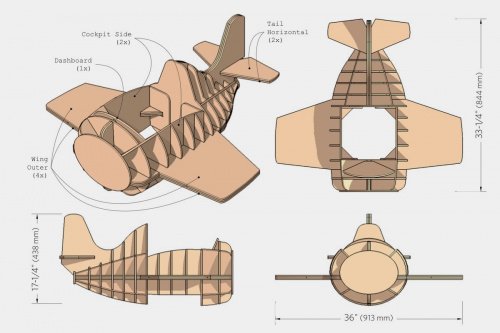
The horizontal fuselage sheets (which include the wings) provide the airplane’s back-to-front structural strength. The vertical pieces are necessary for forming the nose and tail.
To design the rest of the plane's pieces, I copied the 2D profiles that made up the fuselage, made them into faces, and extruded them to the same thickness as the cardboard. Each piece was an individual group at this point; I didn't bother making named components until I was further along.
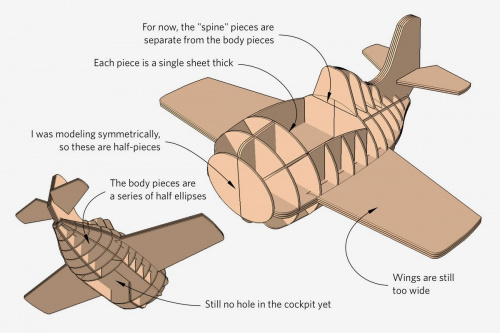
The ellipsoid “fins” that march down the length of the airplane are the key to defining the fuselage’s sleek, rounded shape.
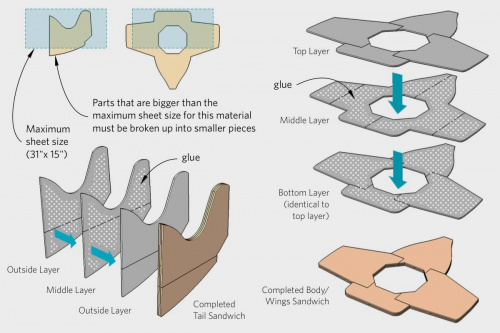
Next, I used the maximum sheet size for the cardboard to figure out which parts would need to be subdivided and re-assembled after they'd been cut. This task was made a bit simpler by the fact that the biggest pieces of the plane—the horizontal and vertical "slabs" I'd started with—were each made up of three thicknesses of material. I just figured out a design that would hide the seams on the outside, visible layers, while allowing the middle layer pieces to overlap enough to form a strong sandwich when I glued everything together.
Parts which would ideally have been cut from a single sheet of cardboard had to be broken up into smaller pieces due to the small maximum sheet size for that material. These were then sandwiched together with glue. The resulting triple-layer laminates ended up being very stiff.
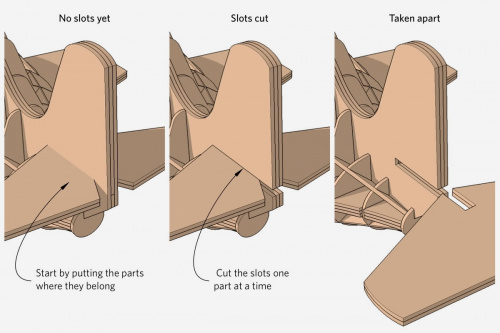
One of the last steps in the design process was to design the slots that would allow all (or at least most) of the pieces to interlock together. Figuring that the kerf (the width of the cut made by the laser) would be very small in this material, I decided to make the slots exactly as wide as the material thickness. This part was actually kind of fun—it's the closest I've ever come to modeling a 3D puzzle.
There are lots of ways to cut slots in the pieces; I used the Line and Push/Pull tools in combination with the Copy and Paste in Place commands.
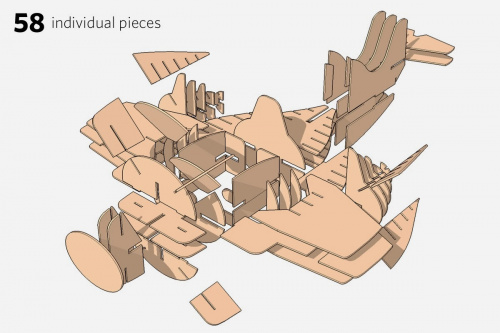
At this point, I began the delicate process of converting my groups into components; piece by piece, I exploded each group and then immediately made it into a component with a meaningful name. Where I had a pair of identical, flipped parts (this was actually the majority of the airplane), I made sure both were instances of the same component. The airplane is made out of 58 individual parts, but only 32 unique components.
Because the airplane is so symmetrical, most of the parts are flipped and duplicated component instances.
Just for fun, and because I knew it would look really cool, I copied the plane onto a duplicate layer, and used the Move tool to arrange the parts as though they'd been exploded out from the object's center.
All of the airplane’s parts, exploded outward for visibility.
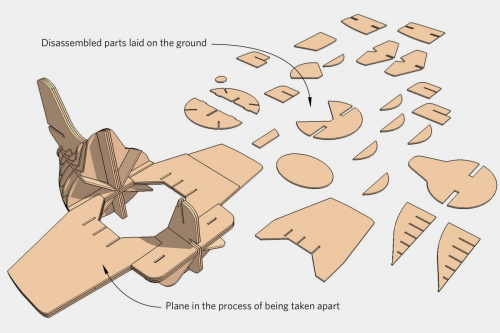
To have something laser cut by Ponoko, you give them a vector file (EPS or SVG) with all of the parts laid out flat. They provide Adobe Illustrator templates for all three of their standard sheet sizes, which makes things a bit easier. In order to go from a 3D, assembled object in SketchUp to a series of 2D cutting files in Illustrator, I needed to disassemble the plane piece by piece. Figuring that it would be easiest to have the assembled and flat versions adjacent to each other, I made a copy of the airplane off to the side and proceeded to take the copy apart with the Move tool. I used the Move tool's rotation grips (and occasionally the Rotate tool) to spin pieces around so they lay flat.
I made sure not to forget any pieces by literally taking apart an assembled copy of the airplane, laying the parts flat on the ground as I proceeded.
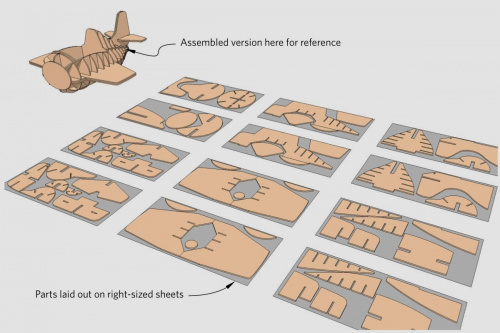
Almost there. I drew a rectangle that matched the sheet size of the cardboard, turned it into component, and made a dozen copies. Then I went through the laborious process of figuring out how to lay out all of the airplane pieces in an efficient way. Having done some experimentation on Ponoko's website, I'd discovered that it's significantly cheaper to produce two copies of the same cutting file than it is to make two different sheets. Good thing, because it turns out that most of my airplane parts are symmetrical; they're mirrored copies that exist in pairs. To take advantage of this, I arranged all of the symmetrical pieces on five sheets and produced two copies of each; all of the "singles" fit on only two more. In total, I had twelve sheets of parts.
The grey rectangles represent 31” x 15” sheets of cardboard. Notice that there are five pairs of identical parts sheets, plus only two unique sheets (in the upper left corner). This significantly reduced the laser cutting costs.
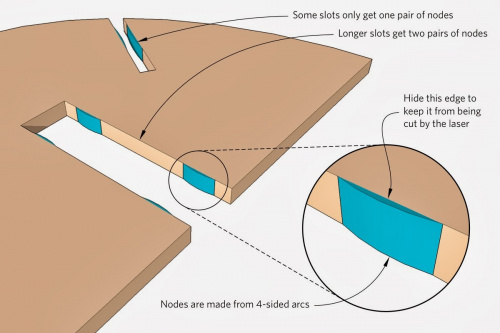
Digging around on Ponoko's website a little more, I discovered a mention of something called "nodes" which help to keep slot-assembled parts from wobbling and falling apart. Basically, it involves adding rounded bumps to the slots in your pieces. The size, position, and number of nodes depends on your material and its thickness, and the website didn't provide any specific tips for my double-layered corrugated cardboard, so I made an informed guess and crossed my fingers: I settled on a node height of 1/16th of an inch, which, multiplied by two, represented about a quarter of the 0.264" thickness of the sheet. That's a lot, but I figured that cardboard is a pretty compactible material. I was lucky; the nodes ended up working perfectly.
Nodes help to keep the parts snug when the final object is assembled.
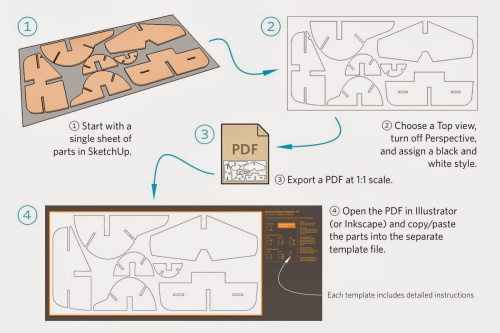
One at a time, I copied each sheet to a new SketchUp file, set my camera to a top, parallel projection view, applied a simple, white Style with no profiles edges or other effects, did a Zoom Extents, and exported a PDF at 1:1 scale. Then I opened each PDF in Illustrator, copied just the parts, and pasted them on a new layer in the template provided by Ponoko. I went through this process a total of seven times—once for each unique sheet I'd be sending them.
The sheets are exported out of SketchUp Pro as 1:1 scale PDF files. These are then opened in a vector illustration program like Adobe Illustrator or Inkscape.
In order for Ponoko to convert an Illustrator EPS (their required upload format) into whatever file they send to their laser cutters, you need to make sure all of the edges in your drawings are colored and sized correctly. Blue lines tell the laser to cut, whereas red lines are used for engraving. Just follow the instructions on the template and you'll be okay.
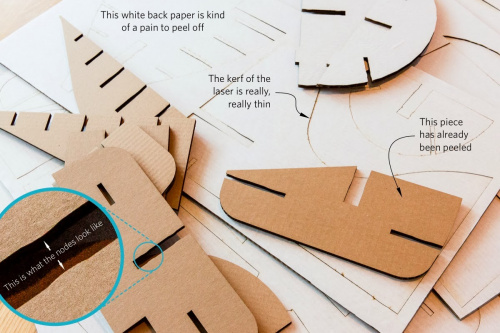
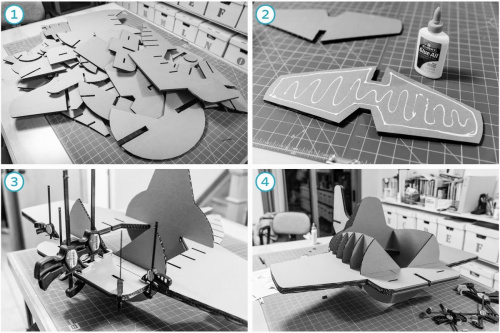
After uploading my files, putting in all my credit card details, finalizing the order, corresponding a few times with the friendly staff at Ponoko, and waiting a couple of weeks, a box arrived at my house. I opened it up and was nearly knocked over by the smell of laser-cut cardboard. It's an odd odor; not terrible, but definitely not pleasant. I quarantined the pieces in the spare bedroom and went to work punching everything out.
The accuracy of the cutting was astounding. I've never laser cut anything; I expected the pieces to look good, but the quality of what I got made me alternate between grinning and literally giggling. For a person who spent hundreds of hours in architecture school hacking away at cardboard, foam core, basswood and plexiglass with an X-Acto knife, the extravagant expense of laser cutting instantly justified itself. I was hooked.
I couldn’t believe the quality of the laser-cut parts that arrived on my doorstep.
It took longer to peel the paper backing off of the individual parts than it did to assemble the actual airplane (not counting the time it took for the glue to dry completely). With only a couple of exceptions, the parts slotted together exactly the way I'd designed them to. It was the most gratifying thing I've made in years.
It took me only a couple of hours to put the airplane together. The next version will have less glue—that was the most time-consuming part of the process.
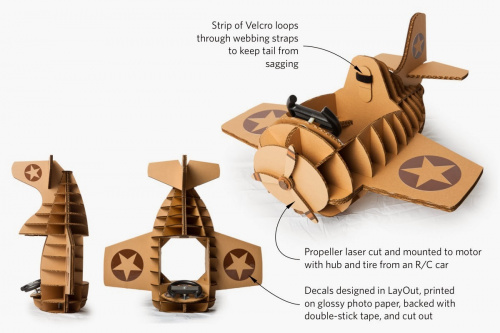
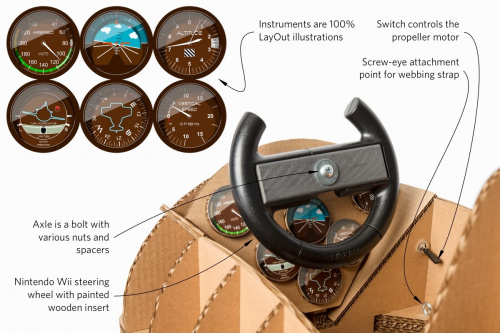
As a devout follower of the Church of Making Things Overcomplicated, I decided early on that the airplane should have a custom-designed instrument cluster. And a steering wheel. And a working, motorized propeller. This is already a monster blog post, so I'll end the description of my process here. To conclude, a few photos of the end result.
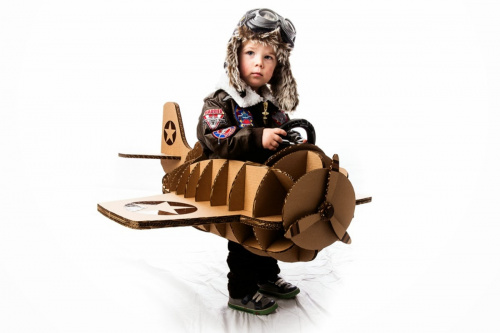
The final result weighs somewhere between five and six pounds, but that includes the steering wheel, the propeller motor, and four AA batteries. My son (who’s two-and-a-half) had no trouble wearing it.
I designed the instrument cluster entirely in LayOut, using layers of translucent details to simulate reflections, highlights and shadows.


Hi! I would like to buy the .pdf, is it possible? I know a boy who would love to play with this.
It doesn't look like the author posted the final .pdf of the files on 3D Warehouse, but you can find the original plane this project was based off of here.
Hi, would I be able to buy the .pdf or even finished product from the designer? This is so awesome and would love to create it for my son!
I love the "Toddler Proxy Object." Very cool project!
Very creative!!!
What was the final build cost?
This is AMAZING, and absolutely adorable! Thanks so much for sharing. I sometimes forget what can be done with a laser cutter, CAD skills, and some patience. Great job, and happy Halloween!
Excellent writeup! Thank you for taking the time to thoroughly explain your great project.
Wow! What an awesome and incredibly detailed build. WANT!