
Turn your ProMicro into a USB Keyboard/Mouse
How cool would it be if you could turn any button, joystick, sensor or other electronic gizmo into a USB keyboard and/or mouse? You could make just about any input device you want into a controller for your computer programs or games. What if you could do it with one line of code, inside the comfy confines of Arduino? Interested? Well, say hello to my micro friend: the SparkFun Pro Micro!
The Pro Micro is a tiny, Arduino-compatible microcontroller centered around an ATmega32U4 - an 8-bit AVR very similar to the ATmega328 with one huge caveat: The 32U4 comes equipped with a full-speed USB transceiver. So now, when you connect the Arduino to your computer, they're connected directly over the USB bus (excuse my RAS). The Pro Micro can be programmed to emulate any USB device you could imagine. You can even program it to act just like a mouse, keyboard or other HID-class USB device.
What is HID you might ask? It's one of the many defined USB device classes. Every USB device is assigned a device class, which defines what exactly its general purpose is. There are loads of classes -- printers, hubs, speakers and webcams to mention a few -- but this tutorial is going to specialize in HID: Human Interface Device. You might be holding an HID device in one hand right now, while your other hand is hovering over another.
So the ATmega32U4 takes care of the USB-hardware hurdle, but we've still got to clear the firmware one. Fortunately for us, Arduino exists, and with the release of 1.0 it comes with built-in support for the ATmega32U4 and its USB core. That USB support includes HID functionality. Unfortunately, that HID stuff is somewhat tucked (or even locked) away from us. The goal of this tutorial is to explain how to use the Arduino HID library, so you can get the most out of your Pro Micro. So lets pop the hood!
Part 1: A simple HID Keyboard
I stress "simple" at the header of this section, because that's what it is. And that's a great thing! There are essentially two functions you'll need to turn your Pro Micro into a USB keyboard:
Keyboard.write(char)- This function will send a single character over USB. The character passed can be any standard, printable, ASCII-defined character: 0-9, a-z, A-Z, space, symbols, etc. Here's an example line of code:Keyboard.write('z')- This will send a single 'z' character to your computer. Note those are single-quotes around the character. You could also replace 'z' with a pre-defined char variable.
Keyboard.print(string) - If you need to perform a series a Keyboard.write()'s, consider using just a single Keyboard.print(). This works similar to Serial.print() -- give it a string of characters and it'll send that stream of characters over USB. An example of that:
Keyboard.print("Hello, world");- The "Hello, world" of the Arduino HID class. This'll send your computer an 'H,' followed by 'e,' followed by an 'l,' followed by ... you get the picture. You could also replace the "Hello, world" with either a String variable, or an array of chars.
Keyboard.println(string) - Just like Keyboard.print() except this adds an [Enter] key to the end of the string.Keyboard.press(byte) and Keyboard.release(byte). They do exactly what you'd expect. One presses a button down, the other releases a button. Make sure you release any buttons you press, otherwise you'll encounter some wiggyness on your computer. That's it. You don't need to include any libraries or anything, just pull out any of those functions.
After a Keyboard.write() or Keyboard.print() function has been performed by the Pro Micro, your computer will have to decide what to do with it. What your computer does with that character, or string of characters, is entirely dependent on what program it's running at the time. If you have a text editor open and active, it'll print it out there.
The most straightforward example I can think of is tying a single button to a single key-press. Give this example a quick try (copy/paste from below, or download the sketch here). If you have a button handy, tie one end to pin 9, and the other to ground. Or, if you don't have a button, just use a wire to short pin 9 to ground.
int buttonPin = 9;  // Set a button to any pin

void setup()
{
  pinMode(buttonPin, INPUT);  // Set the button as an input
  digitalWrite(buttonPin, HIGH);  // Pull the button high
}

void loop()
{
  if (digitalRead(buttonPin) == 0)  // if the button goes low
  {
    Keyboard.write('z');  // send a 'z' to the computer via Keyboard HID
    delay(1000);  // delay so there aren't a kajillion z's
  }
}
When pin 9 is grounded, your computer should receive a 'z' character. When you do activate the keypress, make sure you have an application open that will be able to do something with a 'z'. If you want, just leave the Arduino sketch active, and it should type a 'z' into the sketch editor.
I'd also like to point out that the delay(1000) is an important part of that sketch. The 1000 is arbitrary, but the delay() is not. Try taking the delay out, and your computer will try to catch some z's (zzzzzzzzzzz). Needless to say, you've got to watch out what you're sending to the computer, as well as how fast and how often.
HID USB Keypad
When I'm using my laptop, I often find myself lamenting the absence of a keypad. But with the Pro Micro, I could make a keypad!
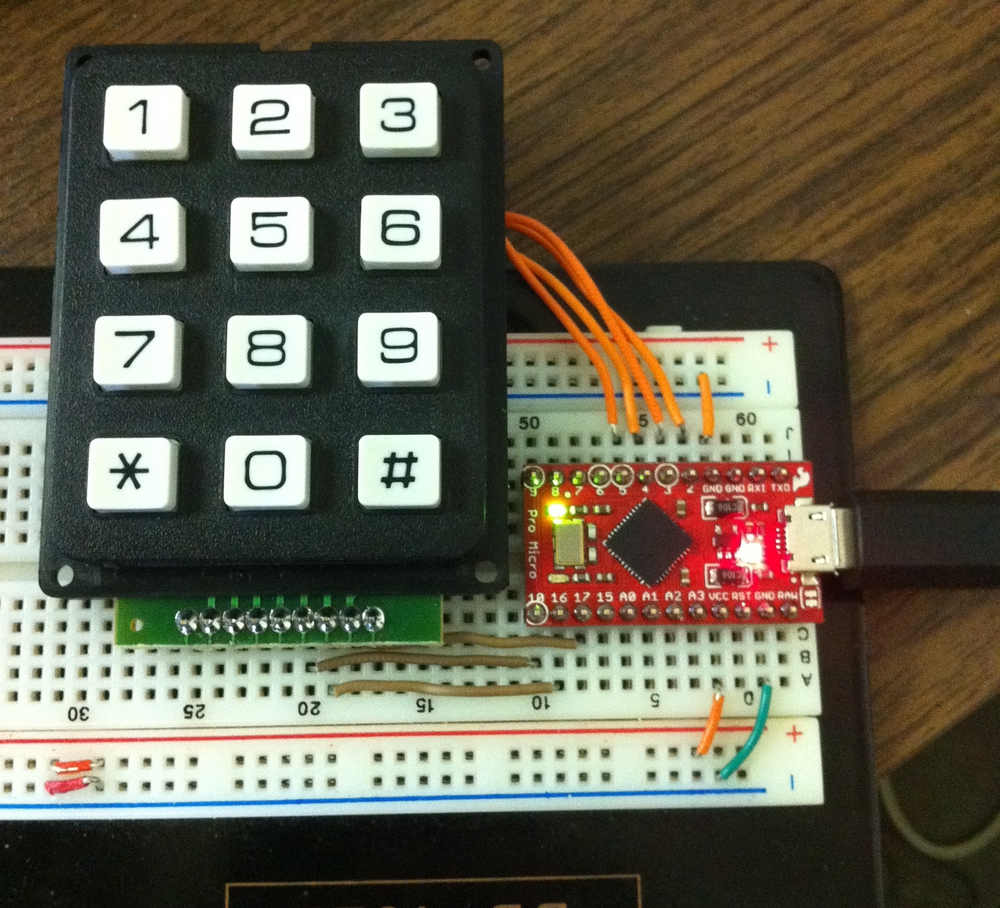
If you pair the Pro Micro with our 12-Button Keypad, you're just a few wires away from your very own DIY USB keypad. Here's an example schematic for my DIY USB Keypad.
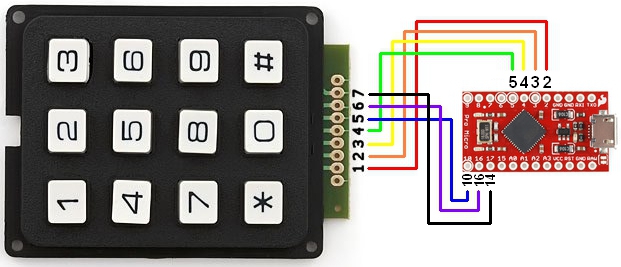
Feel free to connect any of the keypad pins to any digital pin of the Pro Micro. That was the easiest way for me to wire it all on a breadboard.
Load up this keypadHID code (copy paste from below, or click here to download it):
/* keyPadHiduino Example Code
   by: Jim Lindblom
   date: January 5, 2012
   license: MIT license. If you find this code useful, please
   feel free to use this code however you'd like, commercially
   or otherwise. Just keep this license on there whatever you do.

   This code implements a 12-key USB keypad. You can type 0-9,
   * is the + sign and the # key is enter. I'm using SparkFun's
   12-button keypad, your pinouts may vary. Multi-touch is
   not supported.

   SparkFun Keypad Pinout:
   Rows and columns are connected as such:
   -------------
   | 1 | 2 | 3 | - 3
   | 4 | 5 | 6 | - 7
   | 7 | 8 | 9 | - 6
   | * | 0 | # | - 1
   -------------
     |   |   |
     2   4   5
*/
// Pins 1-7 of the keypad connected to the Arduino respectively:
int keypadPins[7] = {2, 3, 4, 5, 10, 16, 14};
int keypadStatus;  // Used to monitor which buttons are pressed.
int timeout;  // timeout variable used in loop

void setup()
{
  for (int i=0; i<7; i++)
  {
    pinMode(keypadPins[i], INPUT);  // Set all keypad pins as inputs
    digitalWrite(keypadPins[i], HIGH);  // pull all keypad pins high
  }
}

void loop()
{
  keypadStatus = getKeypadStatus();  // read which buttons are pressed
  if (keypadStatus != 0)  // If a button is pressed go into here
  {
    sendKeyPress(keypadStatus);  // send the button over USB
    timeout = 2000;  // top of the repeat delay
    while ((getKeypadStatus() == keypadStatus) && (--timeout))  // Decrement timeout and check if key is being held down
      delayMicroseconds(1);
    while (getKeypadStatus() == keypadStatus)  // while the same button is held down
    {
      sendKeyPress(keypadStatus);  // continue to send the button over USB
      delay(50);  // 50ms repeat rate
    }
  }
}

/* sendKeyPress(int key): This function sends a single key over USB
   It requires an int, of which the 12 LSbs are used. Each bit in
   key represents a single button on the keypad.
   This function will only send a key press if a single button
   is being pressed */
void sendKeyPress(int key)
{
  switch(key)
  {
    case 1:  // 0x001
      Keyboard.write('1');  // Sends a keyboard '1'
      break;
    case 2:  // 0x002
      Keyboard.write('2');
      break;
    case 4:  // 0x004
      Keyboard.write('3');
      break;
    case 8:  // 0x008
      Keyboard.write('4');
      break;
    case 16:  // 0x010
      Keyboard.write('5');
      break;
    case 32:  // 0x020
      Keyboard.write('6');
      break;
    case 64:  // 0x040
      Keyboard.write('7');
      break;
    case 128:  // 0x080
      Keyboard.write('8');
      break;
    case 256:  // 0x100
      Keyboard.write('9');
      break;
    case 512:  // 0x200
      Keyboard.write('+');
      break;
    case 1024:  // 0x400
      Keyboard.write('0');  // Sends a keyboard '0'
      break;
    case 2048:  // 0x800
      Keyboard.write('\n');  // Sends the 'ENTER' key
      break;
  }
}

/* getKeypadStatus(): This function returns an int that represents
the status of the 12-button keypad. Only the 12 LSb's of the return
value hold any significange. Each bit represents the status of a single
key on the button pad. '1' is bit 0, '2' is bit 1, '3' is bit 2, ...,
'#' is bit 11.

This function doesn't work for multitouch.
*/
int getKeypadStatus()
{
  int rowPins[4] = {keypadPins[2], keypadPins[6], keypadPins[5], keypadPins[0]};  // row pins are 2, 7, 6, and 1 of the keypad
  int columnPins[3] = {keypadPins[1], keypadPins[3], keypadPins[4]};  // column pins are pins 2, 4, and 5 of the keypad
  int keypadStatus = 0;  // this will be what's returned

  /* initialize all pins, inputs w/ pull-ups */
  for (int i=0; i<7; i++)
  {
    pinMode(keypadPins[i], INPUT);
    digitalWrite(keypadPins[i], HIGH);
  }

  for (int row=0; row<4; row++)
  {  // initial for loop to check all 4 rows
    pinMode(rowPins[row], OUTPUT);  // set the row pin as an output
    digitalWrite(rowPins[row], LOW);  // pull the row pins low
    for (int col=0; col<3; col++)
    {  // embedded for loop to check all 3 columns of each row
      if (!digitalRead(columnPins[col]))
      {
        keypadStatus |= 1 << ((row+1)*3 + (col+1) - 4);  // set the status bit of the keypad return value
      }
    }
    pinMode(rowPins[row], INPUT);  // reset the row pin as an input
    digitalWrite(rowPins[row], HIGH);  // pull the row pin high
  }

  return keypadStatus;
}
Now just open up your computer's calculator and start adding. The * button is configured as the '+' sign, and the # button is configured as the [Enter] key.
There are three functions at work here. The getKeypadStatus() function reads each button of the keypad and returns an int. Only 12-bits of the value returned by getKeypadStatus() are used, each representing the status of each key – 1 for pressed, 0 for not pressed.
The sendKeyPress(int) function is where the HID magic happens. It'll interpret the value returned by getKeypadStatus() and send a keystroke to the computer based upon that value.
In the loop() we continuously check for a keypress. If a keypress is detected, we send the corresponding character to the computer. There is a bit of funkiness in the loop(), as we're trying to emulate a repeat delay, and then a repeat rate. The repeat delay is that short, one-time delay where the key must be held down before it starts repeating endlessly. The repeat rate is a short delay (50ms) to slow the spamming of characters.
Want to get some use out of Keyboard.print()? Try replacing Keyboard.write('1') in the above example with Keyboard.println("Password1234"). Now, when I press 1 on the keypad, it prints out "Password1234 [ENTER]", and I can log into my computer after pressing just one button! If you're as bad at remembering passwords as me (especially when you're forced to change it every few months *eyes SparkFun IT*), perhaps you might benefit from this password-typer. It's not all that secure, but it's probably more safe than writing it down on a slip of paper that you hide under your keyboard. Don't look under my keyboard.
Part 2: HID USB Mouse
That covers about half of USB HID library, how about we add a mouse to the mix now? Implementing a USB HID mouse requires a few more functions, but it's still crazy simple. There are five functions provided by Arduino's HID class that can be used to implement a mouse:
- Mouse.move(x, y, wheel) - This function tells the computer to move the mouse a certain number of pixels along either the x, y and/or wheel axis. Each variable can be any value between -128 and +127, with negative numbers moving the cursor down/left, positive numbers move the right/up.
-
Mouse.press(b) - This function sends a down-click on button(s) (one or more) b. The button(s) will remain "pressed" until you call Mouse.release(b). The b variable is a single byte, each bit of which represents a different button. You can set it equal to any of the following, or OR them together to click multiple buttons at once:
- MOUSE_LEFT - Left Mouse button
- MOUSE_RIGHT - Right Mouse button
- MOUSE_MIDDLE - Middle mouse button
- MOUSE_ALL - All three mouse buttons
- Mouse.release(b) - Similar to Mouse.press(b), this function sends an up-click signal to the computer to tell it that a button has been released.
- Mouse.click(b) - This function sends a down-click (press) followed immediately by an up-click (release) on button(s) b.
Ever want to control your computer's cursor with a joystick? Well, you may not want to after this example (it's not exactly precise), but at least it'll show you how to use the Mouse class. For those playing along, I'm using our Thumb Joystick, planted into its breakout, and connected to the Pro Micro.
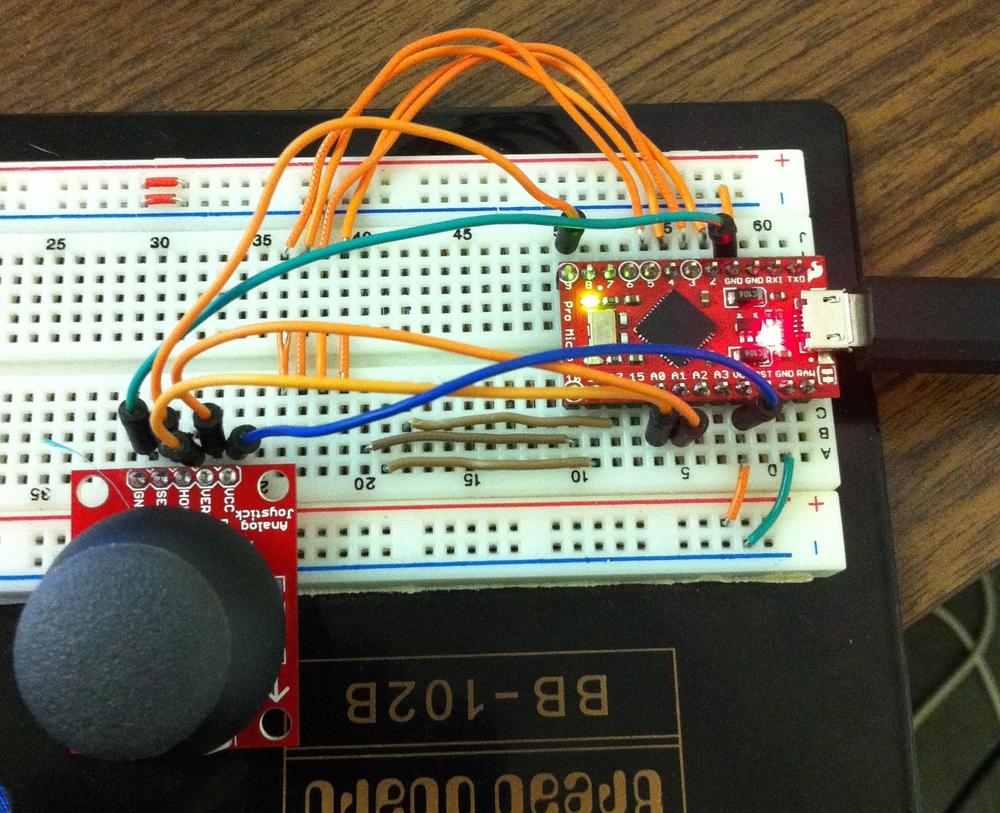
The joystick is powered by the Pro Micro's VCC and GND pins. The horizontal analog output is connected to A0, vertical to A1, and the select switch is connected to D9. As always, feel free to hook it up however you want, just make sure to change the pin definitions near the top of the code.
Here's the code:
/* HID Joystick Mouse Example
   by: Jim Lindblom
   date: 1/12/2012
   license: MIT License - Feel free to use this code for any purpose.
   No restrictions. Just keep this license if you go on to use this
   code in your future endeavors! Reuse and share.

   This is very simplistic code that allows you to turn the
   SparkFun Thumb Joystick (http://www.sparkfun.com/products/9032)
   into an HID Mouse. The select button on the joystick is set up
   as the mouse left click.
 */
int horzPin = A0;  // Analog output of horizontal joystick pin
int vertPin = A1;  // Analog output of vertical joystick pin
int selPin = 9;  // select button pin of joystick

int vertZero, horzZero;  // Stores the initial value of each axis, usually around 512
int vertValue, horzValue;  // Stores current analog output of each axis
const int sensitivity = 200;  // Higher sensitivity value = slower mouse, should be <= about 500
int mouseClickFlag = 0;

void setup()
{
  pinMode(horzPin, INPUT);  // Set both analog pins as inputs
  pinMode(vertPin, INPUT);
  pinMode(selPin, INPUT);  // set button select pin as input
  digitalWrite(selPin, HIGH);  // Pull button select pin high
  delay(1000);  // short delay to let outputs settle
  vertZero = analogRead(vertPin);  // get the initial values
  horzZero = analogRead(horzPin);  // Joystick should be in neutral position when reading these

}

void loop()
{
  vertValue = analogRead(vertPin) - vertZero;  // read vertical offset
  horzValue = analogRead(horzPin) - horzZero;  // read horizontal offset

  if (vertValue != 0)
    Mouse.move(0, vertValue/sensitivity, 0);  // move mouse on y axis
  if (horzValue != 0)
    Mouse.move(horzValue/sensitivity, 0, 0);  // move mouse on x axis

  if ((digitalRead(selPin) == 0) && (!mouseClickFlag))  // if the joystick button is pressed
  {
    mouseClickFlag = 1;
    Mouse.press(MOUSE_LEFT);  // click the left button down
  }
  else if ((digitalRead(selPin))&&(mouseClickFlag)) // if the joystick button is not pressed
  {
    mouseClickFlag = 0;
    Mouse.release(MOUSE_LEFT);  // release the left button
  }
}
The loop() of this code continuously monitors the horizontal and vertical analog values of the joystick, and sends the Mouse.move() command based on what it reads. It'll move the mouse in steps, depending on what the sensitivity variable is set to. With sensitivity set to 2, the cursor will move in either 1 or 2 pixel steps.
It's important to note that the variables used by Mouse.move() - vertValue and horzValue - can be either negative or positive; their sign determines whether the mouse moves up/down or left/right.
The select switch on the joystick is used to control the mouse left click. Notice this code is using Mouse.press() and Mouse.release(), rather than just calling a single Mouse.click(). This requires a bit more coding, but it allows you to do things like drag-and-drop, double click, etc.
Part 3: Keyboard Modifiers and Non-ASCII Characters
Note (June 26, 2012): With the officical release of Leonardo in Arduino 1.0.1, a lot has changed for the better in the core USB and HID files. You can now send keyboard modifiers and non-ASCII characters using the Keyboard Write, Press, and Release member functions detailed in Part 1 above. The following defines were added to Arduino:
#define KEY_LEFT_CTRL  0x80
#define KEY_LEFT_SHIFT 0x81
#define KEY_LEFT_ALT   0x82
#define KEY_LEFT_GUI   0x83
#define KEY_RIGHT_CTRL 0x84
#define KEY_RIGHT_SHIFT    0x85
#define KEY_RIGHT_ALT  0x86
#define KEY_RIGHT_GUI  0x87

#define KEY_UP_ARROW   0xDA
#define KEY_DOWN_ARROW 0xD9
#define KEY_LEFT_ARROW 0xD8
#define KEY_RIGHT_ARROW    0xD7
#define KEY_BACKSPACE  0xB2
#define KEY_TAB        0xB3
#define KEY_RETURN 0xB0
#define KEY_ESC        0xB1
#define KEY_INSERT 0xD1
#define KEY_DELETE 0xD4
#define KEY_PAGE_UP    0xD3
#define KEY_PAGE_DOWN  0xD6
#define KEY_HOME   0xD2
#define KEY_END        0xD5
#define KEY_CAPS_LOCK  0xC1
#define KEY_F1     0xC2
#define KEY_F2     0xC3
#define KEY_F3     0xC4
#define KEY_F4     0xC5
#define KEY_F5     0xC6
#define KEY_F6     0xC7
#define KEY_F7     0xC8
#define KEY_F8     0xC9
#define KEY_F9     0xCA
#define KEY_F10        0xCB
#define KEY_F11        0xCC
#define KEY_F12        0xCD
So, if you wanted to be evil and send ALT+F4, you could write something like:
if (buttonPress)
{
  Keyboard.press(KEY_LEFT_ALT);
  Keyboard.write(KEY_F4);
  Keyboard.release(KEY_LEFT_ALT);
}
Remember that write sends both a press and release. If you use just the press function, make sure you release the button shortly afterwards (unless evil really is your goal).
And it's become that easy! If you haven't upgraded to Arduino 1.0 yet, the below information will still apply. So, I'll keep it as is for now.
End Note (June 26, 2012)
So, that's the sum of what's provided for in the Arduino 1.0 HID library. Enough to emulate just about every mouse and keyboard action there is. However, if you're like me, you may be left wanting a little bit more. For instance, what if you want to send non-ASCII-standard keys to your computer, like the function keys, arrow keys, or even modifiers like CTRL, ALT and SHIFT? The HID library doesn't really support those by default, but we can fix that...
I'll preface this section by saying we're going to be doing a little code hacking within Arduino's core libraries. It's nothing that should cause any problems to your Arduino install -- really just one very minor change -- but you will need to be careful about how you use the code in this section.
Using a programming text editor, you'll need to open up USBAPI.h, in the hardware\arduino\cores\arduino directory of your Arduino install. Any text editor will do, but it's best to use a code editor (Notepad++ or Programmer's Notepad are good ones).

The Keyboard class definition starts at line 96, and should look like this:
class Keyboard_ : public Print
{
private:
  KeyMap* _keyMap;
  void sendReport(KeyReport* keys);
  void setKeyMap(KeyMap* keyMap);
public:
  Keyboard_();
  virtual size_t write(uint8_t);
};
extern Keyboard_ Keyboard;
To send special characters and modifiers, we need to use the void sendReport(KeyReport) member function. Unfortunately, that function is currently listed under the private: label, which means we can't access it in our Arduino sketch. To make it usable, though, all you need to do is move it under the public: label. So, cut the entire void sendReport(keyReport* keys) line and paste it just under the public: line. In the end your Keyboard class prototype should look something like this:
class Keyboard_ : public Print
{
private:
  KeyMap* _keyMap;
  void setKeyMap(KeyMap* keyMap);
public:
  void sendReport(KeyReport* keys);
  Keyboard_();
  virtual size_t write(uint8_t);
};
extern Keyboard_ Keyboard;
Remember to save the header file, and close it. That's all the code hacking you have to do!
To use Keyboard.sendReport() you'll need to give it a KeyReport, which is a data structure (here's a good read for those unfamiliar) defined in USBAPI.h. Here's how it's defined:
typedef struct
{
  uint8_t modifiers;
  uint8_t reserved;
  uint8_t keys[6];
} KeyReport;
A KeyReport contains information like what keys are pressed, and if there are any keys (SHIFT, CTRL, ALT, GUI) modifying it. Each KeyReport has three member variables: keys[6], modifiers, and reserved. We won't make any use of reserved, but the other two are important.
The keys[6] array can store up to six key presses at any one time. For the most part the first value of the array, keys[0], is all you need. The actual value assigned to this variable is not ASCII though, it's is an HID usage ID. The USB standard assigns specific IDs for each and every button on a keyboard; they're all listed in this official HID Usage Table document (the table starts on page 53). Click the image below to see a HUGE listing of all the defined HID Keyboard Usages (your browser should allow you to zoom in on the image):

Basically, what this all means is you can't set keys[0] to the character 'A,' because the ASCII value of 'A' (0x41) is not the same as the usage value of 'A' (0x04).
The modifiers variable controls which, if any, modifiers are acting on a key press. You can set modifiers equal to any of the following macros:
- Shift keys: KEY_MODIFIER_LEFT_SHIFT, KEY_MODIFIER_RIGHT_SHIFT
- Control (CTRL) keys: KEY_MODIFIER_LEFT_CTRL, KEY_MODIFIER_RIGHT_CTRL
- ALT keys: KEY_MODIFIER_LEFT_ALT, KEY_MODIFIER_RIGHT_ALT
- GUI (Windows/Command) keys: KEY_MODIFIER_LEFT_GUI, KEY_MODIFIER_RIGHT_GUI
You can also OR (|) any of those macros together to specify multiple modifiers at the same time.
Once we have all the values we need set up in a keyReport, we can finally send it over to the sendReport(keyReport) function, which will report all keys and modifiers to the computer.
Clear as mud? Let's just jump into the code.
/* keyPadHiduino Advanced Example Code
   by: Jim Lindblom
   date: January 5, 2012
   license: MIT license - feel free to use this code in any way
   you see fit. If you go on to use it in another project, please
   keep this license on there.
*/

#define KEY_DELETE 0x4C
void sendKey(byte key, byte modifiers = 0);
int buttonPin = 9;  // Set a button to digital pin 9

void setup()
{
  pinMode(buttonPin, INPUT);  // Set the button as an input
  digitalWrite(buttonPin, HIGH);  // Pull the button high
}

void loop()
{
  if (digitalRead(buttonPin) == 0)  // if the button goes low
  {
    sendKey(KEY_DELETE, KEY_MODIFIER_LEFT_CTRL | KEY_MODIFIER_LEFT_ALT);  // send a CTRL+ALT+DEL to the computer via Keyboard HID
    delay(1000);  // Delay so as not to spam the computer
  }
}

void sendKey(byte key, byte modifiers)
{
  KeyReport report = {0};  // Create an empty KeyReport

  /* First send a report with the keys and modifiers pressed */
  report.keys[0] = key;  // set the KeyReport to key
  report.modifiers = modifiers;  // set the KeyReport's modifiers
  report.reserved = 1;
  Keyboard.sendReport(&report);  // send the KeyReport

  /* Now we've got to send a report with nothing pressed */
  for (int i=0; i<6; i++)
    report.keys[i] = 0;  // clear out the keys
  report.modifiers = 0x00;  // clear out the modifires
  report.reserved = 0;
  Keyboard.sendReport(&report);  // send the empty key report
}
This example uses the hardware setup in the very first bit of code -- a single button attached to pin 9.
This time, I've added a new function -- sendKey(byte key, byte modifiers) -- which can be passed to both a key (an HID usage ID) and modifiers. It'll take care of setting up the KeyReport variable, and sending all the necessary reports.
It shouldn't take much to guess what's being passed to the sendKey() function in that example. It's the three-finger salute, CTRL+ALT+DEL. Windows users should be familiar with CTRL+ALT+DEL; for them, grounding pin 9 should either call the task manager, or open the Windows Security dialog.

Mac/Linux people, I'm not sure if that'll do anything for you. If you'd rather not have a CTRL+ALT+DEL key, you can replace the modifier parameters with KEY_MODIFIER_LEFT_CTRL (or KEY_MODIFIER_LEFT_GUI for Macs), and the key value with 0x06 (the [C] key usage id). Now you've got a button devoted to copying, and it shouldn't take much more to add a paste key.
Look closely at the sendKey() function. Notice that we have to send two different HID reports. The first report sends our key, and any modifiers that may be included. The second report sends a completely blanked out KeyReport, which is necessary to tell the computer that the key has been released. This is probably why Arduino kept sendReport() as a private function, it's got a lot of mess-making potential if used incorrectly. Be careful!
You'll notice that KEY_DELETE is defined as 0x4C, which matches the "Usage ID (Hex)" value of "Keyboard Delete Forward" in that HID Usage Table document I linked above. Use that as an example for any other keys you'd like to use. There's some intriguing keys defined in there...F24 (0x73)? Who knew it went that high? Volume Up/Volume Down (0x80, 0x81)? Media player controller? RightArrow, LeftArrow, DownArrow, and UpArrow (0x4F-0x52) could be very useful!
If you want to spend a bit less time digging through that table, feel free to adapt this example code, which also includes a header file (HID_Keyboard_Advanced.h) with all of the usage ID's defined.

You can now create any type of USB input device you could ever dream of. Want to use an old arcade joystick as you play an online arcade game? Make one! Here's some code to get you started. You can use the joystick hardware setup from the mouse example above. That code will use the advanced keystrokes, replacing mouse control with up, down, left and right arrow keystrokes.
Conclusion
Well, that was a long-winded tutorial, but this subject has me really excited; I can't help but talk about it! I think the simplicity of Arduino's HID classes opens up an immense world of physical computing possibilities. I'm excited to see what kind of crazy USB devices you all come up with.
I hope this tutorial has you as excited about Arduino USB HID stuff as me. If you've got any questions, or need something clarified, please post in the comments below.
Thanks for taking the time to check this tutorial out!
*Time to buy a ProMicro.
I am emulating a USB mouse with a Promicro and would like to replace my USB cable with a Bluetooth connection. Can someone explain to me how I would be able to do this? Ie what bluetooth transmitter should I use and what's the best way to connect that to the proMicro's USBmicro port?
I'd love to do this with my current project, has anybody figured this out?
Hi guys... I try to understand this. Is it possible to hook up a Arduino board in which I can create a program to make the Promicro send certain characters based on certain events?
Hi all! I was wondering if it's possible to use an UNO R3 with FTDI's FT232RL as a USB HID mouse. I only found articles of Arduino with 8u2/16u2/32u4 etc, but nothing with the FT232RL. The referred Arduino is called Blackboard, by Robo Core, the documentation is in this link https://s3-sa-east-1.amazonaws.com/robocore-lojavirtual/998/Blackboard_v1.1.pdf. Tks!
Hello jimbO,
Thanks very much for your outstanding USB Keypad Project. It gave me just what I needed to implement a slightly larger design for a 5R x 4C keypad. With that number of keys, I was having trouble with your "left shift arithmetic." Apparently, somewhere (perhaps in one or more libraries?), a variable I intended to be an unsigned long was being truncated to 16 bits. No matter; I got around it by means of a line or two of code which simply generated a key number, 1 thru 20. Works perfectly on my Olimexino-32U4 with a button matrix keypad overlay. By the way, if there is a means of doing so, I would be happy to provide you with my code. In any case, props...and keep up the good work!
Larry O.
Is it possible to do the stuff in this article with the newest IOIO OTG board for android?
This tutorial basically explains how to use the HID feature of the Pro Micro in the Arduino IDE. The IOIO does not use the Arduino IDE, but it also does not look like it has built in HID. While it might be possible to code some of this into the IOIO it is well beyond its intended scope.
I've bought my Pro Micro and will soon buy another. Does anyone know how to check the status of CAPS-LOCK and NUM-LOCK within a sketch?
If you want to take a a keyboard further: https://www.youtube.com/watch?v=S9UfrUy_tqE
Have a few spare boards if anyone needs one. All the code and instructions will (eventually) be on github: https://github.com/Mambix/Keyduino
I notice that the functions Keyboard.begin(), Keyboard.end(), Mouse.begin(), Mouse.end() are not mentioned ... Further, I have a bricked board due to the Mouse.end() not doing anything. And Keyboard.end() also does nothing.
To make matters worse, someone made the decision to only have a 1/2 second window for the boot loader upon power up.
Bad combination, none functional ...end() functions and unusable boot loader...
Hi, i am trying to make a custom Kb for a friend, i am trying to achieve multi-key functionality as he has trouble doing so, for an instance, Ctrl+Alt+Del, Alt+Tab, etc... I am able to do the basic key combinations but when i particularly try to do Alt+Tab by, using Keypad.press(KEY_LEFT_ALT) and trying to loop Keypad.write(KEY_TAB) with some delay so as to mimic Holding the Alt key and alternating the TAB key to switch windows, i am able to achieve this, but as soon as it hits the loop for the TAB ... it just loops infinitely, i am trying to listen to the RELEASED event to break the loop but nothing works... no matter what i do, it ends up creating infinite loop... Please help me... i am new to Arduino and not very strong with C... I went through the examples and tried to accomplish above... Here is snippet of code: Pressing 2 should do ALT+TAB action
void checkrelease() { while (flag==1) { Keyboard.write(KEY_TAB); delay(1000); } }
case HOLD: if (key == '2') { Keyboard.press(KEY_LEFT_ALT); checkrelease(); Keyboard.releaseAll(); } break;
case RELEASED: if (key == '2') { flag=0; Keyboard.releaseAll(); }
When i try the above... as soon as i Hold 2 .. it goes to infinite Loop ... please help, thanks in advance.
I am planning to flash a xbox360 chatpad with the openkeyboard project mod, so it can output standard serial data, if i connect the tx-rx pind from the chatpad to this board's rx/tx it will work? thanks in advance
The link for the official HID Usage Tables has apparently changed. It is now http://www.usb.org/developers/hidpage/Hut1_12v2.pdf
Would this be able to be plugged into a raspberry pi USB port and read as a HID device on it or would I need a special driver on the RPi?
Hello I buyed this item with SparkFun 8063 I find the pin :
So I changed :
to :
But it doesn't work , when I press 1 it print 2 ont the screen , I press 3 it's 0 , I press * and I have 1
I can't find my error I test with my ohmmeter and the pinout is correct Also need more information about case value in the program
The comment for the row pins in the source posted in the article was wrong. it should say: row pins are 3, 7, 6, and 1 of the keypad
You've used 1-based indexes for your keypadPins indexes, where you need 0-based indexes.
Your keypad is:
while you had programmed it as:
Just a quick thing I noticed. I was trying to make a simple button that would send a CMD + S (to save a doc in my Mac) and when I tried to use the KEY_MODIFIER_LEFT_GUI, which according to this tutorial is 0x83, it did not work. Apparently the Mac command key is 0x08. after doing that it worked.
define MAC_CMD_KEY 0x08
define SAVE_KEY 0x16 // according to the HID usage table for S or s
sendKey(SAVE_KEY, MAC_CMD_KEY);
I hope this helps someone. btw if you google "KEY_MODIFIER_LEFT_GUI mac" you will see that 0x08 pop up everywhere.
Here's a valuable gotcha that I encountered when building my custom VirtualOn console: Some games and utilities won't recognize "key-strokes" (Keyboard.write) but instead look for key-presses (Keyboard.press) So if you're writing a game controller, swap your if(your button){Keyboard.write('W');} lines for if(your button){Keyboard.press('W');}else{Keyboard.release('W');} and things will go a lot more smoothly.
I have the Sparkfun Inventor's kit and want to do a similar project with the Uno but I'm not sure if it would work. I don't want to go through the process of getting a pro micro when I could use the included Uno.
never mind
Can this work for a standard A-Z keyboard w/ up down & enter funtions? Because I am working on a wrist mounted keyboard & I am curious if this will work for me.
Wow. This would makes building the functionality of input devices almost trivial leaving only the physical design to be perfected.
Hello, can this same setup be used to send the computer say a delta or theta symbol?
I'm using SparkFun's 12-button keypad, you're pinouts may vary. Multi-touch is not supported.
Your pinouts may vary. Sorry, I'm a huge grammar Nazi. :)
Great for DIY Accessibility products for people who find keyboards difficult. Portable speech-to-text device? Foot operated stuff?
These new functions are the answer to my problems, however, they don't compile. I download you're example code and get a "Keyboard.write file not defined in this context". I downloaded the latest 1.0 IDE, and read all the release notes and can find no mention of "Keyboard...." anything. What version of the 1.0 IDE are you using and where did you get it? I'm anxious to get started.
Hugh
Hey Hugh,
Do you have the 'Arduino Leonardo' (here's info on setting that up) selected as your board? It'll probably give you errors if any other boards are selected.
I knew that (brain fart). I'm on a Mac and your post led me to the right place. All works OK! Thanks for the help
Hugh
You know what would be great? Arcade joystick with button + Pro Micro + code that maps the directions to WASD = Minecraft joystick with sprint button (the top button would make the Micro pulse W in quick succession). It just sounds like something so natural-feeling.
Best idea I've heard all day. If you ever figure out how to do this, send me the code.
Actually, couldn't you just Keyboard.write(w); delay(500); Keyboard.write(w); ? I'm fairly new to Arduino, so would this work?
Caveat means something bad, not good, like the Duemilanove is like the Uno but with the caveat that it can't handle HID stuff.
"You keep using that word...".
I think I probably knew that in the back of my mind. Thanks for catching it!
would it be possible to do this with an Uno?
this might work for you:
http://www.practicalarduino.com/projects/virtual-usb-keyboard
The only problem is as far as I can tell each key must be each key must be written individually instead of Keyboard.print(string) or Keyboard.println(string).
When I was building gaming footpedals http://blog.colecago.com/?p=19
I looked for ways to act like a USB Gamepad. I'd rather have my button presses show up as "JOY_Button1, JOY_Button2" etc instead of keys in case those keys are used for something else I don't have to go back and do code changes and re-flash the device. Have you seen any way to do this?
Definitely getting a Pro Micro now. I wanted to get one anyway, but I was concerned about lack of funds. But after reading this, I am DEFINITELY ensuring one of these is in my order :)
I'm planing on trying to create a real mouse out of Pro micro, has anyone already tried this? Help! 😊