You probably won't be too surprised to learn that, as a part of being an engineer at SparkFun, I make a lot of "temporary" projects. Every time I design a new board, I have to test it, and that generally means a lot of support circuitry and code.
As you might imagine, it's a lot of fun to work on these things, and sometimes I like to take a project home to work on it in the evening or over the weekend. However, since these projects are by nature temporary (lasting only until I'm done testing and writing library/example code), I rarely take the time to build up a solid enclosure for them. For a long time, I'd just pitch the mess into a bag and hope; eventually, I got sick of the endless restoration of unplugged breadboard leads that came with that practice. After several rounds of prototyping, I came up with a solution: The Magic Lunchbox!
You just let that handsome devil go on about his business.
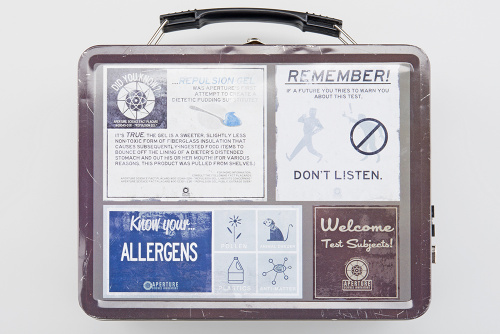
I bought this sweet, kitschy Portal 2 lunch box at St. Mark's Comics in New York on a business trip a couple of years ago. I don't generally buy a lot of, well, stuff, but this one was just too good to pass up. I knew I had to find a use for it; it sat in my office unused for months before I started playing with using it as a temporary home for my projects.
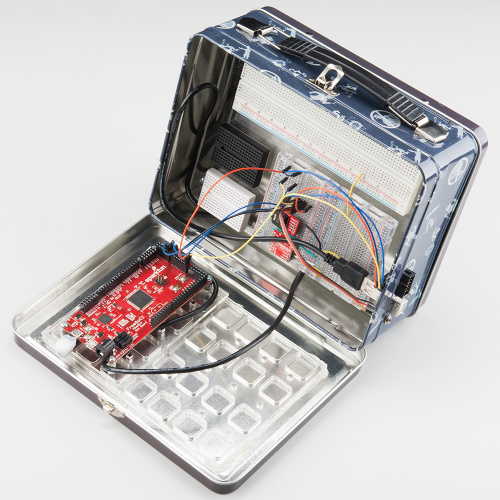
It's bigger on the inside.
Inside, there's a double-layer structure made of laser cut acrylic (you can always tell when a person or group has a laser cutter, as every project they make has a bunch of acrylic in it). The bottom layer has a few 0.25" rare-earth magnet cubes inset into it, which hold it securely against the bottom of the box. The gap between the two layers serves two purposes: first, to provide some storage, and second, to raise the breadboards on the top layer up to a more reachable and manipulable height.
On the lid, there's a grid of acrylic hot glued down, with two 3x3 grids of 0.125" rare-earth magnet cubes inset into it. The grid has two purposes, as well: first, it provides rigidity to the lid, and second, it provides clearance between the surface of the magnets and the lid for the screws on the underside of the exchangeable board carriages. You can see in the picture that I've got a FreeSoC2 board on a removable plate; that plate has matching magnets to hold it down onto the grid. That way, I can swap out my core processor for whatever my current needs are.
Openings
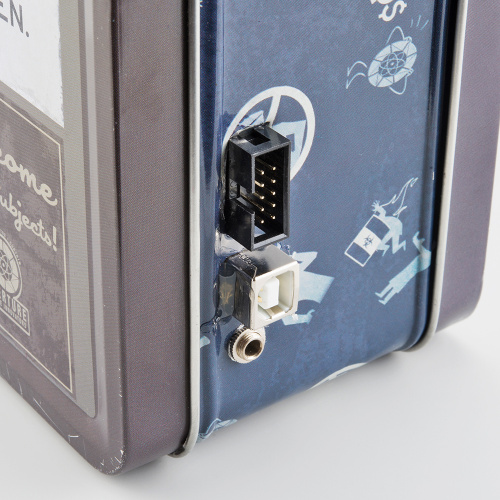
I cut a couple of small holes in the side to allow a little access to the stuff inside. I've got three connectors: a 3.5mm stereo audio jack, a female type B USB connector, and a 2x5 0.1" spaced shrouded header. That way, I can write and upload code without having to open the case.
At the moment, I'm using the Magic Lunchbox to develop my SineUs Pressure project, which is a FreeSoC2-based attempt to characterize my crappy hearing across frequency bands. I made an acrylic box with a couple of arcade buttons on the sides to capture the user's response to left/right tone detection; I didn't get a picture of it because it's ugly, but the SVG files for it are in the repo above.
What's next for the Magic Lunchbox? I'm not sure. I'll probably add some more I/O capacity, maybe a couple of fixed buttons or LEDs on the outside, but I'll let that be dictated by future needs.
How do you move your projects around?


And here we all thought the Lunchbox was to hold the Cake. But the Cake is a lie! ;)
I see what you did there.
Clever use of a lunch box. I might have set it up with the external connectors going through the lunchbox side below the breadboard mount. That way the wires coming in from the side don't interfere with the breadboards. Also allows a little easier access to the storage area.
Though, I suspect you've already discovered this and filed it away as something to do to the next one that you may or may not build...
My favorites are still the USPS flat-rate boxes. Cardboard is just so easy and cheap to house prototypes.
It would be cool to add a couple of lipos and a 3.3V and 5V power rails so you always have the power you'll need. Maybe a semipermanent wifi and Bluetooth board ready to integrate would be useful too.