One of the most convenient ways to connect a lot of peripherals to the Raspberry Pi is over USB. It's relatively fast, carries power and data, and it's universal. Sure, there are some situations where it would be cleaner to use the I2C or SPI interface, but it's hard to beat USB for convenience. I'm currently working on a number of Raspberry Pi projects where USB peripherals — especially USB-to-Serial adapters — make up the majority of the hardware connected to the RPi. This works really well but with one significant caveat, and it has everything to do with the Linux device manager udev.
What's a udev?
Whenever you plug a peripheral device into your Raspberry Pi (or any computer running a current Linux distro) there's a service called "udev" that adds that device to the /dev directory. It also does a few other things, such as launching device-specific applications when a device is present. Usually, the rules that udev uses to decide where to put a device node or what application to launch are set by an installer or a configuration tool, but there's no reason you can't just write your own!
But why would you want to? One reason may be that Linux doesn't always put generic USB com devices on the same device node. If you use a Windows computer you may be used to plugging in an FTDI breakout and getting "COM#" as a port number — and that port number sticks with the device! If you unplug that breakout and plug in another, it won't ever get the same name. However, if you have a few FTDI breakouts connected to your Raspberry Pi, they'll all take turns enumerating as usb0, usb1, usb2 (or tty0), etc. depending on the order that they're plugged in. Even if you leave the devices plugged in, they'll sometimes switch places on reboot. Each FTDI breakout has a unique serial number, however, so why can't they always enumerate the same way? Well, with a little help from udev, they can!
Another reason you might want to write a custom udev rule is to launch your own executable or script whenever you plug in a device, such as dumping files off of a connected thumbdrive, or launching a terminal program when a serial device is connected. And udev rules can be connected not only to specific devices by serial number, but also to device classes or device types (All FTDIs or all USB devices or all storage devices, things like that.)
How do you do it?
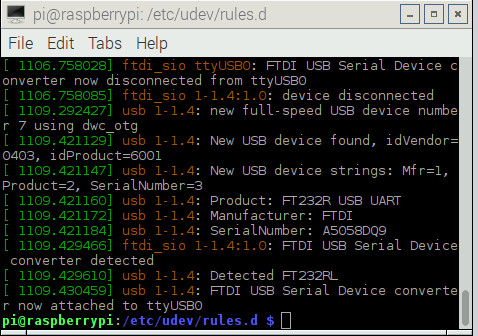
Let's assume what we want to do is to give each of our FTDI breakouts a human-friendly name. First, we need to find the serial number for each of the devices that we want to identify. The easiest way to do that is to ask our new friend, udev! But first we'll need to know which node the device that we want to rename is on. I find the easiest way to do this is to unplug the device, plug it back in, then check the system log with dmesg. So we enter the command:
dmesg
...and in return we get something like this:
Now you can see that our device is connected to ttyUSB0, which is helpful but isn't actually the full path that udev is going to need. Luckily, udev can also return the full path given that info, so we'll nest a few udev commands together like this:
udevadm info -a -p $(udevadm info -q path -n /dev/ttyUSB0)
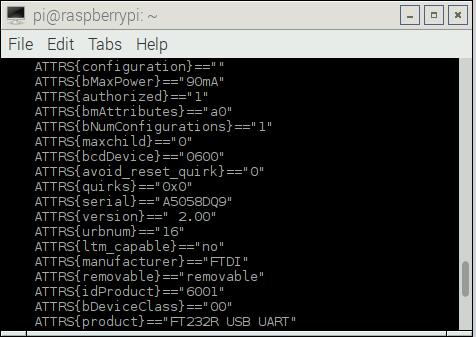
In response, udev will return all the info for our device connected to ttyUSB0. We'll need some of this information in order to uniquely identify the target device in our new udev rule. Scroll through the results looking for an attribute called "serial." The section you're looking for goes kinda like this:
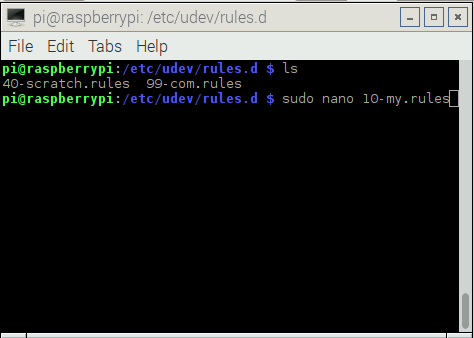
Make a note of the product field as well as the serial number; these are going to set this FTDI breakout apart from every other. Now we have everything we need to write our custom rules. Udev stores all the rules in the /etc/udev/rules.d/ directory. There may be multiple rules files and they're executed in order, so it's a good idea to look at the contents of this directory and start your new rules filename with a smaller number than the existing files. For instance, you can see below that there were two existing rules files on my Pi: 40-scratch.rules and 99-com.rules, so I added 10-my.rules.
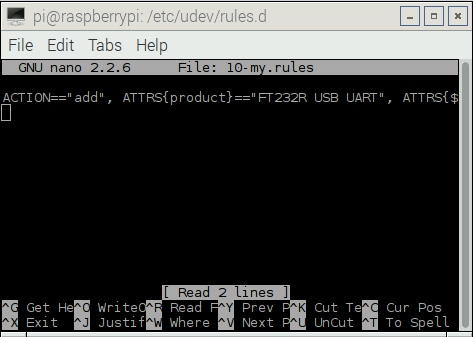
You can use whatever text editor you like most, but for small jobs like this I prefer nano. Here, you can see I've added a new rule to my new rule file:
Some of the rule got cut off in this screenshot so let's take a closer look at the construction of this thing:
ACTION=="add", ATTRS{product}=="FT232R USB UART", ATTRS{serial}=="A5058DQ9", SYMLINK+="Serial_Friend"
The first parameter — ACTION — defines the udev action that we want our rule to trigger on. In this case, we want it to trigger whenever a device is added. You may notice that the next few parameters use the "==" comparison operator, which might give you a clue as to what they do. These parameters are the attributes we want the device to match in order for our rule to be applied. This is where we use the information that we collected from the udevadm info command earlier. You can add as many of these as you want, and they can be as specific or as broad as you like. Any attributes from the udevadm info results can be plugged in here. For instance, if you wanted your rule to apply to all FTDI breakouts, you could remove the serial line above, and only match for the "product" attribute. Finally, the SYMLINK parameter tells udev that we want create a symbolic link to the device node with a given name. This is our new static, human-friendly name and I chose "Serial_Friend" for mine.
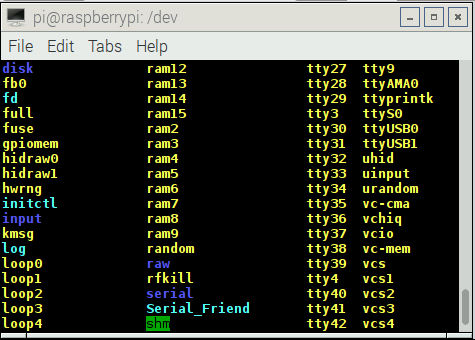
Once this line is added to your new rules file, simply exit and save changes. Now unplug your device, re-plug it in, and check the /dev/ folder for your new symbolic link:
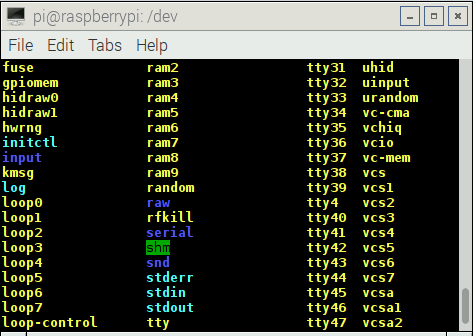
Here it is before the device is plugged in...
...and here it is after!
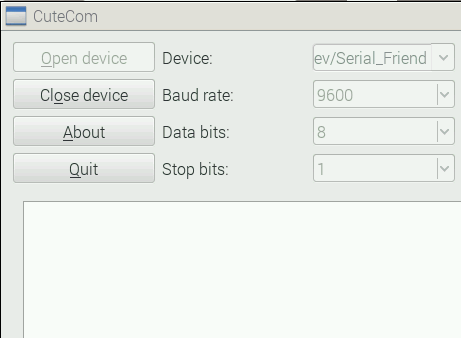
Hey, there it is! And because it's a symbolic link to the device node, it works just like the device node in scripts and other programs. Here's mine open and ready to talk in cutecom:
So there it is! Go forth and worry no longer about losing track of your USB devices. Remember, this doesn't just work for USB-serial bridges but for any device connected to the Raspberry Pi. For a more in-depth look at udev rules, check out this link. If you think I've missed a trick here, please share in the comments section!



Thank you for this resource.
Great write-up! I have been accessing udev before, for the RTL-SDR, but what is shown here to make the USB-serial devices show up not just as ttyUSB-forever-changing, helped on understanding it. I got an FTDI cable to show up with a distinct symlink, but some of the PL2303-based cables here seem to not show much of distinct values for anything (urbnum and version properties, but even these were the same on two of the cables here). Still, this is nice to know.
Good writeup!
However, you should point out that this is in no way RPi specific. Udev is part of any modern Linux for quite a while now and this information applies the same to Linux on a PC, BeagleBone, OrangePi, some hacked wireless router or any other Linux running device. I am sure it could be useful knowledge for someone.
Thank you!
For sure, that's why I put that parenthetical in the section describing udev. I just put Raspberry Pi in the title for the sake of SEO.
But you make a great point that this is totally applicable to any Linux system since like 2.6 (I think we're on 4.1 now?)
Great write up! Really made udev a lot less mysterious