This football season, show your team some extra love with the Sound Reactive Sports Jersey. With embedded electronics hidden inside, this jersey animates with addressable LEDs whenever the crowd cheers.
I wore the Sound Reactive Sports Jersey to a game and found that it's a ton of fun and a great way to make new friends. Plus, if you aren't much of a sports fan (like myself), it makes the game much more fun and exciting! GO BUFFS!
New friends:
Active participation:
Inside this unassuming jersey is a LilyPad Microcontroller, LilyPad switch, electret microphone breakout, LiPo Battery and WS2812 LED strip. The microphone waits to hear a loud noise, which will activate a programmed animation on the LEDs. This animation can be easily customized to your team colors. The switch is available to keep the LEDs on at all times, or to have them return to off when the cheering dies down. The fabrication technique is dependent on the jersey style. For this one, I slipped the LED strip into the knit collar because it was perfectly sized and diffused the LEDs in a way that I liked.
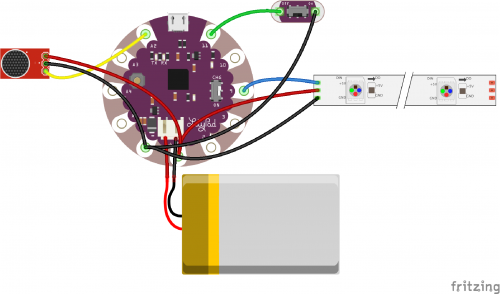
With the combination of traditional and sewable hardware, I used both conductive thread and hook-up wire to build my circuit, which is completely insulated with a combination of felt, hot glue and puff paint. In order to connect the traditional hardware and hook-up wire to the sewable electronics and conductive thread, I soldered one end of each piece of wire into a loop --- soldering the other end to the hardware. The loops can be treated like sew tabs. This technique makes the microphone breakout (or any other kind of traditional hardware) easy to connect with the LilyPad microcontroller.
The image below illustrates the circuit:
Having a hard time seeing the circuit? Click on the wiring diagram for a closer look.
The code used in this project is provided below. Copy and paste it into the Arduino IDE, making sure the correct board is selected in your board manager for upload. Look for my comments in the code to find the lines where you need to customize your team colors. You can select two colors, but if you only have one, I recommend using white as the second.
/*
 *  Melissa Felderman for SparkFun Electronics.
 *
 *
 * This code has been adapted from the
 * Example Sound Level Sketch for the
 * Adafruit Microphone Amplifier, and includes the Adafruit neopixel Library and example code.
 *
 */


#include <Adafruit_NeoPixel.h>

#define PIN 9

int numPix = 27;
int switchPin = 11;

const int sampleWindow = 250; // Sample window width in mS (250 mS = 4Hz)
unsigned int knock;


Adafruit_NeoPixel strip = Adafruit_NeoPixel(numPix, PIN, NEO_GRB + NEO_KHZ800);

void setup() {


  Serial.begin(9600);
  //pinMode(ledPin, OUTPUT);
  pinMode(switchPin, INPUT_PULLUP);
  strip.begin();
  strip.show();
}

void loop() {


  unsigned long start = millis(); // Start of sample window
  unsigned int peakToPeak = 0;   // peak-to-peak level

  unsigned int signalMax = 0;
  unsigned int signalMin = 1024;


  int switchMode = digitalRead(switchPin);
  // collect data for 250 miliseconds
  while (millis() - start < sampleWindow)
  {
    knock = analogRead(A2);
    if (knock < 1024)  //This is the max of the 10-bit ADC so this loop will include all readings
    {
      if (knock > signalMax)
      {
        signalMax = knock;  // save just the max levels
      }
      else if (knock < signalMin)
      {
        signalMin = knock;  // save just the min levels
      }
    }
  }
  peakToPeak = signalMax - signalMin;  // max - min = peak-peak amplitude
  double volts = (peakToPeak * 3.3) / 1024;  // convert to volts


  Serial.println(volts);
  if (volts >= 2.0 && switchMode == LOW)
  {

    animateLEDSwitchOn();

  }
  if (volts >= 2.0 && switchMode == HIGH)
  {

    animateLEDSwitchOff();

  } if (volts < 2.0 && switchMode == LOW) {
    staticOnLED();
  } if (volts < 2.0 && switchMode == HIGH) {
    turnOffLED();
  }

}

void animateLEDSwitchOff() {
  for(int counter = 0; counter <20; counter++){
  for(int i = 0; i <= numPix; i = i+2){
    strip.setPixelColor(i, 255, 255, 0); //ADD FIRST TEAM COLOR
  }for(int i = 1; i <= numPix; i = i+2){
    strip.setPixelColor(i,0,0,0);
  }
  strip.show();
  delay(100);
for(int i = 0; i <= numPix; i = i+2){
    strip.setPixelColor(i, 0, 0, 0);
  }for(int i = 1; i <= numPix; i = i+2){
    strip.setPixelColor(i,255,255,255); //ADD SECOND TEAM COLOR
  }strip.show();
  delay(100);
  }
  for (int i = 0; i < numPix; i++){
    strip.setPixelColor(i,0,0,0);
  }strip.show();
}

void animateLEDSwitchOn() {
  for(int counter = 0; counter <20; counter++){
  for(int i = 0; i <= numPix; i = i+2){
    strip.setPixelColor(i, 255, 255, 0); //ADD FIRST TEAM COLOR
  }for(int i = 1; i <= numPix; i = i+2){
    strip.setPixelColor(i,0,0,0);
  }
  strip.show();
  delay(100);
for(int i = 0; i <= numPix; i = i+2){
    strip.setPixelColor(i, 0, 0, 0);
  }for(int i = 1; i <= numPix; i = i+2){
    strip.setPixelColor(i,255,255,255); //ADD SECOND TEAM COLOR
  }strip.show();
  delay(100);
  }
   for(int i = 0; i <= numPix; i = i+2){
    strip.setPixelColor(i, 255, 255, 0); //ADD FIRST TEAM COLOR
  }for(int i = 1; i <= numPix; i = i+2){
    strip.setPixelColor(i,255,255,255); //ADD SECOND TEAM COLOR
  }strip.show();
}

void turnOffLED(){
  for (int i = 0; i < numPix; i++){
    strip.setPixelColor(i,0,0,0);
  }strip.show();
}


void staticOnLED() {
  for(int i = 0; i <= numPix; i = i+2){
    strip.setPixelColor(i, 255, 255, 0); //ADD FIRST TEAM COLOR
  } for(int i = 1; i <= numPix; i = i+2){
    strip.setPixelColor(i,255,255,255); //ADD SECOND TEAM COLOR
  }strip.show();
}
We hope you love this project as much as we do! Share your thoughts in the comments below!
Interested in learning more about LEDs?
See our LED page for everything you need to know to start using these components in your project.







Wow! I would love to have this jersey and wear it to Giants every game. Where can get it, I am ready to pay any price.
I'm curious, how do these LED + clothes projects do in the washing machine? Are they removable or come out OK as long as the battery is removed and the 'gentle' cycle is used?
A neat extension of this project would be to use ESP8266 and maybe IFTTT to parse your favorite team's twitter feed and light up when they score, for times when you're not at games.
Great suggestion! I often experience delays in the IFTTT protocol, which would mean this Jersey would light up at seemingly random moments. I wonder if another service might be more reliable?
There seem to be a bunch of different services which offer an API for sports scores, but it would probably be hard to find one that's 1.) free and 2.) has a high enough rate limit that you could poll it quickly enough to be somewhat responsive. A different approach might be to use tasker on a mobile device to parse a Twitter notification directly. This would rely on your sports team having a Twitter feed that updates 1.) quickly and 2.) in the same way every time.
Perhaps my idea is unworkable with current services. 🤷🤷¯_(ツ)_/¯ Regardless of feasibility, it was fun to think about. Thanks for taking the time to reply and for bringing us great projects!
lately all your projects involve putting LEDs in clothes...did your inspiration die?
Hi there! As a visual artist, I find LED projects to be very inspiring, with endless fabrication possibilities. What kinds of projects are you interested in seeing built with SparkFun parts?