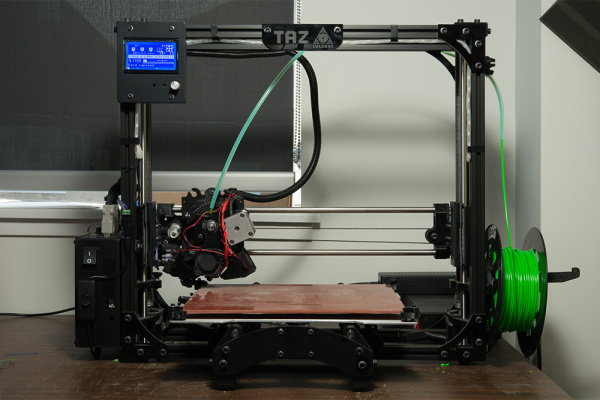
Viewing your 3D print in a room at night with barely any light can be difficult, especially when the light source above you creates a shadow over the print bed. That's the problem that I came across when inspecting prints at SparkFun during odd hours. The quick and simple solution: Add a non-addressable LED strip, switch and power supply to the 3D printer's frame!
The lighting made a big difference when inspecting a print after dark.
 |
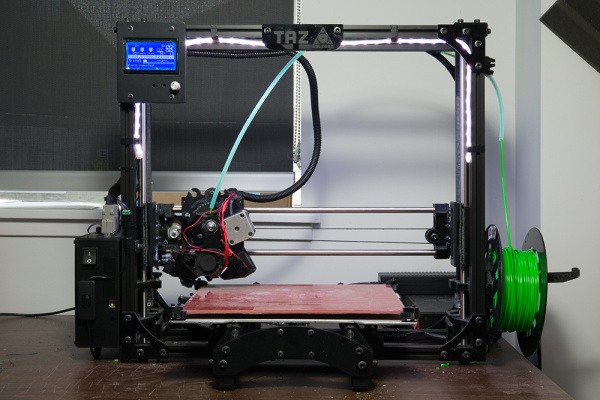 |
| Darkness Starting to Loom Over the Horizon | Print Bed with LEDs Illuminating the Print Area |
If you would like more details about how to add lighting to your 3D printer, check out the tutorial!
Light Up Your 3D Printer's Bed
June 27, 2018
Having issues viewing your print in a dark lit room? In this tutorial, we will be using LED strips to light up a print bed's area on a LulzBot 3D printer!
Have you added LEDs to a 3D printer's frame? If so, did you add a microcontroller and sensors? Let us know your thoughts below in the comments. Until next time!
Interested in learning more about LEDs?
See our LED page for everything you need to know to start using these components in your project.





Nice, I'm the author of the enclosure plugin for octoprint, you might give it a try.
With if you can not only control simple led strips, but heaters / coolers / fans / filament sensors, you can control everything using special g-codes, buttons on the octoprint UI, you can even add physical buttons to control raspberry pi outputs, or set buttons to send g-codes or even run shell scripts on the pi.
I have few buttons to automate some stuff, for example, change filament purging the old one, pause print / continue / etc...
Check it out more about the plugin here: https://github.com/vitormhenrique/OctoPrint-Enclosure
Neat! Yeah, I have considered adding a camera to remotely view prints to save time. I'll have to check it out. Thanks!
Some stuff that you can do with the plugin: * Control WS8212B Strips * Add temperature sensors on your enclosure or near your printer * Add active heaters on your enclosure and keep the temperature nice and high for large ABS * Control Humidity on your filament storage * PWM controlled outputs * PWM controlled outputs based on temperature sensor * Active cooling for good PLA printing * Schedule GPIO's to turn on and off with a fixed period of time during printing. * Mechanical buttons to pause and resume printer jobs * Mechanical buttons to send GCODE to the printer * Mechanical buttons to control raspberry pi GPIO * Mechanical buttons to execute shell scripts * Multiple filament sensors for dual or more extruders * Alarm when enclosure temperature reaches some sort of value * Notifications using IFTTT when events happen (temperature trigger / print events / etc) * Add sub- menus on navbar to quick access outputs and temperature sensors
Thank you for your work on the enclosure plugin! By far the most useful plugin for Octoprint, IMHO.
No worries! It all started as a very crude hack to get some large ABS print on my Lulzbot Taz, after sharing it and got more and more requests now it's a 4000 lines of code madness..
I added RGB strips in my printer enclosure and they are controlled with the GPIO outputs from the printer controller. Using gcode commands the leds are red while the bed and extruder heat up, then white while printing, then blue while cooling down. Finally they turn off when the extruder has cooled down.
Sounds cool. Since it was a community printer I wanted to be careful about connecting directly to the print controller. I'll have to look more into the pinout to see what is available for the LEDs. =)
Great work!! This was something much needed information related to 3d printer service.
I added two 1W-LEDs and a fish-eye Pi-Cam all controlled by Octopi. Works very well;-) https://www.bytesalad.org/~marco/OctoPiCam.jpg
Thanks for sharing! I like the setup. The high power LEDs are nice and bright. I have a few that I built to shine over my desk at work. =)
I added a strip of LED's to my LulzBot mini, controlled via Raspberry Pi running Octoprint with the enclosure plugin. The LED's turn on automatically at the beginning of the print and shut off when the print is finished. With the Pi camera, it makes remotely monitoring prints at any hour a breeze.
Nice. I was considering adding a camera eventually to remotely check up on the prints. I'll have to look into that. =)
I picked up a cheap wifi camera during a black friday sale and pointed it at the print bed. We can get monitor the print job from cell phones, tablets, or computers. Very handy for only $28.