SparkFun Barometric Pressure Sensor Breakout - BMP180
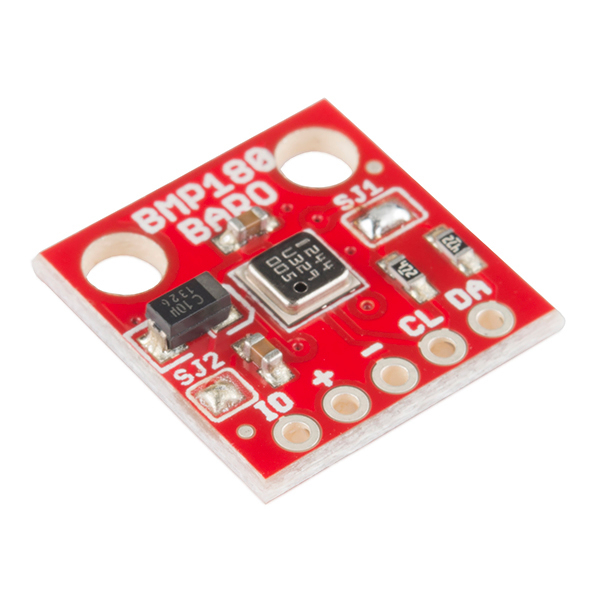
This is a breakout board for the Bosch BMP180 high-precision, low-power digital barometer. The BMP180 offers a pressure measuring range of 300 to 1100 hPa with an accuracy down to 0.02 hPa in advanced resolution mode. It's based on piezo-resistive technology for high accuracy, ruggedness and long term stability. These come factory-calibrated, with the calibration coefficients already stored in ROM. What makes this sensor great is that it is nearly identical to its former rev, the BMP085!
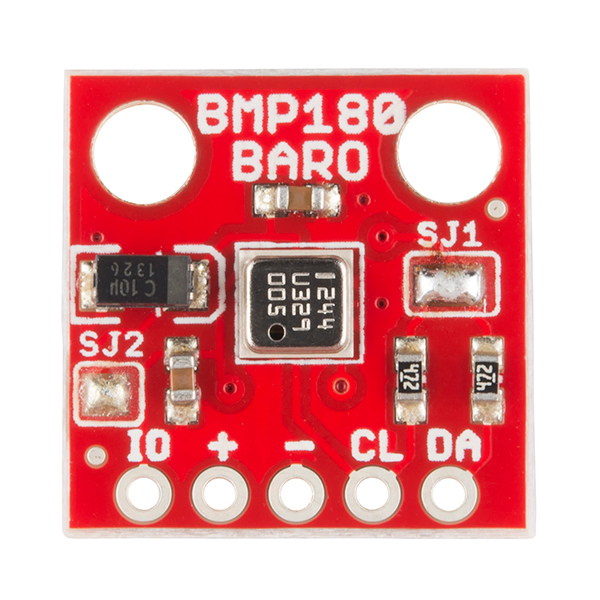
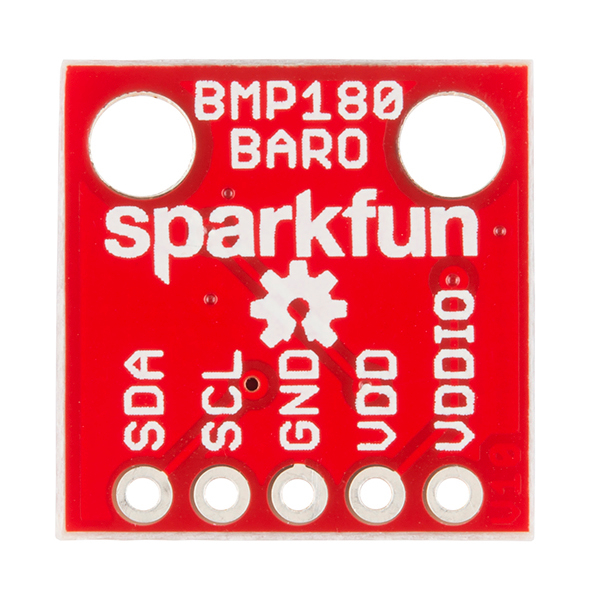
This breadboard-friendly board breaks out every pin to a 5-pin 0.1" pitch header. VCC can be from 1.8V to 3.6V and is I/O lines are 5V tolerant; we typically run it on a clean, regulated 3.3V supply. The analog and digital supplies (VDDD and VDDA) are tied to a single header pin, but are separately decoupled. It connects to a microcontroller via I²C bus (also known as TWI, or on the Arduino, the "Wire" library).
- Digital two wire (I²C, TWI, "Wire") interface
- Wide barometric pressure range
- Flexible supply voltage range (1.8V to 3.6V)
- Ultra-low power consumption
- Low noise measurements
- Factory-calibrated
- Includes temperature sensor
- Low-profile with a small footprint
- [Schematic](http://cdn.sparkfun.com/datasheets/Sensors/Pressure/BMP180 breakout.pdf)
- [Eagle Files](http://cdn.sparkfun.com/datasheets/Sensors/Pressure/BMP180 breakout.zip)
- Datasheet (BMP180)
- Quickstart Guide
- GitHub
SparkFun Barometric Pressure Sensor Breakout - BMP180 Product Help and Resources
Core Skill: Soldering
This skill defines how difficult the soldering is on a particular product. It might be a couple simple solder joints, or require special reflow tools.
Skill Level: Noob - Some basic soldering is required, but it is limited to a just a few pins, basic through-hole soldering, and couple (if any) polarized components. A basic soldering iron is all you should need.
See all skill levels
Core Skill: Programming
If a board needs code or communicates somehow, you're going to need to know how to program or interface with it. The programming skill is all about communication and code.
Skill Level: Competent - The toolchain for programming is a bit more complex and will examples may not be explicitly provided for you. You will be required to have a fundamental knowledge of programming and be required to provide your own code. You may need to modify existing libraries or code to work with your specific hardware. Sensor and hardware interfaces will be SPI or I2C.
See all skill levels
Core Skill: Electrical Prototyping
If it requires power, you need to know how much, what all the pins do, and how to hook it up. You may need to reference datasheets, schematics, and know the ins and outs of electronics.
Skill Level: Rookie - You may be required to know a bit more about the component, such as orientation, or how to hook it up, in addition to power requirements. You will need to understand polarized components.
See all skill levels
Comments
Looking for answers to technical questions?
We welcome your comments and suggestions below. However, if you are looking for solutions to technical questions please see our Technical Assistance page.
Customer Reviews
4.1 out of 5
Based on 10 ratings:
1 of 1 found this helpful:
Very useful but the library needs to be updated
I got it working on an ESP8266 with no difficulties but I kept getting incorrect readings compared to a barometer on my desk and the NWS station about three miles away (a difference of about 10-15 hPa). Looking through the library, the forumulas for computing the compensated temperatures and pressures do not match the data sheet at all. It looks like the library is just a copy of the BMP085 library without checking that the algorithm was the same. I'm going to try and rewrite my copy to see if the final pressures come out closer to the right value.
1 of 1 found this helpful:
Great Product for R/C Aircraft
This barometer is dead simple to use. Example code let me build altitude telemetry into my Radian glider. One Moteino (Arduino with transceiver) + BMP180 in the glider. One Moteino + OLED display on the ground. Moteino provides a 915 MHz link. Shows current altitude above ground and average of last ten readings. Easy to know when the glider is in a thermal. GREAT PRODUCT!
1 of 2 found this helpful:
Outstanding Breakout!!!
Thanks to the previous review I bought this amazingly simple to use breakout, everything was up and running in less than 20 minutes.
Great product.
This thing sucks :/
I connect all the pins to the redboard correctly, and have the redboard run the example program on the SFE website, and all that happens it this thing starts heating up and SMOKING! What a rip off! Do NOT buy!OLD REVIEW
I got my replacement, and finally hooked it up. It works w/o the smoke effects now, but "works" is an overstatement. My current elevation is ~500 ft, and the pressure here is 30.43 according to NOAA. Here is the output from my RedBoard:
provided altitude: 1655 meters, 5430 feet temperature: 20.27 deg C, 68.48 deg F absolute pressure: 987.20 mb, 29.16 inHg relative (sea-level) pressure: 1205.71 mb, 35.61 inHg computed altitude: 1655 meters, 5430 feet
Obviously, you get what you pay for.
Hi, Sounds like you received a bad unit. I'll contact you directly about a replacement. Thanks
Works well, issues with ATtiny85
This sensor works very well with the ATmegas -- Uno, pro mini, etc.
However, I cannot get it working with ATtinys for the life of me. I've tried scoping it, and SDA and SCL are always high while this is connected. I've tried many different ways (TinywireM was my first bet) to get this working. I've removed it from the Tiny AVR programmer (which apparently has issues with i2c when using in-circuit). I've tried and reconfirmed 1mhz or 8mhz bootloader burning, with adjusting the TinyWireM library as necessary for the CPU speed change. I will probably try bitbanging in a bit.
Blinking an led works great.
Can anyone confirm?
Can you take the pressure.
-3.3V- works well and was running in minutes. Outputting data to an LCD. Very nicely put together and ready to mount up. Very happy to have one on my current project.
BMP180
Well written and detailed tutorial - worked the first time! A fun way to learn - expand programming knowledge! Well worth the beer. Adding a display will be the next challange.
Review incomplete
I have been unable to get the BMP180 to work with the LinkM (USB to I2C converter) using libusb-1.0. I have had the BMP085 working with legacy libusb-0.1. Libs are very similar so change over should have gone easy. Using same parameters in libusb calls, but in someway things are not equal. So can't give complete review. The BMP085 certainly worked fine.
0 of 2 found this helpful:
Good, but
It works fine and shows a steady indication of barometric pressure. I want it to work independent of a computer. I have several LCD shields and I would like to redirect the output to the LCD. Right now I have several projects going on, so that may take a while.


I only have one I2C line on the Pro Mini I'm using. Any ideas on how to have two of these on the same bus?
How do I change pin configuration if I want to plug on the same Arduino board another sensor like (https://www.sparkfun.com/products/12055) ? They are all configured to use pins A4 and A5 on the Arduino Uno
This board communicates over I2C using a specific address. Unfortunately the Uno only has 1 I2C line (A4 and A5). Some I2C boards do have an option to change the address allowing you 2 or 4 boards on a single I2C lines, but the BMP180 does not have that feature. You might be able to use software I2C if you can find a library to do that. If you are just trying to use 2 different I2C boards with different addresses you just need to connect them both. Keep in mind that most of our I2C boards have pullup resistors on the I2C lines. If you keep adding boards those resistors will be in parallel and the effective pullup will be much less than expected. For this reason we have solder jumpers on our board to disconnect the pullups. If you have 2 or 3 boards this may or may not be an issue, but if you are having problems with multiple boards that you aren't having with a single board try disconnecting the pullups (make sure to leave 1 set of pullups). If you have any other questions feel free to contact our techsupport team.
About a year ago I discussed issue using these with a Teensy 3.1 and was able to determine the cause. Are you interested in the fix. I was contacted on another forum for PJRC about this.
Hi, I would like to use this sensor (BMP180) on an elevator for extended periods (months together), below is the guidance from Sparkfun.
Sparkfun guidance: "You should also remember that pressure changes due to weather will affect your altitude readings. The best accuracy will be obtained if you take a “fresh” p0 when you need it and don’t rely on it to be accurate for extended periods due to changes in the weather"
How can I obtain a fresh p0 when the elevator is continuously moving ?
Take a reading every time the elevator hits the ground level and store it as p0. If you know the altitude of the ground floor, it shouldn't be too hard
This says my elevation is ~5000 ft, and the current pressure is 28.95 inHg, but NOAA disagrees: They say its ~30inHg. This thing is inaccurate! AND this is my second one (SFE sent me a new one b/c my last one had a similar issue)
Note that like all pressure sensors, the BMP180 outputs absolute pressure while NOAA reports relative pressure. What's the difference? Relative pressure that you get from weather reports is always altitude-compensated so that you can directly compare weather data between e.g. San Francisco and Denver without always having to take the altitude difference into account (the absolute pressure in Denver is 3/4 of that in San Francisco, but the relative pressure makes it look like both of them are at sea level). To get relative pressure from your sensor, edit the "SFE_BMP180_example" code and put your current altitude in meters at line 73. The code will then give you pressure that you can compare to weather reports. Note also that taking any pressure reading indoors will almost certainly be wrong due to building pressurization from HVAC systems etc.
Determining altitude from the sensor is also tricky because it will vary depending on any weather systems moving through at the moment. Your best bet is to take a baseline reading in your code; after that, when you move the sensor up or down, you will get a relative altitude difference from the baseline. The altitude example does exactly this. The accuracy of this decreases over time due to changes in the weather.
Definitely read through the BMP180 hookup guide, especially the "measuring weather and altitude" section.
I've just been reading the Quick-Start Guide for this board, plus some other educational pages SparkFun has provided (on SI units), and have to say that I am really impressed with the way SparkFun supplies thorough, easy-to-grasp, step-by-step info for users of their products. Great going, SFE! Thanks! My students appreciate your work as well.
By any chance will you be making a Breakout for the BME280? Bosch finally has released the updated version of the BMP180 which also has a humidity sensor.
Seconded!
You mention an accuracy of down to 0.02 hPa. This is of course impossible for such a low-cost device. Absolute accuracy can be up to a couple of hPa. The 0.02 hPa is the noise floor.
Any feedback on the BMP180 versus the T5403?
I hope you can make more soon!
We're trying - there's a global shortage of these parts, and we're waiting for a large order of them to arrive.
Just looking at the Bosch Sensortec site, are there any plans on carrying the BME280? It adds SPI (while keeping I2C) and also has a humidity sensor in the package
When it's available (these parts take a long time to incubate), we'll take a look at it. Thanks!
I hope you can make more soon! We need it!
Does the BMP180's calibration EEPROM store any values that are meant to be negative? Page 15 of the datasheet suggests that the 4th, 5th, and 6th value would be the only ones that can be typed unsigned, but I can't tell if that's just specific to the example. A Google search yields the same ambiguity. Does anyone have a definitive answer from experience?
The schematic shows solder pads for pullups and tie-ing supplies together. What is the state of these pads on buying the device. Un-soldered makes sense - but the photos show big blobs of solder. Which is it?
These come presoldered since that provides the most straightforward configuration for our beginning users. (They are easy to open if you need to). We do try to indicate this on our schematics - if you look closely at the jumpers, we put a line between the pads to indicate a normally-closed connection. Normally-open jumpers will have an air gap between the pads.
I've got an object for anyone who wants to use this with the Propeller microcontroller: https://github.com/jrleeman/BMP180
Hello,
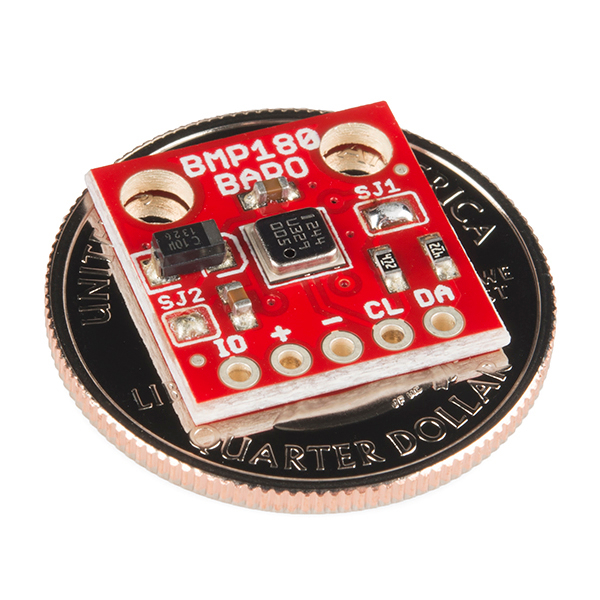
I'm wondering what the dimensions of the board are (in mm, if possible). Thanks.
From the 2.54 mm pitch header I'd say about 14 mm x 14 mm.
is there a risk of damaging this if it goes above the 1100 hectopascal range or is that just its range of accuracy?
The "absolute maximum ratings" section of the datasheet says it will survive up to 10000 hPa. Typically this means that once you're back into its measurement range it should function normally.
Typically ;) I wouldn't push absolute maximums on anything more than "absolutely" necessary, though.
I would like to interface the sensor to the Raspberry Pi, but I am just learning how to program in python and the only example code on GitHub is for the Arduino. Has anyone written any programs for the Raspberry Pi that they are willing to share? 7/19/14 I was looking on the Adafruit website, and they have a Python library for the the BMP085/180. Here is a link: https://learn.adafruit.com/using-the-bmp085-with-raspberry-pi/using-the-adafruit-bmp-python-library
Pls, what is the difference between "Barometric Pressure Sensor" and "Altitude/Pressure Sensor"?
From the sensor's point of view, there is no difference. Both "barometric" and "altitude" sensors only measure absolute atmospheric pressure. The difference is in how you interpret the readings. For barometric, you compute what the pressure should be at the sensor's (hopefully fixed) altitude; any difference from that is caused by changes in the weather. For altitude, you take a pressure reading, call that the baseline, then for any changes you can back out how far up or down you've traveled. But note that pressure changes for both weather and altitude, changes in either can mess up the other measurement.
Also note that the above example code for the BMP180 shows you how to use it for either a barometer or an altimeter, so you can do either one with this sensor.
Anyone have this working on a due? After going through some forums I found a new Wire.cpp file to help with the I2C on the due, and I went from no connection to getting ridiculous values.
We are trying to use Digital Pressure Sensor ( BMP085 ) in our project as an altimeter to measure height of an Antenna from the sea level.
I am supposed to get 1010.01 hPa of Air pressure so that the corresponding height would be something around 27m from the sea level , But the Pressure reading from the sensor is 1004.5 hPa (i.e. Altitude of 73.10 m) which is not correct according to my GPS Location.
So please suggest us any way to calibrate this pressure sensor for proper altitude, also mention ways to get faithful reading during seasonal or climatic changes.
Did you compensate for local altimeter setting? As you might know, barometric altimetry requires the local setting due to normal changes. GPS altimetry does not.
No, I don't have any idea about these local setting. If you have any app note or some calibration technique for this , then please share.
just got mine the other day hooked it up to an uno and it worked great. I then hooked it up to a teensy 3.1 and it would just return the max value for each reading. does the library not work with teensy 3.1?
The description says "breaks out every pin to a 6-pin 0.1" pitch header" but I only count 5 holes? Simple typo, or I am missing something?
Sharp eyes! Thanks for the catch.
Would this function as a vacuum gauge? I need to get fairly precise (under 5PSI) and having it be digital would be fantastic.
According to the datasheet this will only measure down to 300 hPa = 4.35 psi, so the answer is probably no.
Dangit!
Is there any idea when these will be back in stock? (Weeks, months, years?)
Keep your eye open. They had 50 late last week. Took less than 24 hours to sell out again
Ok thanks!
So these sensors are accurate enough to detect ~ 1-foot change in altitude at sea level?
Is this known to work with the RaspberryPi?
I can't speak for this particular breakout board, but the BMP180 sensor itself is, yes.
I'm a little surprised that SparkFun is offering this breakout for twice the price of the Adafruit BMP180 breakout, which includes a regulator and level-shifting. The cost of the sensor itself certainly doesn't justify the price. Is it possible that someone miscalculated, SparkFun?
Great point, there's a global shortage of chips right now so we're paying a premium for them, which worked its way into the initial retail price. We've lowered it in anticipation of larger quantities being available.
Also note that in most cases* you shouldn't need level shifting to connect this to a 5V system. I2C is an open-drain bus, which means that the host processor will actively drive the signal to ground for "low", but will let it float to the pull-up voltage (3.3V) for "high". 3.3V still counts as "high" on most 5V microprocessors, so as long as you're powering this board with 3.3V (available on most Arduinos), it will work very well when connected to a 5V processor.
Thanks for the additional "fine print" information. I want to ask a clarification on 3.3V vs 5V.
I use an Arduino connected to a DS2482-800 (8-channel 1-Wire master) with a network of DS18B20 temp sensors. The 1-Wire master is powered by 5V off of the Arduino and all temp sensors run in parasitic power mode off of the 1-Wire master. My intent is to connect the BMP180 to one of the channels of the 1-Wire master. If I understand your comment correctly, I should not connect a 3.3V sensor to a system running at 5V. I expect the solution is to try powering the entire system on 3.3V and change the pull-up resistors. Not sure if all my temp sensors will still work in parasitic power mode but it's worth a try. Any thoughts?
Note that "1-Wire" is not the same as "Wire", which is Arduino's name for I2C (we agree, it's confusing).
The BMP180 isn't designed to function on a 1-Wire bus, so you'll need to connect it to a Wire/I2C bus. You should be able to run both of these buses simultaneously and separately on an Arduino. The example code has comments on how to connect the BMP180 to your Arduino, and there's more information on Wire/I2C in our tutorial: https://learn.sparkfun.com/tutorials/i2c. Good luck!