SparkFun Bluetooth Mate Silver
We rebooted this amazing product. See our new BlueSMiRF v2.
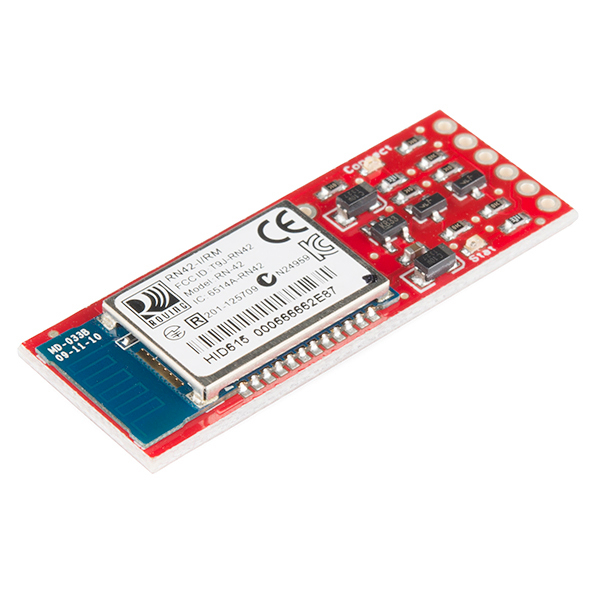
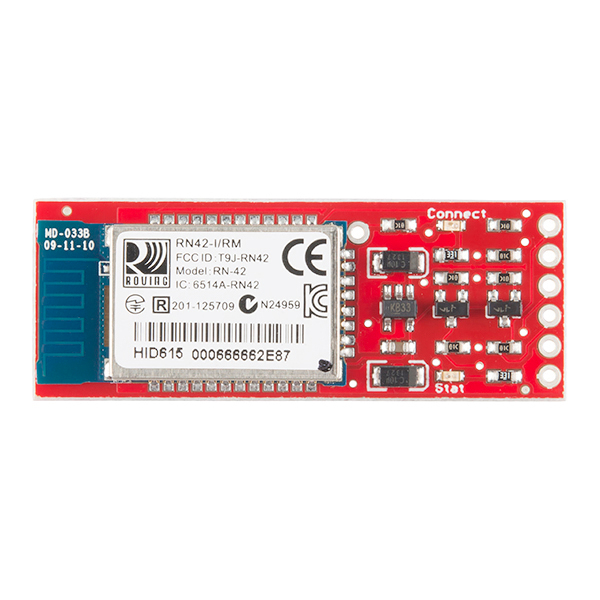
The Bluetooth Mate is very similar to our BlueSMiRF modem, but it is designed specifically to be used with our Arduino Pros and LilyPad Arduinos. These modems work as a serial (RX/TX) pipe, and are a great wireless replacement for serial cables. Any serial stream from 2400 to 115200bps can be passed seamlessly from your computer to your target.
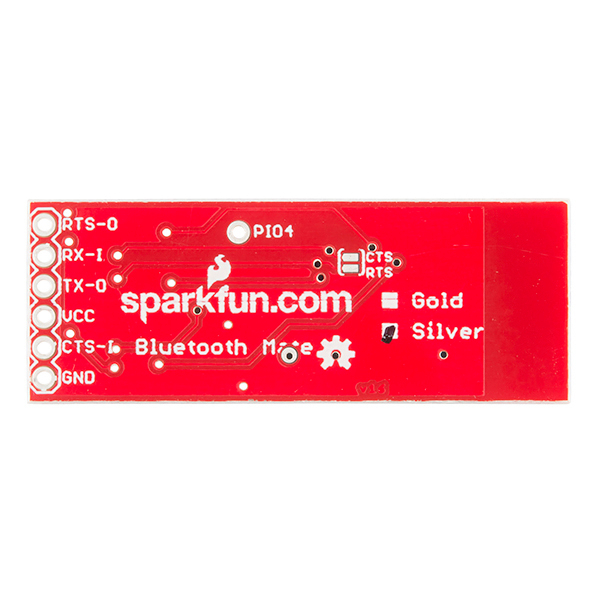
Bluetooth Mate has the same pin out as the FTDI Basic, and is meant to plug directly into an Arduino Pro, Pro Mini, or LilyPad Mainboard. Because we've arranged the pins to do this, you cannot directly plug the Bluetooth Mate to an FTDI Basic board (you'll have to swap TX and RX).
The RN-42 is perfect for short range, battery powered applications. The RN-42 uses only 26uA in sleep mode while still being discoverable and connectable. Multiple user configurable power modes allow the user to dial in the lowest power profile for a given application. If you need longer range, check out the Bluetooth Mate Gold.
The Bluetooth Mate has on-board voltage regulators, so it can be powered from any 3.3 to 6VDC power supply. We've got level shifting all set up so the RX and TX pins on the remote unit are 3-6VDC tolerant. Do not attach this device directly to a serial port. You will need an RS232 to TTL converter circuit if you need to attach this to a computer.
Unit comes without a connector; if you want to connect it to an Arduino Pro, we'd suggest the 6-pin right-angle female header.
Note: If you are looking for the ability to use the FTDI directly with your Bluetooth Mate check out our Crossover Breakout for FTDI!
Note: The hardware reset pin of the RN-42 module is broken out on the bottom side of the board. This pin is mislabeled as PIO6, it is actually PIO4. Should you need to reset the Mate, pull this pin high upon power-up, and then toggle it 3 times.
- v6.15 Firmware
- Designed to work directly with Arduino Pro's and LilyPad main boards
- FCC Approved Class 2 Bluetooth**® **Radio Modem!
- Low power consumption : 25mA avg
- Hardy frequency hopping scheme - operates in harsh RF environments like WiFi, 802.11g, and Zigbee
- Encrypted connection
- Frequency: 2.402~2.480 GHz
- Operating Voltage: 3.3V-6V
- Serial communications: 2400-115200bps
- Operating Temperature: -40 ~ +70C
- Built-in antenna
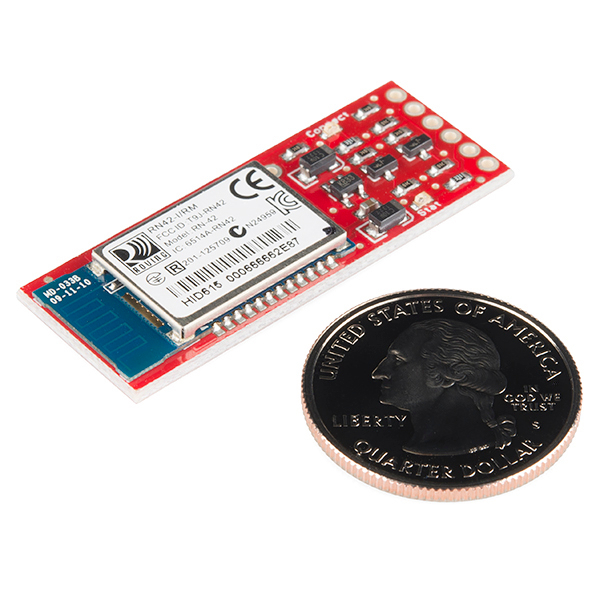
- Board: 1.75x0.65"
SparkFun Bluetooth Mate Silver Product Help and Resources
Hackers in Residence - Hacking MindWave Mobile
February 26, 2014
Review, teardown, and hacking tutorial for the MindWave Mobile, a $99 commercial grade EEG sensor.
Using the BlueSMiRF
September 16, 2013
How to get started using the BlueSMiRF and Bluetooth Mate Silvers.
GPS-RTK2 Hookup Guide
January 14, 2019
Get precision down to the diameter of a dime with the new ZED-F9P from u-blox.
Core Skill: Soldering
This skill defines how difficult the soldering is on a particular product. It might be a couple simple solder joints, or require special reflow tools.
Skill Level: Noob - Some basic soldering is required, but it is limited to a just a few pins, basic through-hole soldering, and couple (if any) polarized components. A basic soldering iron is all you should need.
See all skill levels
Core Skill: Electrical Prototyping
If it requires power, you need to know how much, what all the pins do, and how to hook it up. You may need to reference datasheets, schematics, and know the ins and outs of electronics.
Skill Level: Rookie - You may be required to know a bit more about the component, such as orientation, or how to hook it up, in addition to power requirements. You will need to understand polarized components.
See all skill levels
Comments
Looking for answers to technical questions?
We welcome your comments and suggestions below. However, if you are looking for solutions to technical questions please see our Technical Assistance page.
Customer Reviews
4.6 out of 5
Based on 13 ratings:
1 of 1 found this helpful:
Works great - but...
My only complaint would be that it would be immensely useful to have the GPIO pins individually terminated to ground with pull-down resistors and provide solder-bridge pads to strap them to a logic high. This would allow using the hardware control modes, which would greatly simplify reconfiguration once installed in a device. It is vitally important to have independent access to GPIO4 in order to be able to perform a factory reset of the device.
Otherwise, this device is nothing but GREAT!
nifty!
Really easy to hook up once you read through the user manual.
SparkFun Bluetooth Mate Silver... Works beautifully!
I have been painfully frustrated trying many Bluettoth modules with my Arduino Uno, but so far this little Mate is the easiest to configure and use… I definitely recommend it… Can't wait to try the Mate Gold!
Simple and easy to setup
Connects to the microcontroller with AT commands pretty easily. Bluetooth connection is stable. Cheap way to get bluetooth on your controller.
Versitile device
When combined with a RS-232 to TTL/Cmos Converter it is even more useful for building interfacing between Serial ports with differing Logic levels. So I am happy to have one of these available in the tool box. Combining these two functions on one breakout board and adding a small modular case and DB9 connector would be great.
FUnctions as advertised
I use this with a Samsung phone to control/steer an autopilot on a sailing vessel. An ASCII command sentence is passed via the bluetooth mate to the autopilot and the boat takes the appropriate action. Range is at least 30 ft. Data seems not to be corrupted in our testing to date.
It works perfectly with my Arduino board.
It Works
Easy to set up and use in conjunction with the Arduino Pro. Super easy to program.
Works well, but there's a trick to entering command mode
This is a very useful bluetooth module that can be configured to act as a Bluetooth SPP device, connect as a client to an SPP device, along with other possibilities and many configuration options, but it also really wasted a lot of my time today...
All the docs say to simply send "$$$" to enter command mode, and while that works from the terminal, it never worked when sent from an Arduino program. I spent the better part of a day pulling my hair out while trying to debug everything that I could think of, even down to the UART logic levels with my oscilloscope, under the belief that it wasn't properly receiving what the Arudino was sending to it.
Turns out that there's an undocumented quirk: You need a slight delay between sending each '$' character. Doing three individual Serial.print("$") calls worked for me, while a single Serial.print("$$$") consistently failed. For good measure, I later threw a delay(20) between each one as well.
Works well with ZED-F9P GPS module
It would help if it could be ordered with a right angle female 6 pin connector
Simple, easy to use, and it works.....
It took about 4 minutes to solder in a header, apply power, pair the device with my Galaxy S4, send data, and confirm using oscilloscope. It just simply works..... Could not ask for anything more.
If you wanna mess around with bluetooth, this board is great for it. I like the fact that it runs on 3.3v for those processors that are not 5v tolerant. I didn't dig into the datasheet for this, but it was easy to find. Improvements: Not sure, but tx and rx leds would be a nice addition.
Extremely simple to use Bluetooth to serial bridge
Solved an problem for me in converting an embedded device with only a wired serial port to bluetooth connectivity. Required almost no effort other than cabling to match the serial port connector. The bluetooth serial port profile was easily recognized by the host machine when paired and easily established communication to the target embedded device at 115200b/s.


Question : i wrote a win32 application where it does 9 bit uart with manual control of Rts and monitoring of Cts. this works with ftdi serial cables but with rn41 it only works as 8N1. the module ignores rts and mark/space parity for 9 bit mode.... is there a work around for this?
Hi there, it sounds like you are looking for technical assistance. Please use the link in the banner above, to get started with posting a topic in our forums. Our technical support team will do their best to assist you.
Have you checked out the hookup guide? As mentioned in the guide, you should be able to use a USB-to-serial adapter with serial terminal or a microcontroller with the Arduino IDE to communicate with the board.
Is this module capable of being a "Master"? I want to use an arduino to read bluetooth bike sensor data(HRM,CPP, and CSC), and relay that to a screen.
Increible el precio, en cuanto tenga algo de dinero lo comprare
Does anyone know if this is the smallest bluetooth modem out there, at least easily usable?
For anyone attempting to use this with a Pro Micro and blindly following the Hookup Guide provided above to test out your new toy, please note that the Pro Micro follows the same pin limitations as the Leonardo, listed at http://arduino.cc/en/Reference/softwareSerial, so pin 2 will not work for RX with this module!
I'm using an Arduino Micro (not the pro micro) and i can't get pin 2 to work as RX, I assume this is the same problem? If so, what pins can i use as RX? Thanks.
Check out the Software Serial Library it tells you which pins you can use.
Also, keep in mind that the Leonardo and Pro Micro have the USB connection separate from the hardware serial line meaning you should not need to use software serial (just use Serial1). If you want to use software serial you still can, just check which pins you are using.
.
does this work on the lilypad ? I also tried it on UNO but does not power up. from the UNO i am passing a 5V. The UNO is powered by USB.
Once the UNO gets working i want it to work on lilypad.
I successfully set this to master mode and connected to a device. How can I disconnect with it? I read something about I can use SO,<string> and with the first character of that string, I'm able to disconnect, but I don't think it receives any commands after I have connected to something. At least it doesn't respond anything for any commands after the connection has been established. What can I do to disconnect?
I want to connect this board has a max3072 (RS485), but RTS pin of the board hasn't never a high level .why?
Can someone tell me whats the component here ? - http://store.picbg.net/pubpic/6E/7A/ac5bff5377286e7a.png
That's a MOSFET (N-Channel) as it's labeled in the schematic. Are you looking for a specific part number or something else?
yes I want to implement the logic behind it but I need component name like what chip can I use or part number :)
It's the MOSFET BSS138 N-Channel. Hope that helps!
Thank you !
Having difficulty getting back to factory default. It started out in serial SPP but I must have messed up the config via the $$$/CMD mode because now it is recognized by all receivers as a keyboard and I cannot get it back to talk to me. I've tried the GPIO4 reset process, shorting the pin to VDD (pin 11) and toggling 3 times, but no go: It powers on with the quick flash saying its ready to reset, but then promptly goes to the slow blink, apparently not waiting for me to toggle the pin. Any suggestion?
Hello, I've just published an Instructable in which I use a Bluetooth Mate Silver to handle the bluetooth communication between an Arduino micro and an Android phone. You can find the instructabel here: http://www.instructables.com/id/Gravity-Touch-bluetooth-glove/. I hope that can help. Best, Jonathan
I am attempting to connect two of these modules. I have previously been able to get them to connect but I had an "issue" and might have sent bad commands. So, I reset the modules back to their factory settings. Since then, I haven't been able to connect the two modules. I have been able to search and find the both devices. I can store the address of the device but when I try to connect, I am unsuccessful. Any suggestions?
I FOUND THE SOLUTION: It appears that when I received the modules that they were set to (SA=0) and when I did the factory reset they were set to (SA=1). By changing to authentication to "SA,0", I was able to connect the two devices without sending the pin or any info confirming the pairing/connection.
Another side note... I started having issues when I used the factory setting reset command (SF,1). I still am unable to connect the two modules. However, I have been able to connect my phone to each of the modules but I can't get the two modules to connect. I have tried putting one in master mode and one in slave and that was unsuccessful as well.
These are the commands that I have entered...
Inquiry,T=4,COD=0 Found 1 0006666628EE,Tyler,1F00 Inquiry Done
C,0006666628EE TRYING CONNECT failed ? ? D
Settings BTA=000666662655 BTName=Jorden Baudrt(SW4)=115K Mode =Slav Authen=1 PinCod=1234 Bonded=0 Rem=0006666628EE
For a project I need to make a network with 4 arduino's. Is it possible for this module to be connected to multiple modules simultaneously? So I can have 4 arduino's each whit its OWN bluetooth transceiver all talking with each other?
By definition Bluetooth doesn't really do networks bigger than 2. this is why its actually referred to as pairing. So you can get 2 devices to talk but not really more than that. If you need 4 I would look into XBee modules.
My unit never seems to leave the config timer mode -- the stat LED is constantly blinking at 2 blinks/sec. Is there something I can do about this?
Can I connect multiple Bluetooth device like this with my PC. I mean I am trying to collect some sensor data in wireless manner using Bluetooth. If this device uses serial protocol, how can I discriminate the signal from many sensors which are using the same serial communication? Thank you in advance for your answer.
Do I need to have a bluetooth dongle to hook up to my computer if my computer is bluetooth capable? Also, I believe that you will need a USB hookup for your arduino board if you are programming it for the first time. I learned that the hard way.
No, you do not need a bluetooth dongle if your computer already supports bluetooth. I have connected my laptop directly to the Bluetooth Mate which I have connected to an Arduino Pro Mini. I can successfully communicate serial data between the arduino and my laptop, but I can not program the arduino via bluetooth (as you mentioned). I believe the key is that the RTS line from the bluetooth module is simply to control serial flow between the bluetooth module and the arduino (i.e. no relation to the laptop's RTS state). What we really need is GPIO10 (DTR) routed to DTR on JP3 so that the arduino IDE can reset the arduino board. The bluetooth module's UART_RTS (which is routed to JP3) is not the same as GPIO11 (RTS, but driven by the remote PC). Similarly, GPIO10 is DTR, but driven by the remote PC. There also seems to be some discrepancy between the Bluetooth Mate PDF and the Roving Networks documentation as far as pin numbers. The Bluetooth Mate PDF says it's using the RN-41, whereas the board now comes with the RN-42.
Great product. I am a beginner, and I was able to communicate with my android smartphone by following the Hookup Guide in just an hour. I'm using an Arduino Pro Mini 5V, and the app "Bluetooth SPP" on my phone, which is a simple bluetooth serial terminal.
Does this have HID software in it too? I'm assuming so due to the firmware version level. I think anything over 6.11 has HID options. But I need to know bcause if it does it would perform double duty: the application switch to SPP mode to allow download of code and could switch to HID mode to become a keyboard device... no need for two radios. (Of course in HID mode I'd loose the serial monitor capability... though under sever error codition it could switch back to SPP and dump a message)
Is it possible to make a connection with an android phone. WITHOUT having to open another application on the phone?
My goal is to have tasker notice when the bluetooth device has been activated, and than run a script on my phone. So far I don't think I can do that with this device, and that makes me upset.
Okay so I figured it out:
By default this device is in SPP, I want to put it in HID mode so it connects automatically.
From there it now connects to my phone automatically once paired.
Hopefully this helps someone out.
Can I use this product to plug into the console serial port of a BeagleBone Black?
If not, can I add a TX/RX switching PCB to do this?
Can I use this on a Raspberry Pi? If I have the right TX/RX setup and FTDI board (one used for arduino) can I hook up the FTDI straight to the GPIO pins on the pi?
Thanks!
You can, but it seems backwards. I would either use the I/O pins on the Pi and skip the FTDI board or get a cheap Bluetooth dongle and skip both boards. But hooking the FTDI to the GPIO pins on the Pi seems like a crazy loop.
How would one go about connecting this to an Uno R3 board (as a serial connection, not with virtual serial)? Also using a motor shield, building a simple BT rover with it.
If you want to use the Uno's hardware serial port, it'd be similar to the hookup on this page of the tutorial. But instead, hookup TX and RX like this:
If you're using the hardware serial port, be careful about leaving the BT module connected when you're uploading code. I'd recommend disconnecting the Mate's RX line when you upload, to make sure it doesn't receive any data meant for the Arduino.
Alright, thanks; another question is if it can be used to directly interact with a sketch directly via serial, not particularly experienced with the programming side of 'bot building.
Can anyone provide a sample project using this board? ... (I am using a MICROCHIP PIC18F MCU design, the module does work [RTS-O connected to CTS-I], but would particularly like to see the use of RTS and CTS control lines, by the MCU, when sending a "big" packet of data.... ).... THE "BLUETOOTH PRIMER" LINK above DOES NOT WORK!? .....
Does the price consist shipping cost?
Will it hookup directly to a Arduino Pro Mini 3.3V as well?
Sure! It's designed to work at both 3.3V and 5V.