Teensy 3.2
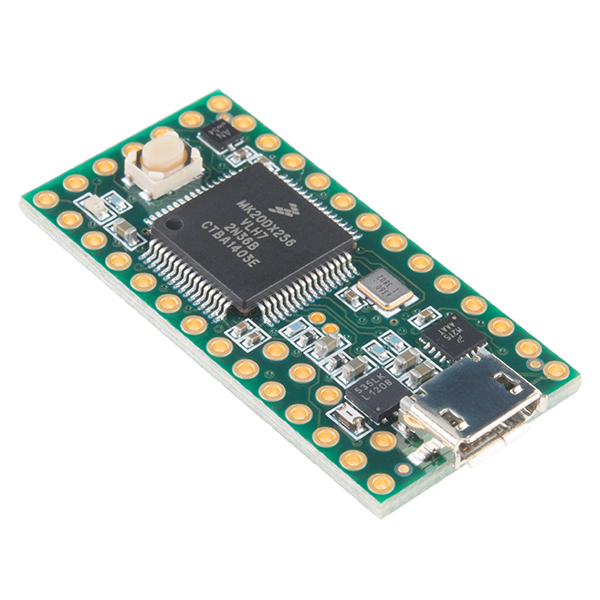
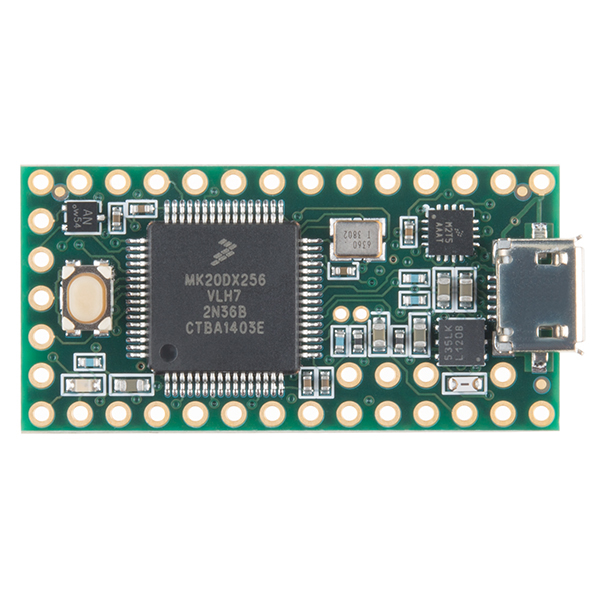
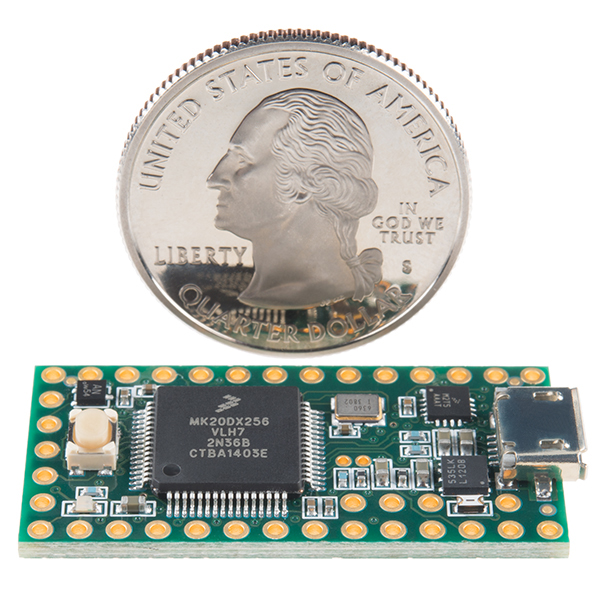
The Teensy is a breadboard-friendly development board with loads of features in a, well, teensy package. Each Teensy 3.2 comes pre-flashed with a bootloader so you can program it using the on-board USB connection: No external programmer needed! You can program for the Teensy in your favorite program editor using C or you can install the Teensyduino add-on for the Arduino IDE and write Arduino sketches for Teensy!
The processor on the Teensy also has access to the USB and can emulate any kind of USB device you need it to be, making it great for USB-MIDI and other HID projects. The 32 bit processor brings a few other features to the table as well, such as multiple channels of Direct Memory Access, several high-resolution ADCs and even an I2S digital audio interface! There are also 4 separate interval timers plus a delay timer! Oh yeah, and all pins have interrupt capability. Also, it can provide system voltage of 3.3V to other devices at up to 250mA.
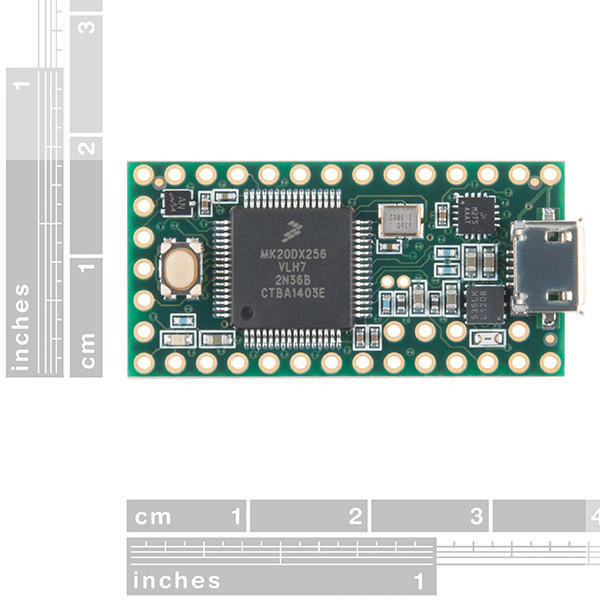
All of this functionality is jammed into a 1.4 x 0.7 inch board with all headers on a 0.1" grid so you can slap in on a breadboard and get to work! The Teensy 3.2 adds a more powerful 3.3 volt regulator, with the ability to directly power an ESP8266 Wifi, WIZ820io Ethernet, and other 3.3V add-on boards that require a little more power. Additionally, if it is used within the Teensy 3.1 limits of operation, the Teensy 3.2 and 3.1 are interchangeable!
Note: This does not come with a USB cable, please check below for an appropriate one.
Attention: Due to supply constraints, orders may not be filled immediately; orders not allocated to immediately, will be placed on backorder and filled as inventory allows. If you are a business, distributor, or reseller, please contact sales to place your order: sales@sparkfun.com.
- 32 bit ARM Cortex-M4 72 MHz CPU (M4 = DSP extensions)
- 256K Flash Memory, 64K RAM, 2K EEPROM
- 21 High Resolution Analog Inputs (13 bits usable, 16 bit hardware)
- 34 Digital I/O Pins (5V tolerance on Digital Inputs)
- 12 PWM outputs
- 7 Timers for intervals/delays, separate from PWM
- USB with dedicated DMA memory transfers
- 3 UARTs (serial ports)
- SPI, I2C, I2S,CAN Bus, IR modulator
- I2S (for high quality audio interface)
- Real Time Clock (with user-added 32.768 crystal and battery)
- 16 DMA channels (separate from USB)
- Touch Sensor Inputs
- 1.4 x 0.7" (~35 x 18 mm)
- Datasheet (MK20DX256VLH7)
- Manual (MK20DX256VLH7)
- Teensy Quick Start
- Teensyduino Software
- Pin Assignment Charts
- Using the RTC
- Teensy Help Page and FAQ
Teensy 3.2 Product Help and Resources
Getting Started with the Teensy
June 18, 2015
Basic intro to the Teensy line of products, with soldering and programming suggestions.
Teensy XBee Adapter Hookup Guide
June 18, 2015
Getting started with the Teensy 3.1 / Teensy 3.2 and XBee. Establishing a serial link.
TeensyView Hookup Guide
March 16, 2017
A guide to using the TeensyView OLED board to display text and graphics.
Vox Imperium: Stormtrooper Voice Changer
October 25, 2016
Add some flair to your Imperial uniform by changing your voice using a Teensy 3.2 and Prop Shield.
Getting Started with the SmartLED Shield for Teensy
November 9, 2018
In this tutorial, we will connect different RGB LED matrix panels to PixelMatix's SmartLED shield and Teensy.
Choosing an Arduino for Your Project
December 11, 2017
Examining the diverse world of Arduino boards and understanding the differences between them before choosing one for a project.
Proto Pedal Example: Programmable Digital Pedal
September 22, 2016
Building a pedal around the Teensy 3.2 and Teensy Audio shield. Changing the effect in the pedal is as easy as uploading a new sketch!
How to Load MicroPython on a Microcontroller Board
September 4, 2018
This tutorial will show you how to load the MicroPython interpreter onto a variety of development boards.
Boss Alarm
March 30, 2016
Build a Boss Alarm that alerts you of anyone walking into your office and automatically changes your computer screen.
Core Skill: Soldering
This skill defines how difficult the soldering is on a particular product. It might be a couple simple solder joints, or require special reflow tools.
Skill Level: Rookie - The number of pins increases, and you will have to determine polarity of components and some of the components might be a bit trickier or close together. You might need solder wick or flux.
See all skill levels
Core Skill: Programming
If a board needs code or communicates somehow, you're going to need to know how to program or interface with it. The programming skill is all about communication and code.
Skill Level: Competent - The toolchain for programming is a bit more complex and will examples may not be explicitly provided for you. You will be required to have a fundamental knowledge of programming and be required to provide your own code. You may need to modify existing libraries or code to work with your specific hardware. Sensor and hardware interfaces will be SPI or I2C.
See all skill levels
Core Skill: Electrical Prototyping
If it requires power, you need to know how much, what all the pins do, and how to hook it up. You may need to reference datasheets, schematics, and know the ins and outs of electronics.
Skill Level: Rookie - You may be required to know a bit more about the component, such as orientation, or how to hook it up, in addition to power requirements. You will need to understand polarized components.
See all skill levels
Comments
Looking for answers to technical questions?
We welcome your comments and suggestions below. However, if you are looking for solutions to technical questions please see our Technical Assistance page.
Customer Reviews
4.6 out of 5
Based on 68 ratings:
2 of 2 found this helpful:
The Teensy 3.2 is now my goto board!
3 UARTS, high res ADC's, 7 timers and built like a tank!
3 of 3 found this helpful:
Fast - loaded with IO
I've been using Teensy since the 3.0 kickstarter. I've rolled them out into several projects. They work well. They are well support with the Arduino Libraries. I recommend them.
2 of 2 found this helpful:
A bit of a crank to get to running with arduino but it works
Some say that the keyboard-HID doesn't work, Why would you say that? You probably need to select the proper USB Type from the teensy section of the arduino Tools menu AND add a significant delay to allow time for the OS to enumerate the board. I have one pumping my WINXP password to an old laptop!
The teensy-helper install will only install with SUPPORTED arduino versions. I am not a fan of this board's USB connector (TIGHT SMD connector with substantial shear force applied to the solder pads during the cable un/plug cycle), but I fault the USB cartel for that, NOT Paul or Robin.
2 of 2 found this helpful:
Amazing
It's a flexible and powerful board, with huge capacity and small size, for me it is the best option for make projects.
2 of 2 found this helpful:
Huge "bang for the buck"
MUCH faster than 8-bit AVR Arduino boards. I recommend combining the Teensy 3.2 with the Sparkfun Teensy shield board. The result can be used as a direct alternative to several Arduino models. The Teensyduino extension to the standard Arduino IDE is superb.
2 of 2 found this helpful:
Lots of pins for everything I need plus it has a 12 bit ADC for better resolution. Super happy with the Teensy and this has started to become my go-to micro.
1 of 1 found this helpful:
Simply the best 'duino in the world
These have flawless software improvements to the arduino standard libraries. Things that are obvious. Tons of memory, crazy fast (even loading code to the teensy is faster too). More pins, multiple serial arrangements, better ADC and PWM and faster UART and +++. It's just better in every way. I can't think of a single complaint.
1 of 1 found this helpful:
So incredibly versatile and easy!
This is one of the most straight forward dev boards I've ever used. So easy to use. Really well documented. I have been using the MIDI over USB functionality and it's a dream. I'll be using PWM, CAN, and RS232 as well as breaking out some I/Os. Seriously, there is no reason not to buy this thing.
3 of 3 found this helpful:
Very Impressive
I am building an instrument which must log one analogue channel and one axis of acceleration at about 100 to 1000 samples per second (s/s) for about a day. It must fit inside a 1" diameter tube (batteries as well). I bought a Teensy 3.2 (I had previously used a Teensy LC), and Sparkfun Accelerometer, RTC and microSD cards. I also bought a couple of 400 mAHr Lipo's and a charger/boost board.
I have it working and tested to 1k s/s and it could probably go about 10 times faster. It draws about 50 mA. There is plenty of room for data on the 16 GByte microSd.
My main problems were due the Arduino IDE or (more probably) my lack of understanding of it. I have been programming for 50 years and developing microprocessor systems for 40. But I am just starting to use the Arduino IDE. It seems It is much less powerful than Visual Studio, Eclipse, Netbeans or even PSoC Designer, all of which I have used in recent years. But there is a lot of sample sample code available with a little searching and it is all open for view. The Teensy board itself is very powerful for $20 and is physically small. It integrates well with other Arduino components and with the Arduino IDE.
1 of 1 found this helpful:
Super product; fit my requirements to a T
Size was not so much a factor but I/O pins and memory were. The board lived up to expectations. The Teensyduino devel addon worked as advertised. So we were up and running in no time. Having 70+mhz processing was also delightful. The use of the backside pins did take a little working around, but we got access wires soldered in and epoxied down. And we found enough info to make some circuit boards to hold it after we tried the Sparkfun breakout board. All in all a great part.
1 of 1 found this helpful:
Tiny, inexpensive, extremely capable
This is a very powerful board for the size and money. It is easy to program, using the Teensyduino add-on to Arduino (it's not quite as smooth as some other board integrations, but it's not difficult, works well, and comes with a heap of useful libraries). I've built a few of these into projects (24-channel dimmer, robot controller, replica props). Works great in a breadboard if you solder male or stacking headers to it (leave off the ones on the narrow end, as they make it tricky to plug into a breadboard). Paired with a Prop Shield, it has enough horsepower to run a full Kalman filter (code is installed the NXPMotionSense library with Teensyduino and is also available on the prop shield page on the pjrc.com web site) and serve as a very smooth, stable, and responsive IMU.
3 of 3 found this helpful:
Quickest project turnaround I've ever managed
I had a client that wanted to tie a series of RS-232 commands to a list of keyboard shortcuts to allow automation of a specialized application that ran on custom developed computer hardware. Due to support and manufacturer limitations, installing software on the target system was not an option. I was able to add a Sparkfun RS-232 to TTL level shifter (PRT-00449) to this Teensy, mount everything in a nice enclosure, and provide a finished product that simply appeared as a HID USB keyboard to the target system within three days despite never having developed for the Teensy platform before. The Arduino IDE plugin made development a breeze.
7 of 8 found this helpful:
Just Awesome
First, the specs and price on these little boards couldn't be better.
But the main reason I love Teensy so much is that the "bootloader" is contained in a separate chip from the main MCU. The loader is placed in RAM from the secondary chip when you press the programming button, but otherwise isn't even in flash on the main MCU.
This means that if you drop the Arduino stuff, you have access to 100% of the resources of the MCU completely under your control. That might not be your cup of tea, but it's refreshing to find hobbiest dev boards unencumbered by hobbiest bootloaders.
2 of 3 found this helpful:
I'd have it's babies
Best dev board ever. Audio applications for days! I'm going to stick one of these in everything that's not moving!
Teensy 3.2 and Prop Shield
Both working great no issues using them.
0 of 2 found this helpful:
not exactly what I expected
First it was slow to get here. slower than snail mail. second there was no USB cable provided with the board and hence it is useless unless you buy a cable for it. the board is poorly supported. could not get the boot loader to work with windows 10 and there seems very little support for it at prj website.
Looking over the shipping records, it appears that you have used FedEx Economy. This is the slowest method for domestic shipping because FedEx carries the package to your city, then passes it off to the US Postal Service for final delivery. This method can take a number of extra days. If delivery time is important, FedEx ground is the preferred shipping method.
There is a note on the product page clarifying that the USB cable is not included. But this is a standard USB micro B cable that is common with many smart phones and modern devices. Likely you may already have one in your home that you can use.
There is plenty of support (both covering Win10 and others) that can be found here. Also the PJRC forums are a good resource for additional information. http://www.pjrc.com/teensy/teensy31.html
Great little unit.
This thing is perfect for small projects but still powerful. Programming is simple and it fit's into small units where others don't. Combined with the Teensy Prop it's all you need for simple animatronics with high quality sound.
Amazing work by Paul!!!
Amazing how powerful this tiny thing is
Excellent Cortex Based MCU
The Teensy add-on to Arduino is easy and quick to install. The Teensy itself is easy to code and very very powerful. I can poll IMU data and run kalman filters at 1kHz!
Great all around product
Needs addition ESD protection, but other than than it is extremely powerful and capable
Nano on steroids.
The tweensy 3.2 has great pwm features and also a great ADC or should I say 2 ADC's. This unit is a arduino nano on steroids. It has many additional functions to the standard arduino which are just functions that should be there, eg setting the pwm freq, ADC resolution, ADC sampling average count, pwm resolution the list goes on and on. Not to mention it is upto 7 times faster and has much bigger memory.
Easy to use with Arduino and super fast!
The reason that for me this board is awesome is: - Interrupts on all the digital pins - Being able to be a USB joystick/ keyboard, and a whole lot more with just a click (no having to reflash the usb chip)
Plus there are a ton of peripherals and really good arduino libraries built around them (the pjrc site does a good job documenting this). Awesome product and thank you Sparkfun for the Quickstart guide!
0 of 1 found this helpful:
Overall it is good
Teensy is with good design. If we can have more examples on using Arduino IDE to program teensy, it would be better. We encountered some problems on rs232 serial communication with teensy.
Easy to Use
Solder in the headers and your off and running. I bought this to use for the Sparkfun Proto-8 project. So far all is working well.
Very nice!!
I had trouble knowing when to push the button, but RTFM cleared that up!! I had overlooked the USB configuration file, which was missing. I made the Hand Pan or Space Drum out of mine, very nice!!!
Makes a spectacular, cool, creepy display.
Used a Teensy 3.2 to make animated eyes with “Uncanny Eyes” code. Makes a spectacular display for a robotic face! Video of it is at https://www.youtube.com/watch?v=2n72VYGFevo . Worked great controlling the eyes, but burned through two Teensy’s trying to also control the servos for the mouth and eyebrows. Reason for failures unknown. Switched the same servos and wiring to an Arduino Uno with no problems.
Powerfull Arduino compatable processor
32 bit instructions instead of 8 for Arduino (Efficient, mostly one clock cycle instructions) IDE overlay Arduino compatible (easy to use) One true digital to analog channel output (sound and music) 96 MHz clock rate (ovderclocked but works well) 3.3VDC operation (low power requirements) Real Time Clock option on-board (requires a crystal and battery) Good support online
Amazing Platform
I wanted to build high quality chiming clocks. I needed a platform with an accurate real time clock, a powerful DSP to synthesize chimes and bells, and good power management capabilities so I could run on batteries for a year. Check (with optional crystal), check (with add on audio board), and check (with some very nice power libraries)! Lots of memory, I/O, and processing power. The audio board has a very useful design tool so you can easily put together all kinds of mixers, filters, delays, and other audio effects. A little more complicated than your basic Arduino, but a joy to use.
Serial Ports
I work extensively with low speed asynchronous communications. Usually, I can't get enough ports. This thing has plenty. Wish the analog input code wasn't quite so cumbersome but it is blazingly fast.
Good little processor
I have used the Teensy 3.2 on another project to replace an Arduino UNO, with some success. This time I had an Arduino in an older project, but found I needed more RAM and substituted in the Teensy. A little rewiring and everything worked out fine.
love my teensies
I've been using Teensy 3 since they were introduced. It is the smallest, most powerful arduino compatible, with awesome support from PJRC. There are a number of daughter boards (shields, hats, whatever) including adapters for regular arduino shields and the Adafruit Feather series.
Most versatile little microcontroller
I love the beefy 3.3v regulator on this board. i love having the 250ma of 3.3vdc ready to power auxiliary parts, sensors, and even a radio.
0 of 1 found this helpful:
Not DOA but close to.
I was able to use the Teensy provided loader application to load the slow blink program successfully and was able to watch it blink. I was then able to load the fast blink program successfully and was able to watch it blink fast successfully. After that I installed the Teensy Teensyduino software. After that point the entire Teensy was no longer recognized by my system (Windows 10) as a valid USB device and the device no longer lights up at all. Following that the Teensy loader will also not recognize it. After prolonged periods of being plugged in the device will attempt to appear to boot with a blinking light and the system does attempt to recognize it again but will fail. Teensy support suggests using high quality USB cables. My cables I'm using I have used for years programming Arduino Micro boards and the same cables (as of trying this product) still work fine with my Arduino Micros, so I do not suspect the cable of being the issue. I have tried this same process with a system that has not seen the Teensy before and its behavior is non functional (not recognized).
Nice little board
Teensy combines a much more powerful processor with the Arduino libraries. I'm an experienced C/C++ programmer and am used to having to talk to microprocessor peripherals and offboard chips, on PIC and AVR, but it's nice to be able to suck down a library and have it just work. I've been using these with the Labview Lynx library, doing user interface on a windows machine running labview, and putting the low-level data acquisition and control on the Teensy. I found that works fine to have multiple Teensys plugged into a USB hub hanging off of my laptop. It seems each chip automatically gets assigned a distinct virtual serial port.
I read through the CPU chip manual, and it has all kinds of features, many of which are supported by Teensy-specific libraries. So far I've only used the ADC library, which allows access to higher resolution than is available through the standard Arduino routines.
My goto board
Over the past two years, I have completely switched over to using Teensy boards due to the increased specifications and capabilities they have over the Arduino boards. This is my third Teensy 3.2.
Wonderful and powerful little µController board
The Teensy is the logical next step if you are comfortable with an Arduino and yearn for a little more. There is a lot of support, even from it's creator, Paul Stoffenberg, and the Teensy forums is the place to go if you need more advanced help with your project. I have yet to find something the Teensy cannot do and spec it for all my designs. I have never blown one and they work for years!
Teensy 3.2 fast and Powerful
Teensy 3.2 is fast, powerful and very reliable. It works fine as the main brain of the project.
Very powerful board
For the size, this is a powerful board and combined with some of the other items in the Teensy universe, has easily become my go-to board for audio projects.
Powerful little guy
This chip has way more capability than I can use but it's nice not to have to worry about that. Lots of I/O is great too. I do wish there was a version with headers already soldered on.
Great microcontroller
One of the best micro controllers I have used. Easy to program. I have used this for a USB keyboard interface to older vintage computers and have designed and produced a USB MIDI controller to control musical effect units and recording software.
Http://shift838.99er.net
Well worth the money spent
Lots of IO. Great CPU speed. Small form factor. Replaced fried motherboard, 16K memory board, universal IO board and "KC Standard" cassette interface cards of my 1976 Altair computer.
First rate product
Very powerful. Plenty of GPIO. Easy to use. Compact design. A very good complete controller that is great for prototyping before committing to a dedicated uController for a final design or product. I use the whole Teensy family for all of my work and fun projects instead of Arduinos.
A lot of computing power in a tiny package
Took a while to find my way around the teensy website but once I knew how to get the info I needed to develop apps on it, this little unit has proved to be a gem.
I had problems with memory on Arduino especially when I needed to create large arrays but on my teensy, it has so much more memory I could create the arrays without running out of memory. I needed to do some math intensive calculations (Bicubic Bezier curve). Arduino was slow but teensy3.2 blew through the calculations instantly. Teensy3.2 has a lot more digital pins so I will be able to attach more sensors and with many more interrupt pins I can do more alerts.
I was also able to attach an external real time clock and use the time libraries without a problem.
Most important of all many of my Arduino projects can run on Teensy3.2 with minimal modifications (in many cases no modifications). And I love the smaller size. This translates to a smaller footprint allowing me to build devices that fit in smaller spaces.
One thing I have not implemented but hope to implement at a later time is going into power saving mode. I hope there is documentation to help me figure out running in low power where I can put Teensy3.2 to sleep for a couple of seconds,
Arduino Killer
For price and capabilities this is an Arduino killer. Even without on the pins on the bottom of the board.
Excellent for quick experiments and more permanent projects
Currently my go-to for quick bench experiments. The D/A is used for generating quick custom wave forms as well as accurate DC for testing. Small size and lots of IO for dense and complex applications. Plenty of memory, ram and eeprom for storing settings. It is fast enough for several of my interrupt intensive projects.
For $20.00 it is a good deal.
Not your grandfather's Arduino
My video review: https://www.youtube.com/watch?v=4AWbB15eiJY
Cheers Joe
Good upgrade
Teensy isthe ideal product for most of my projects. I'm happy to see this update and the possibility to work more easily with the ESP8266 wify module.
Just as easy as an Arduino
I was up and running within minutes with Teensy. It's also very cute.
Great platform!
Cheap, powerful and easy to prototype!
Lots of memory, speed, and I/O
Everything this hardware hacker and professional software developer needs.
A Good One
Love it! Easy to use and code examples for interrupts are available. Unlike the Feather and SAMD21 which are just about useless except for blinking some LED's.
Some distrib's are spiking the price + 30% or more.
Nice board, needs SWD connector
Really nice board, size, features, and processor. I need some kind of debug however so I need SWD connected. Had to put one on myself. I'd use board more but this is too much hassle. Especially since the SAM21D mini is about the same thing but with cortex M connector layout on the board.
Amazing Little Board
I bought two of these to just for testing purpose and I'm impressed with their speed and features. I'm going to migrate my old Arduino Nano projects to this one :)
A single Teensy 3.2 is almost equivalent to six of my Arduino Nano (of course with some pros and cons).
0 of 3 found this helpful:
If you're getting this for a custom keyboard, don't. It doesn't work.
0 of 1 found this helpful:
very good module
It is very simple but very powerfull. I like more than arduino srandard board

What kind of silliness that I am FORCED to change to another arduino version, JUST to install the 'core' for this board! I finally got my LAST version to work with my projects, and now to see WHAT ELSE the arduino devs have changed! The last sentence of the first paragraph in this product description makes no mention that YOU MUST HAVE a supported arduino version to install - valid versions, 1.0.6, 1.6.5-r5, 1.6.9, 1.6.11 or 1.6.12. Any other version, and you're out of luck.
I know that the RTFM/command-line junkies among us will say that there is an encyclopaedia called PJRC that I should read. To that I say, NO! The vendor SHOULD have made this note.
Oh, you have to DL a compatible arduino version, install and RUN ONCE, then terminate arduino before installing.
Indeed per PJRC the Teensy 3.2 replaced the 3.1 as follows :: "The main change is an improved 3.3V regulator, to allow Teensy to directly power ESP8266 Wifi, WIZ820io (W5200) Ethernet, and other power-hungry 3.3V devices." and "We're specifying Teensy 3.2's power output at 250 mA and the maximum voltage input at 6 volts"
The second paragraph says that the Teensy can supply up to 100mA - the bigger regulator is supposed to be able to supply 250mA https://forum.pjrc.com/threads/29774-Teensy-3-2.
Sparkfun: Please update - please edit the spec above: "it can provide system voltage of 3.3V to other devices ..." - PJRC is " specifying Teensy 3.2's power output at 250 mA " - that is the reason for newer Teensy 3.2 versus the Teensy 3.1.
The new dedicated regulator is the ONLY difference between 3.1 and 3.2. (Version 3.1 used the regulator that is built into the microcontroller.) They are otherwise identical, so there should be no compatibility issues if you are putting these into something designed for version 3.1.
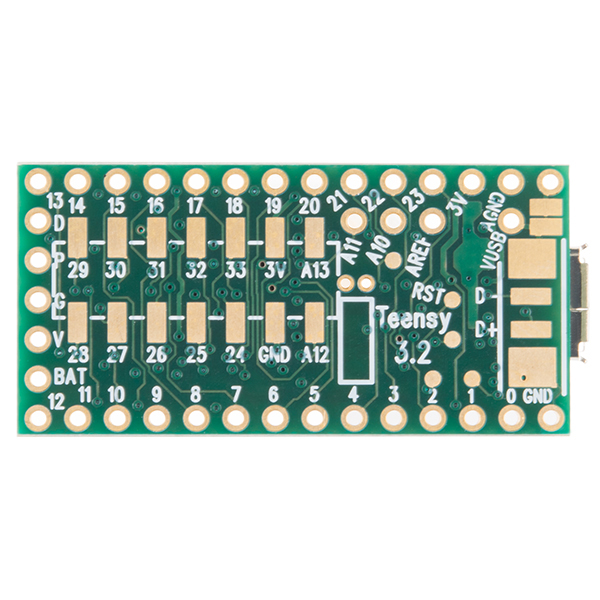
Shirley: In terms of compatibility, evidently the pad for the reset pin changed location in the Teensy 3.2 compared to the 3.1 In addition, the pads for USB D-/D+ also changed location. Unless you actually use the 3 pads or use one of the third party shields that had a pogo pin to bring out the reset pad to a pin, it should not present a compatibility problem.
RobBrownNZ, you might ask the same question at the forums at pjrc.com, which are the development forums for the Teensies.
I tried Teensy 3.1, and found that it didn't reset reliably when it was powered straight from 3.3V (rather than from USB). Adding a capacitor on the reset pin helped but it still wasn't 100%, and then I accidentally ripped the 'R' pad off the PCB and gave up on the board as a result. Has anyone else experienced unreliable resetting with these things? Any advice on how to improve it?