Controlling an Arduino with an iPhone
You can download the Source Code here.
How it works:
In this tutorial you will learn how to communicate between the iPhone/iTouch app TouchOSC via a WiFi network to a Processing sketch displaying graphics and finally to control an Arduino board to light up an LED.
TouchOSC is just one of many iPhone/iTouch apps that can send Open Sound Control signals. I particularly like TouchOSC because it's stable, it’s only $4.99 and most importantly comes with a really easy to use iPhone interface builder for your computer. There are many applications and hardware devices that can transmit and receive OSC signals, so don’t think that you need an iPhone/iTouch to play with OSC.
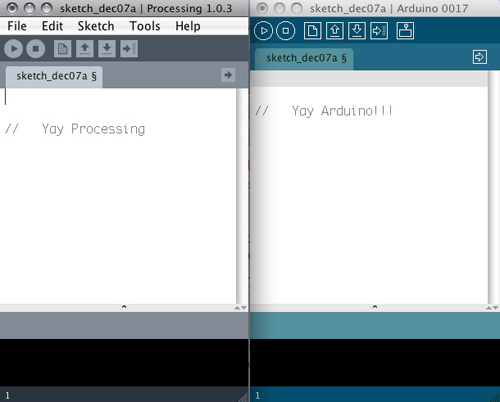
Processing is a great application for quickly creating visualizations, interactive installations, and physical computing projects. Processing is free to download and has a large community at Processing.org. Arduino and Processing are also built on the same interface and look nearly identical.
Creating the circuit:
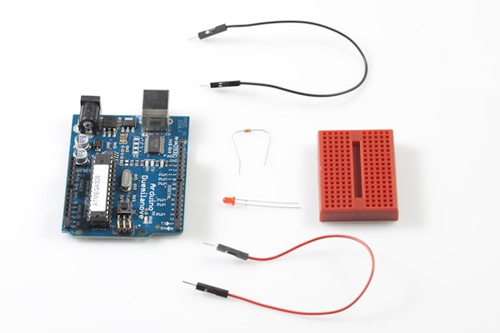
First thing we’ll need to do is to create a simple circuit with an LED, a resistor, a breadboard, some jumper wires and an Arduino board connected to a computer via a USB cable.
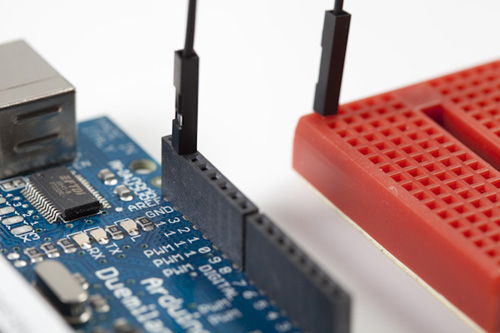
Let’s connect our negative/ground jumper to the first row in the breadboard and the other end into one of the ground plugs (GND)
Notice that the LED has two different length leads coming out the bottom, the shorter one is the negative lead.
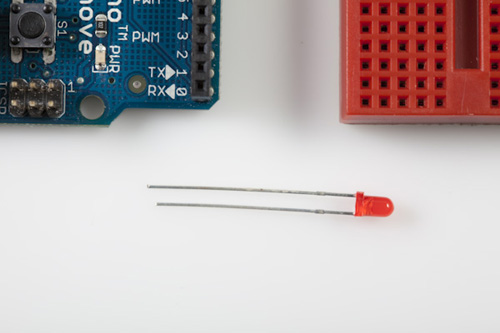
Place the negative lead into the same row as the negative jumper. Place the positive end in the next row down.
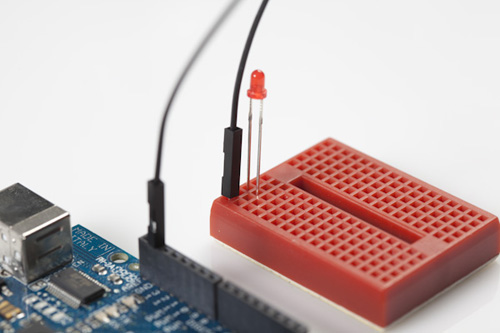
Place either end of the resistor into the same row as the positive end of the LED ( The second row). Place the other end of the resistor into the third row.
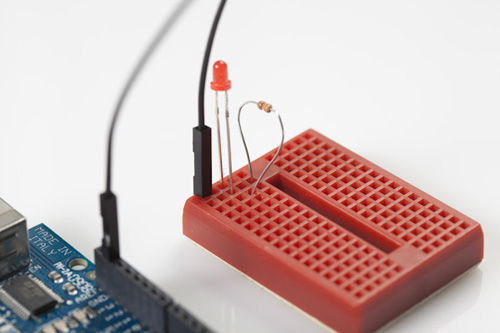
Next connect the red/positive jumper to pin 11 and the other end of the red jumper into the same row of the end of the resistor (The third row).
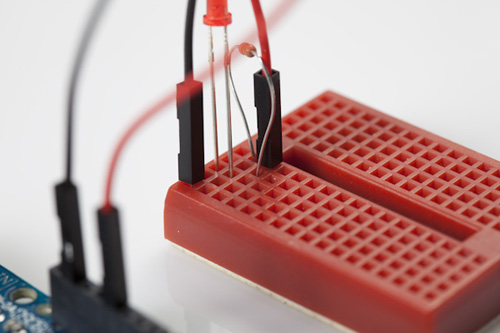
Uploading the Arduino Sketch:
Make sure your Arduino is plugged in via the USB cord and load up the Arduino software on your computer. You can download Arduino and find a lot of resources at www.Arduino.cc.
Alright, now let’s open up Arduino and program it to look for specific characters via serial.
You can download the Arduino sketch here, or simply copy and paste it from below.
Here is the source code, copy it into the empty Arduino window:
//----------------------Arduino code-------------------------
int message = 0; // This will hold one byte of the serial message
int redLEDPin = 11; // What pin is the red LED connected to?
int redLED = 0; // The value/brightness of the LED, can be 0-255
void setup() {
Serial.begin(9600); //set serial to 9600 baud rate
}
void loop(){
if (Serial.available() > 0) { // Check if there is a new message
message = Serial.read(); // Put the serial input into the message
if (message == 'R'){ // If a capitol R is received...
redLED = 255; // Set redLED to 255 (on)
}
if (message == 'r'){ // If a lowercase r is received...
redLED = 0; // Set redLED to 0 (off)
}
}
analogWrite(redLEDPin, redLED); // Write an analog value between 0-255
}
//----------------------------end Arduino code--------------------------------
You can go through and read the comments to learn more about what each line of code is doing.
Great, now save your Arduino sketch by going to the File menu, then Save As.
Compile/verify your sketch by hitting the play button, wait for the status bar to say “Done compiling”.
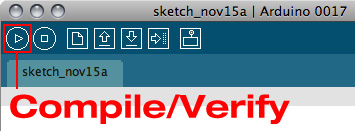
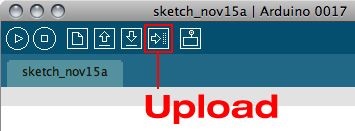
Upload the code to your Arduino board by selecting the right arrow button in the Arduino interface.
Once uploaded open the Serial monitor and try typing an upper case “R” and hitting enter, this should make the LED light up. If you type a lower case “r” it should turn the LED off.
Creating and Running the Processing Sketch:
Next you are going to download Processing to the host computer which must be on the same WiFi network as your iPhone/iTouch so that they can communicate. Download Processing from Processing.org, then install and open Processing.
You can download the source code here, or simply copy it from below and paste it into an empty Processing window:
//-----------------Processing code-----------------
import oscP5.*; // Load OSC P5 library
import netP5.*; // Load net P5 library
import processing.serial.*; // Load serial library
Serial arduinoPort; // Set arduinoPort as serial connection
OscP5 oscP5; // Set oscP5 as OSC connection
int redLED = 0; // redLED lets us know if the LED is on or off
int [] led = new int [2]; // Array allows us to add more toggle buttons in TouchOSC
void setup() {
size(100,100); // Processing screen size
noStroke(); // We don’t want an outline or Stroke on our graphics
oscP5 = new OscP5(this,8000); // Start oscP5, listening for incoming messages at port 8000
arduinoPort = new Serial(this, Serial.list()[0], 9600); // Set arduino to 9600 baud
}
void oscEvent(OscMessage theOscMessage) { // This runs whenever there is a new OSC message
String addr = theOscMessage.addrPattern(); // Creates a string out of the OSC message
if(addr.indexOf("/1/toggle") !=-1){ // Filters out any toggle buttons
int i = int((addr.charAt(9) )) - 0x30; // returns the ASCII number so convert into a real number by subtracting 0x30
led[i] = int(theOscMessage.get(0).floatValue()); // Puts button value into led[i]
// Button values can be read by using led[0], led[1], led[2], etc.
}
}
void draw() {
background(50); // Sets the background to a dark grey, can be 0-255
if(led[1] == 0){ // If led button 1 if off do....
arduinoPort.write("r"); // Sends the character “r” to Arduino
redLED = 0; // Sets redLED color to 0, can be 0-255
}
if(led[1] == 1){ // If led button 1 is ON do...
arduinoPort.write("R"); // Send the character “R” to Arduino
redLED = 255; // Sets redLED color to 255, can be 0-255
}
fill(redLED,0,0); // Fill rectangle with redLED amount
ellipse(50, 50, 50, 50); // Created an ellipse at 50 pixels from the left...
// 50 pixels from the top and a width of 50 and height of 50 pixels
}
//----------------------------------end processing code------------------------------------
You can go through and read the comments to learn more about what each line of code is doing.
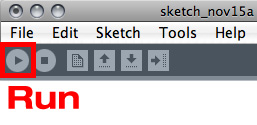
Now Run the Processing sketch by hitting the play button, it looks very similar to the Compile button in Arduino.
TouchOSC editor:
Download the TouchOSC interface editor from:
http://hexler.net/software/touchosc
Once you have downloaded and installed the TouchOSC editor open it up. Right click on the black empty interface window and select Toggle Button.
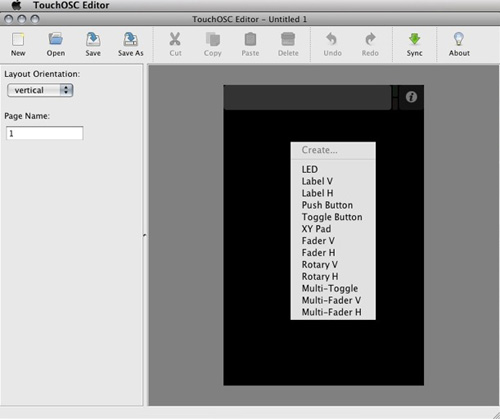
Make sure that you leave the name of the toggle button as “toggle1”.
Save your interface as whatever name you want, select SYNC.
TouchOSC iPhone App:
Next you’ll need to download the TouchOSC app from the App Store and cost $4.99. Once installed hit the info button at the top right of the program, then select Network.
The host should be the IP address of your computer running Processing.
On an Apple computer:
You can find this by selecting the Apple at the top left of your screen, then selecting “About This Mac”.
Then select “More Info”
Then “Network”
The IP address is a set of 4 numbers separated by periods under IPv4
On a Windows computer:
To find the IP address of a windows computer, open the Command Prompt (You can do this by typing 'cmd' in a 'Run' Window). Then type 'ipconfig' in the command prompt and press enter. The IP Address will be listed.
Once you have found the IP address of the Host, change it on your iPhone.
Next change the “Port (outgoing)” to 8000.
Change the “Port(incoming)” to 9000.
Select “Layout”, then “Add”. You should see your Host computer’s name come up, select it to download the interface you just created using the TouchOSC editor.
Next select your new interface from the list of preset interfaces.
Make sure “Stay connected” in ON
Accelerometer is OFF
Double-tap lock is OFF
Send z messages is OFF
Finally hit “Done”
The toggle button you created on your iPhone should now turn the LED on/off and update the Processing graphics in real-time as well.
Congrats, You're Done!!! Now what?
Now if you want to take things a bit further you can swap out the Arduino code that is triggered to do anything else that you have seen Arduinos do. Here is an example of TouchOSC controlling a couple fans using the same lessons taught in this tutorial. One of the first projects I did with this iPhone controlling Arduino idea was build an iPhone controlled tank, the source code for both Processing and Arduino can be downloaded here.
TouchOSC has a whole variety of buttons, toggle switches, rotary faders, vertical and horizontal faders and even an XY touchscreen interface. Try experimenting using the Processing examples on the TouchOSC website.
Also TouchOSC is not the only app that can send OSC signals, there is also MrMr which is free, but I found it a bit buggy and slightly more difficult to use.
Also if you have an Android phone, you can download FingerPlay MIDI to send OSC messages. Just make sure it is sending the OSC signal: /1/toggle1/value
Since mobile phones seem to only be getting more connected and jam packed full of great sensors like multi-touch, gps, and accelerometers, I have no doubt that this is just the beginning of what our phones will be able to control and interact with.
hello Joel. I have been tryign to figure out a way to if there was a way to receive text messages from my phone to the arduino. So far no luck. I don't even know how other companies are doing it with like watches. I have a few of them from different companies. Cheap ones that are like 10 dollars us that can receive text messages. Has anyone came across this before on a way of doing it?
Joseph
Great tutorial. How I got it to work was checking the port number and making them the same and the command println(); right after the following :
if(led[1] == 0){ // If led button 1 if off do.... arduinoPort.write("r"); // Sends the character “r” to Arduino println(); // this is the same as carriage return redLED = 0; // Sets redLED color to 0, can be 0-255 } if(led[1] == 1){ // If led button 1 is ON do... arduinoPort.write("R"); // Send the character “R” to Arduino println(); // this is the same as carriage return redLED = 255; // Sets redLED color to 255, can be 0-255
To all the members in here that been having problems communicating Processing with Arduino. I've been breaking my head all day and I finally figured out what was wrong. You just have to check in what serial port is Arduino connected to. Here's what I did (Mac):
Apple logo/About this Mac/More information or System information/Hardware/USB
There, you will see all the connected devices to the USB Port, for me it appears Arduino Leonardo. Down under are all the specifications from the port, just look where it says something like ID location (I have it in spanish). You will see a large number followed by a slash and a single number. Ex:
ID de la ubicación: 0xfd130000 / 5
So I just changed in my processing code, instead of using 0, used 5.
As described above:
My piece of code
Hope this is useful. I've seen a lot of comments with this problem. Thank you for this amazing tutorial, looking forward to control my motors with my cellphone.
I had a problem with the Arduino Mega 2560 and this tutorial. I could not get the serial connection between processing and the arduino. The connection between openOSC and Processing worked fine, and i could toggle the led with the arduino serialmonitor. I WAS STUCK.
Of an unknown reason (some techneard may be able to explain) the serial connection on the arduino mega has to be reset with an 10uF capasitor between the Reset port and GND on the arduino.
And you have to call serial monitor 1 in processing:
good luck, works fine for me know, even on windows7 64bit
Why not make TouchOSC communicating directly with the Arduino UNO platform with a proper shield? There are at least 2 shields which allow Arduino to talk to wireless devices (the original one and the cheaper one with an IC by Microchip)!
What I have in mind is: TouchOSC and Arduino UNO (with a WiFi shield) connected to the same WiFi network, communicating each other through OSC messages (Arduino has its own OSC library, just like processing has). Is it possible? I've never seen a tutorial explaining this kind of connection!! Why always putting Mac or PC running Processing in the middle? Arduino can handle OSC messages as well as Processing do!
Any kind of suggestions or tutorials on what I just said are well accepted! ;)
Thanks guys!
I saw your comment a few months ago and thought you had a great idea. I've kept an eye out for something ever since.
Here we are a few months later and I found a guide just yesterday on using the OSCuino library + Arduino + Touch OSC to control an LED. I tried it, and was able to successfully control an LED from my iPhone.
http://trippylighting.com/2014/10/12/touchosc-arduino-tutorial/
Hey guys! I've worked with OSC and Processing quite a lot, so if you have a question, I might be able to help you. Be specific please :)
Hey! i'm getting problem while linking my touch osc file with the processing. the Osc file that i've made is not getting displayed.What changes are to be done in this code. I've used the above mentioned code of arduino and processing. Please help me out. its urgent. thank you
You said you are having trouble linking the OSC file to Processing. Do you have the app on your phone running your layout properly? If so, then the only challenge is to enter the IP address of your computer and make sure the phone can talk to it. Are you to the point I have described?
This is so awesome! Concidering I was learning how to make an LED blink not 2 weeks ago this tutorial is super good! This impressed my whole family (I am 15). I will surely be using my new knowledge of Iphone controlled arduino in a lot more of my projects from now on!Thanks so much for the awesome tutorial!
great tutorial that inspire me to write an article about how to develop iOS applications to control robots. the article could be read here http://www.intorobotics.com/tutorials-how-to-build-ios-applications-to-control-a-robot/
In processing when I run this code I get an error message "Serial does not run in 64-bin mode". Does anyone know why/how to fix? Thanks!
Hey There..
I read the post and it seems I share the same issues as some only I could not find an answer suitable for my case.
TouchOSC communicates with my computer and Processing program. Clicking the button on my Iphone lights up the LED on my computer but not the LED on my an Ardruino. Typing “r” or “R” gets the correct results.
Processing however gives the following issue in red :)
RXTX Warning: Removing stale lock file. /var/lock/LK.046.033.000
Can anyone help please.
I use OS X 10.8.2 so i guess it should be up to date but not sure.
Thank you for your help.
Try and use a stable release of Processing. 1.5.x should work. Other than that, just Bing it :)
We used your work as inspiration for our laser firing robots group project.
See here for more info.
Thanks!
So I got the TouchOSC to talk to Processing (it toggles the Processing button on and off). It doesn't toggle the LED on Arduino on and off. I checked the ports and I am sure that both my Arduino and Processing are running the same port. I am also uploading Arduino sketch to board and then closing it, so as not to cause errors with Processing. RX led on arduino is steady ON so it's receiving data non stop, but light wont go on or off. I checked the Arduino sketch itself and it works when I manually type in R or r....any ideas why this is happening?
Hello,
I am having some problems with this tutorial and would appreciate any help.
I have uploaded the arduino code ok and can turn the led on and off using R and r in the serial monitor ok.
I seem to be having issues with processing. When I run the processing sketch I get the following in the bottom window.
sun.misc.ServiceConfigurationError: com.sun.jdi.connect.Connector: Provider com.sun.tools.jdi.SharedMemoryAttachingConnector not found sun.misc.ServiceConfigurationError: com.sun.jdi.connect.Connector: Provider com.sun.tools.jdi.SharedMemoryListeningConnector not found OscP5 0.9.8 infos, comments, questions at http://www.sojamo.de/oscP5
[2012/12/15 12:3:47] PROCESS @ OscP5 stopped.
[2012/12/15 12:3:47] PROCESS @ UdpClient.openSocket udp socket initialized.
[2012/12/15 12:3:48] PROCESS @ UdpServer.start() new Unicast DatagramSocket created @ port 8000
[2012/12/15 12:3:48] PROCESS @ UdpServer.run() UdpServer is running @ 8000
[2012/12/15 12:3:48] INFO @ OscP5 is running. you (192.168.1.10) are listening @ port 8000
Stable Library
Native lib Version = RXTX-2.1-7 Java lib Version = RXTX-2.1-7 RXTX Warning: Removing stale lock file. /var/lock/LK.015.018.000
However I do get the window with the virtual led and I can turn it on and off using TouchOSC on the iPhone, but nothing seems to happen on the arduino.
Any suggestions?
Thanks
Duncan
please someone help me .i cant get this done,i got evrything like its says this tutorial but the only led i can get on and off is the rx led on my arduino and the touch osc an the proccecing sketck it does not light either please help i been trying for so long
thanks
solved
Hi, I have problem when run the program in processing, this starter ok, but when press the toggle button in my iphone in the Sketch of processing apear a error and the led no turn on:
Native lib Version = RXTX-2.1-7 Java lib Version = RXTX-2.1-7
[2012/8/28 19:10:4] ERROR @ OscP5 ERROR. an error occured while forwarding an OscMessage
to a method in your program. please check your code for any possible errors that might occur in the method where incoming OscMessages are parsed e.g. check for casting errors, possible nullpointers, array overflows ... . method in charge : oscEvent java.lang.reflect.InvocationTargetException
I have a computer with windows seven x64, processing-1.5.1, touchosc-editor-1.5.4-win32 and iphone 4 with ios 5.1.1
Before have many problems:
First with oscP5, but I find the solution, I have processing 1.5.1, download oscP5-0.9.8 unzip this and copy oscP5 folder to processing-1.5.1\modes\java\libraries\ and OK.
Second problem with:
WARNING: RXTX Version mismatch Jar version = RXTX-2.2pre1 native lib Version = RXTX-2.2pre2
This problem I find the solution: goto http://rxtx.qbang.org/wiki/index.php/Download and download rxtx-2.1-7-bins-r2.zip from "Binary" column. goto C:\Users\Downloads\rxtx-2.1-7-bins-r2.zip\rxtx-2.1-7-bins-r2 and copy RXTXcomm to C:\Program Files\processing-1.5.1\java\lib\ext goto C:\Users\Downloads\rxtx-2.1-7-bins-r2.zip\rxtx-2.1-7-bins-r2\Windows\i368-mingw32 and copy both rxtxParallel.dll and rxtxSerial.dll to C:\Program Files\processing-1.5.1\java\bin
This is all, please help with the problem when press toggle button in the iphone.
hi there, nice project and all, managed to get it up and running, but now i would like to control 2 or more separate LEDs, is it possible? like 1 red, 1 yellow, 1 blue? i tried to play around with the codes, but got no results from it, can any1 help out here? thanks!
I used iOSC which is slightly different and modified some of the code above and it took some struggles getting it done right. The chief issues are (which I learned the hard way): 1) You can’t use the Arduino IDE while Processing is running, else you are going to get a whole bunch of errors 2) Make sure you are accessing the correct serial port 3) If you happen to have Processing running while trying to download the program to the Arduino then you will get errors as well. 4) Make sure you install the latest version of RXTX. I can send you the files and sketches if you wish. Though, the above code should work fine.
iArd is an app available on app store that connect directly iPhone to Arduino via Ethernet shield! visit http://nkcorporation.altervista.org
The virtual LED glows to red when I tap on the iPhone.If I enter 'R' or 'r' manually using cutecom in Ubuntu then the led on the breadboard glows.But when i use the iPhone the led on the breadboard refuses to glow.What may be the problem.The processing starts and the window having the virtual led appears,but there are errors popping.The error is java.lang.NullPointerException at processing.serial.Serial.write(Unknown Source) at processing.serial.Serial.write(Unknown Source) at skecth_dec12a.draw(sketch_dec12a.java:56) at processing.core.PApplet.handleDraw(Unknown Source) at processing.core.PApplet.run(Unknown Source) at java.lang.Thread.run(Thread.java:662) What may be the problem?
Choose iPad or iPhone
Better formatting:...
Add Toggle...
Click Sync in TouchOSC Editor...
Run TouchOSC on iPad...
Layout / Add / Steve-PC...
OK existing layout will be overwritten...
There is nothing below "Add"...
No layouts to choose from...
There were 2 complex examples that I deleted...
Obviously the connections was setup properly because I got as far as I did...
What did I do wrong?
You'll never believe how simple the solution was...
Add Toggle
Click Sync in TouchOSC Editor
Run TouchOSC on iPad
Layout / Add / Steve-PC
OK existing layout will be overwritten
There is nothing below "Add"
No layouts to choose from
There were 2 complex examples that I deleted
Obviously the connections was setup properly because I got as far as I did
What did I do wrong?
Hello, im having some trouble! My arduino LED works with the R on and r off, but i cant get any communitacion between touchosc and processing, ive already unlocked the firewall and tried to change de port, but no response.. I hope someone can help me, i really need it working! Thanks
This is a great tutorial. Everything worked perfectly in about 15 minutes but... What would I have to change in the code to add another button to control another LED? I've tried tinkering with it a little bit, but I cant seem to add another button in the Processing code. Any little bit of information would be incredibly helpful.
Is there a way to get the same functionality of TouchOSC in an independent app? Say you wanted to create an app that could control an RC car, but wanted to have your own app to do so, without having to start up TouchOSC?
Worked in 30 minutes, great tuto, cant go to sleep right now, too excited about the possibilities this is opening...
OscP5 0.9.6 infos, comments, questions at http://www.sojamo.de/oscP5
[[[ ### [2011/5/18 1:22:8] PROCESS @ OscP5 stopped. ]]]
[2011/5/18 1:22:8] PROCESS @ UdpClient.openSocket udp socket initialized.
[2011/5/18 1:22:9] PROCESS @ UdpServer.start() new Unicast DatagramSocket created @ port 8000
[2011/5/18 1:22:9] PROCESS @ UdpServer.run() UdpServer is running @ 8000
[2011/5/18 1:22:9] INFO @ OscP5 is running. you (192.168.56.1) are listening @ port 8000
WARNING: RXTX Version mismatch
Jar version = RXTX-2.2pre1
native lib Version = RXTX-2.2pre2
now it has the new statement that is in [[[ ... ]]]
OscP5 0.9.0 infos, comments, questions at http://www.sojamo.de/oscP5
[2011/5/18 0:53:25] PROCESS @ UdpClient.openSocket udp socket initialized.
[2011/5/18 0:53:26] PROCESS @ UdpServer.start() new Unicast DatagramSocket created @ port 8000
[2011/5/18 0:53:26] PROCESS @ UdpServer.run() UdpServer is running @ 8000
[2011/5/18 0:53:26] INFO @ OscP5 is running. you (192.168.56.1) are listening @ port 8000
WARNING: RXTX Version mismatch
Jar version = RXTX-2.2pre1
native lib Version = RXTX-2.2pre2
this is the warning i receive is there something wrong ???
Great tutorial,
leads the way for many exciting projects.
Thought i would share a link i found useful:
http://www.frieder-weiss.de/OSC/index.html.
Download the OSC Monitor change the port number to 8000 and it shows you the OSC values that are currently being recieved.
Seems very useful when using faders.
Incredible!!! A great tutorial, it´s perfect for my quadcopter!!!
where did you take these photos
Thank you for posting this.
I had some problems along the way but all were answered for me by reading everyones comments.
This tutorial has given me just enough information to see the potential this kind of connectivity has.
Here are the problems & solutions I had.
Problem: TouchOSC on the iphone Times out and is unable to download layout.
Solution: Open up the firewall and add an exception,
select TCP add the port number 9658. This stops the firewall from blocking transmission.
Problem: Procession GUI responds to the iphone layout being touched (red dot lights up) But the LED will not illuminate.
Solution: Find the code in the processing that looks like this "this, Serial.list()[0]" Change the 0 to be what your COM port your Arduino is attached to.
NOTE: my COM port was COM3 but actually the number required was 1. "Serial.list()[1]"
I dont get this Why 1 and not 3 ?
So don't be deterred if COM 7 isn't 7 maybe try 5.
Hi guys.I was following everything step by step, But i still cant get TouchOSC to communicate with arduino. Im working with windows PC and I tested it with serial monitor.PC and iPhone are in the same network as i loaded the new toggle button into touchosc on the ipod.
Please Help....
Have you see if Processing is selecting the right serial port? It was my problem at first time
HI guys,I have a bit of a problem and maybe someone can help me.I was following everything but i still cant get my touchosc to communicate with arduino.I'm working on windows, loaded the arduino sketch and tested it in the Port Monitor. I know that PC as iPhone are in the same network as I loaded my new button into touchosc on the ipod.
I was wondering if someone know what the problem is?
I have 2 issues (with my program lol) <br />
<br />
1.<br />
In processing I get an "THe package'oscP5" does not exist. You might be missing a library.<br />
<br />
2. When I go to layout add on my iphone4 no Hosts are found.<br />
<br />
Help
Hello guys,I got a situation here and i was wondering if someone can help me.I saw a lot of youtube videos using the touchOSC+arduino+processing.I purchased touchOSC to try it.Found this tutorial here which looks complete.But after following everything step by step, i still cant get my touchosc to communicate with processing nor arduino.I loaded the arduino sketch tested it with serial monitor (capital R +enter)seemed to work.But for the rest i cant seem to solve it.Am running on a windows PC.Both PC as ipod are in the same network because i was able to load my edited toggle button into touchosc on the ipod.<br />
<br />
Any help will be appreciated.Thx in advance.
I used iOSC which is slightly different and modified some of the code above and it took some struggles getting it done right.
The chief issues are (which I learned the hard way):
1) You can't use the Arduino IDE while Processing is running, else you are going to get a whole bunch of errors 2) Make sure you are accessing the correct serial port 3) If you happen to have Processing running while trying to download the program to the Arduino then you will get errors as well. 4) Make sure you install the latest version of RXTX.
I can send you the files and sketches if you wish. Though, the above code should work fine.
I am getting the exact same result as Toasty her with my MEGA2560 board. I was also able to monitor the message from the Processing program by using a second serial port, and it looks correct. The RX LED on the Arduino is quite busy so something is transmitted. Anny help would be greatly appreciated.
@waala and @Toasty... I was having the exact same problem and I was able to fix it by doing two things.
1: Close the Arduino IDE after uploading the code. I think the IDE may be locking up your serial port.
If it's still not working...
2: Change the arduino port in the Processing code. I had to change it from Serial.list()[0] to Serial.list()[1] to reference my COM4 port.
I am able to get the TouchOSC to communicate with my computer and Processing program. When I click the button on my Ipod the virtual LED on my computer screen lights up, but not the LED on my an Ardruino. I am able to open up the Serial monitor and type "r" or "R" and get the correct results.
Any ideas on what is going on?
I've set up everything how it says but it doesn't work. after i run Processing and test the arduino with the "R" the led flashes but doesn't stay on. The iphone touch osc app isn't communicating either. Any ideas?
Hi! Great staff! I am interested in a robotic project:http://letsmakerobots.com/node/10577
I would like to manage this delta robot via iphone. In a comment of the same link there is the processing code. Please have a look.
Could someone help me to modify it to communicate with TouchOSC? Could I use a XY pads? Is it possible?
Please help me. Thanks a lot, Filippo
I have written a draft. Could someone check it please? Ufortunely I haven't an iphone for testing. Anyway someone could check my new processing code. Here my code:
import oscP5.*; // Load OSC P5 library
import netP5.*; // Load net P5 library
import processing.serial.*;
OscP5 oscP5;// Set oscP5 as OSC connection
Serial myPort; // The serial port:
int servo1 = 0;
int servo2 = 0;
int servo3 = 0;
int serialBegin = 255;
float X,Y
void setup() {
size(600,600);
myPort = new Serial(this, Serial.list()[1], 115200);
frameRate(100);
noCursor();
}
void oscEvent(OscMessage theOscMessage) { // This runs whenever there is a new OSC message
String addr = theOscMessage.addrPattern(); // Creates a string out of the OSC message
// if(addr.indexOf("/1/toggle") !=-1){ // Filters out any toggle buttons
X=theOscMessage.get(0).floatValue();
Y=theOscMessage.get(1).floatValue();
}
}
...
I really dont understand how the processing code turns the touchosc message into a value that can be sent to the arduino. Could someone please help me. I am trying to figure out how to use push buttons
I'm just guessing at this but I'm pretty sure that:
int i = int((addr.charAt(9) )) - 0x30;
picks the 9th's character (which since the count starts with 0 would be the character immediately after /toggle) and assigns that to i.
Problem is, it only accepts one character so if you start adding more LED's, by the time you hit /toggle10+, the value of i always stays 1. Until you get to /toggle20 in which case, i remains 2.
i have been trying for and hour now to add a second led to the setup but i haven't been able to get it when i try reapeating the code and changing it for a second led i get an out of bounds error
sorry accidental double post, i got a second led set up by using id 0 but it seems that if i go over 1 i get an out of bounds exception. any help would be appreciated
iv been trying for and hour now to add a second led to the setup but i haven't been able to get it please help
when i sync via the touchOSC editor it come up with: Connection failed! timed out. Any ideas?
Can anyone here offer some advice?
I am getting the following Processing error message:
"The function addr.Pattern() does not exist"
...which highlights the following line as the source of the error:
String addr = theOscMessage.addrPattern();
Any ideas??
As a side note, I deleted the command "import netP5" which was also causing an error, and comments here suggested it was actually redundant. Maybe the 2 are related??
Thanks.
oooh boy spent around weeks on this xbee still no connection.... i just want to make that light turn on with my iphone with out the usb..... Then one part i dont understand is the reset button do i have to soilder it together with something else.... so far i did this..... connected TX to DIN RX TO Doout pwR To PIN 3 .... GRND.... you i am also useing XCTU ... made one of the coodinator and othe end peace... any idesa plzz
XBee Explorer Regulated and connected DIN to RX AND DOUT to TX also GRN and power the arduino with lipo usb to 3V3.......... on my laptop i have the XBee Explorer USB and like you said i reseted but is not working......... i am trying to turn the light on and off with out the usb connected to the Arduino ....if i understand this i could move on to finshing my tank project.... i read so much online like changing the pan, DL,SL,BD...... stilll no luck .... also tryed with some other programs like python no luck... i need help////
I've had success getting two (series 2) xbee's to talk (using mbed) with the same setup (xbee regulated and usb explorer). I couldn't get it to work out of the box either so used the XCTU tool (via VirtualBox and Windows XP as on a mac) to set one as a 2.5 Router and the other a 2.5 Coordinator with both Pan IDs set to 332. I left the baud at 9600.
I used minicom in two unix terminal windows to test the output of one xbee went to the other (both were connected via usb, one via the mbed and the other via the xbee explorer). Flashing of the leds on the breakout boards was useful to test that the transmit and receive worked as expected (eg: as you type in the terminal of the xbee explorer connected you should see tx flash so at least you know that side is working).
Found this helpful: http://blog.kevinhoyt.org/wp-content/xbee-setup.pdf
Mbed reference: http://mbed.org/projects/cookbook/wiki/XBee (includes wiring diagrams which could be useful).
i have 2 xbees series 1 and usb explore and regulator do i have to add more programing codes to the skecth.? cause when i pair them up is not working...i searched the net and had no luck. Any ideas to help me out?
By default the XBees should be configured to work with any other new XBee, however you can use X-CTU to check the configuration of the XBees. Perhaps the stock configuration was changed for some reason.
http://www.digi.com/support/kbase/kbaseresultdetl.jsp?kb=125
XBee Explorer Regulated and connected DIN to RX AND DOUT to TX also GRN and power the arduino with lipo usb to 3V3.......... on my laptop i have the XBee Explorer USB and like you said i reseted but is not working......... i am trying to turn the light on and off with out the usb connected to the Arduino ....if i understand this i could move on to finshing my tank project.... i read so much online like changing the pan, DL,SL,BD...... stilll no luck .... also tryed with some other programs like python no luck... i need help////
Yes i did it .......... it feels good man thanx to my man RoHs for the easy step by step instruction aslo thank to BDubSon and Lquidspark for the post..... i didn't know any think about this when i frist started now ....... am the KING (jking) just feels good dawg all you guys keep up the good work peace
Jfish, once you know it's "COM7" you can also do this:
arduinoPort = new Serial(this, "COM7", 9600);
That way, if you are constantly changing your "list" of comports, which would affect a specific one in the list such as "Serial.list()[3]", COM7 will always be COM7 no matter where it is on the list.
All:
This was a great project - thanks for the post. I ran into the same issues with the oscP5.jar. I also ran into another issue that was worth a post: When I loaded the oscP5.jar file I could run the program but the light would not work. It turns out the code was defaulting to the first serial port instead of the one that was used by my Audrino board. The command: println(Serial.list()); will return a list of all ports in an array. You can then set the line of code in the example with the correct port: "arduinoPort = new Serial(this, Serial.list()[3], 9600);" In my case, "3" was the correct entry for COM7 on the list returned from (Serial.list()); Yours may be different.
Hi, I am tring to follow your steps, but I have problem with connecting iphone with your PC(Win 7) when they are in the same wireless network.
When I go to the "Add Layout" page of the touchOSC, it keeps Searching, and nothing comes out.
Would you by any chance help me fix this? Thanks.
what BDubSon said...it should work, but depending on your network/wifi router settings there may be some conflicts.
I use Win 7 Ultimate and the very first and second times I tried sync'ing it didn't show my computer name either. Eventually it did show up on my iPhone, and it's worked ever since. Just make sure your HOST IP address on your iPhone in the TouchOSC app is set to your computer's IPv4 IP address, and keep trying. I can even start the iPhone listening first, open the TouchOSCEditor and click it's Sync button and then my computer shows up on the iPhone.
Hey well I guess the version updates have changed things or I am an idiot. LOL
I am getting "The package oscP5 does not exist. You might be missing a library"
So I did the research I downloaded the oscP5.jar file I put it in
name/documents/processing/libraries/oscP5.jar and still the same error.
So I put it in the project folder and still the same error.
Also noticed that all links to this and netP5 dont link to anything they are gone. I purchased the Touch OSC but cant use it now. Hmmm any ideas?
anyway versions are
Processing 1.09
the latest oscP5 that I got off the site
OSX Snow Leapord
Hey Liquid,
I had the same problem as you. The author who packaged the oscP5 library didn't zip it up right. The contents of the zip should be in another folder named "oscP5" and that whole thing should be in your sketchbook under a folder named "libraries". So when you are done, your oscP5.jar will be like this [sketchbook DIR]\libraries\oscP5\library\oscP5.jar
Restart Processing after you make the move so it picks up the changes.
You are also right about the netP5... it doesn't seem to do diddly.
@Sparkies, thanks for posting this tutorial! It's MAD KEWL!!!!
I would also probably change the BASIC rating to MODERATE because it's a lot to set up and figure out. Not all that difficult, but a lot of room for error to occur which makes it challenging.
thanks for helping out BDubSon
guess it don't like backslash... try this:
[sketchbook DIR]/libraries/oscP5/library/oscP5.jar
Thanks a ton for this
no problem.
Is everything needed here included in the Arduino starter kit? (It's helpful when you add a parts list to the tutorials.) Thanks.
I tried OSC stuff and it worked initially, but then it just stopped working sometimes. my advice is just use the Ardumote app on iPhone/ipad. Its easier to setup and you don't need to write any processing scripts because it doesn't require a PC in the middle.
here's a video of it... http://www.youtube.com/watch?v=lX-VxmEOtIM
Yep :)