LPC2148 USB Bootloader Tutorial
The USB Bootloader for the LPC2148 is a cool trick that SparkFun created for some of our ARM7 based projects. Because the ARM architecture allows for such large flash space (over 1MB on some chips!) loading code onto the LPC2148 ARM7 over the serial port was painfully slow. Over time, we discovered how to connect the LPC2148 to an SD card for datalogging, and a LPC2148 to USB running the mass storage profile. The bootloader brings all these techniques together to create an easy to use and very fast development system without any need for expensive hardware or software (all free!).

MP3 Development Platform
Don't be mistaken, a bootloader is not a new idea; in fact the idea of bootloading, or bootstrapping, has been around since the 1950's. The implementation we use is somewhat different than that used by personal computers, but the idea is generally the same. In this tutorial we will cover what a bootloader is, why it's a good idea, and how to use it. In the last part of the tutorial we'll even get into exactly what the bootloader is doing at the code level. If you're new to the LPC2148, or you've just received a SparkFun product with the USB bootloader, or if you just want to learn a little bit about our LPC2148 USB Bootloader, then this tutorial is for you!
What is a Bootloader?
A bootloader is a small piece of code that runs before the operating system starts running. In our case the bootloader is the code that runs before the device firmware starts up. Typically a bootloader is used because the system memory is too small to contain the entire program, and so the bootloader uses a set of routines to call the program from a different part of memory.
The SparkFun LPC2148 USB bootloader performs three steps:
- First, the bootloader checks to see if a USB cable has been plugged in. If the LPC2148 detects the presence of a USB cable then it initiates a USB Mass Storage system. This will cause the target board to appear on any computer platform as a removable flash drive. The user can then seamlessly transfer files to the flash drive. In the background, the LPC2148 moves the user's files onto the SD card using the FAT16 file system.
- The next thing the bootloader does is look for a firmware file. For SparkFun projects, the bootloader looks for a file named FW.SFE. This file contains the desired operating firmware (in a binary file format) for the LPC2148 microprocessor. If the bootloader finds this file on the FAT16 system then it programs the contents of this file to the flash memory of the LPC2148. In this way, the bootloader acts as a “programmer” for the LPC2148; and we can upgrade the firmware on the LPC2148 simply by loading a new file onto the micro SD card. Cool!
- After performing the first two checks, the bootloader calls the main firmware. The main code should not even know that the bootloader was used and will run normally.
Why would you use the LPC2148 USB Bootloader?
You certainly don't have to use a bootloader on SparkFun products or any other ARM based project. However the bootloader provides several distinct advantages. First, if you have a board that has been preloaded with the bootloader then you don't even need a programmer to load code onto the board! This is great because most every tinkerer has a spare USB cable lying around, so you don't need any special equipment to start creating your own embedded systems.
Another reason the LPC2148 USB bootloader is great is because it is smokin' fast at loading code! When using a serial programmer to load code onto an ARM, it can take several minutes to get your code up and running(around 45 seconds for a 200kB file at programmed at 38400 baud) This can be a major setback when you're writing very large programs, and you start debugging. If you're only changing one or two lines of code, and it takes several minutes to load your changes onto the board, it's easy to get frustrated. Using the LPC2148 USB bootloader allows you to load code in seconds, literally!
How do you use the Bootloader?
First you have to program the bootloader onto the LPC2148. We use the LPC serial port programmer to load this code once over the serial port. Once the bootloader is on the LPC2148 , using it is simple! Several SparkFun products come with the bootloader already loaded: the UberBoard, the MP3 Development Board, KinetaMap and the Package Tracker are all ARM boards with the bootloader installed before being sent out the door. If you are creating your own ARM project based on the LPC2148 with a USB interface and a FAT16 storage system, then you will have to program the bootloader code on first (we'll go over that in part 3 of this tutorial).
For now lets assume that you have an UberBoard, and you've written some neat code to use the on-board accelerometer. That's great, but how do you get the code from your computer onto the UberBoard? It's easy: plug a USB cable in, turn the power to the board on, and when the USB Mass Storage Device opens on your desktop just drag and drop the FW.SFE file onto the device. When you unplug the USB cable the UberBoard will automatically reset; the bootloader will look for the file named FW.SFE and if the file is found the bootloader will program the new code onto the microprocessor. Presto! You're new code will now be up and (hopefully) running.
That seems easy enough, but how do I get this FW.SFE file? Good question! In order to get the FW.SFE file, first we have to compile the code. In order to compile the code you need a...compiler! At SparkFun we use the WinARM suite and the GNU-GCC compiler. We'll go over how to set this up in a bit. After you set up your compiler, the Makefile has to be created/edited to properly create the FW.SFE file. A makefile is used to tell the compiler how you want your code to be interpreted by the ARM. I say the makefile has to be “created/edited” because generally we don't create makefiles from scratch (in fact, I've never created one from scratch). We take a makefile that's known to be good, and play around with it until it does what we want it to do. Makefiles are usually included in examples that come with WinARM. In a later part of this tutorial we'll cover what needs to be changed in a makefile in order to create the FW.SFE firmware file.
Setting Up Your Programming Environment (WinARM)
Warning! Unfortunately, the archived programming environment (WinARM-20060606.zip) that was originally used to compile the bootloader is now unavailable to download from the tutorial. The alternative programming environments out there that was listed in the tutorial may be able to work but it has not been tested. Also, you may be able to find a work around by checking the SparkFun Community Forums.
If you're new to programming, or even if you have some programming experience but you're new to embedded systems, then you may be wondering how exactly you get the code you need to put onto the bootloader. To do this you'll need what is generally referred to as a programming environment. A programming environment consists of a text editor (for writing the code), a compiler (for creating the “machine” code), and a programmer (for loading the code onto your device). Some environments will come with other tools as well, such as debuggers and microprocessor simulators; you'll learn how to use those later though (and probably from someone else...). There are several programming environments out there; OpenOCD and Keil are two very prominent ones that I know of. However, the only one I've used is called WinARM. It's free, it works great, and it has everything you need. In this section of the tutorial we'll cover the steps you'll need to take to get the WinARM programming environment set up on you computer. Since I use Windows, though, the instructions will only be for Windows; hopefully if you use another operating system you'll be able to draw enough information from these steps to figure it out yourself.
- The first thing you need to do is download the WinARM zip file. You'll have to scroll down a little ways until you find the download for the “WinARM 20060606 zip Archive.” Click the link to download the zip file. It's a pretty big file(95 Mb), so don't be surprised if it takes a while to download.
- Once you've downloaded the WinARM 20060606 zip file, you need to extract the contents into the C:\ of your PC. That is, once extracted the directory C:\WinARM should exist, and inside this folder should be nine other folders along with a Readme file.
- The next part is perhaps the most confusing. You'll need to extend your system-search path. This is an environment variable in windows. Follow these steps to extend your system search path:
1. Right click on “My Computer” and select “Properties.”
2. Click on the “Advanced” tab.
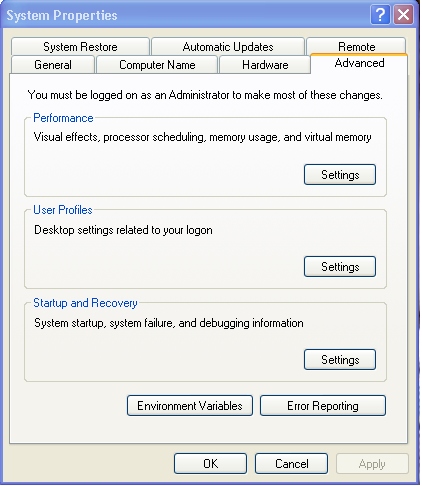
Advanced System Properties Window
3. Click on the “Environment Variables” button near the bottom of the window.In the Environment Variables window, scroll down the System Variables list until you see the Variable named “Path.”
4. Select the “Path” Variable and press the “Edit” button.
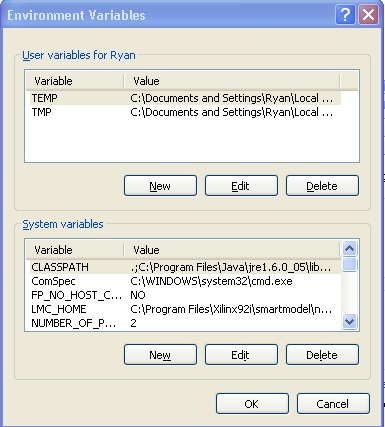
Environment Variables Settings Window
5. With the Edit System Variable window open, scroll to the end of the Variable Value text box and paste this string: ";C:\WinARM\utils\bin;C:\WinARM\bin" at the end of the text that is already in the text box. WARNING: Do not delete any of the text that already resides in this text box as these values are used by Windows to run other programs.
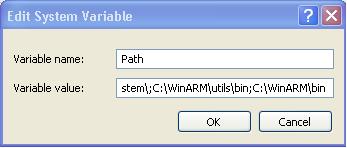
6. Press “OK” to close out all of the System Properties windows that are now open(there should be three).
2. Click on the “Advanced” tab.

Advanced System Properties Window
4. Select the “Path” Variable and press the “Edit” button.

Environment Variables Settings Window

Editing the Path System Variable
6. Press “OK” to close out all of the System Properties windows that are now open(there should be three).
Once you've completed all of these steps WinARM should be properly installed on your system. You now have the tools available to write and compile code, and using the ARM bootloader you will be able to easily get that code onto your embedded system. In the next section we'll go over some simple code to load onto an UberBoard, and what you need to do to your Makefile in order to create the firmware file needed to load onto the SD card for the bootloader.
In Part 1 of this tutorial we discussed what a bootloader is, why one would use a bootloader, and how the LPC2148 USB bootloader is used in SparkFun projects. We also downloaded and installed the WinARM programming environment to allow us to write and compile code in C for the LPC2148. In this part of the tutorial we'll briefly go over some code for a LPC2148, but more importantly we'll cover a Makefile and what it does along with how you edit your Makefile in order to compile your code to utilize the LPC2148 USB bootloader.
Getting Started:
Here's a list of the tools and files you'll need to follow along with this tutorial.
Hardware:
- For the step-by-step instructions I'm using a SparkFun UberBoard V2; however you don't have to use this board to use the bootloader. Other SparkFun products that come with the USB bootloader firmware are: the MP3 Development Board, the Logomatic v2, the KinetaMap and the Package Tracker. More will follow, and you can even create your own! Part three of this tutorial will show you how to use the bootloader in your own project.
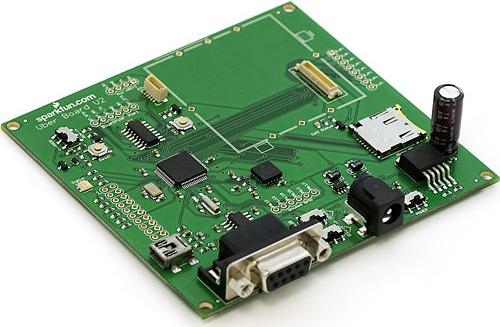
UberBoard v2 Hardware
The “main” code I'll be referencing will be written for the UberBoard, but if you write your own code for a different board that's fine; the Makefile will work regardless of what board you are programming.
Software:
- WinARM (See part 1 of this tutorial for instructions on how to get/install this)
Tools:
- USB cable with miniUSB connector
- Power Source (either a battery or a cable, depending on your project)
- UberBoard v2 (or other ARM based project with the USB bootloader firmware and the USB hardware installed)
Files:
The contents of this folder include:
- main.c (sample “blinky” code for the UberBoard)
- Makefile
- main_memory_block.ld (Special file the Makefile uses to compile the code)
- Startup.S (Another file the Makefile uses)
- LPC214x.h (A file with definitions pertaining to the ARM microprocessor)
- syscalls.c (Another file used by the Makefile)
Compiling and Loading Code onto an USB Bootloader Enabled Board
Before we look at the “inner workings” of the bootloader we're going to go over the core of this tutorial. When it comes down to it, there are five things you need to program your board. You've got your UberBoard(or other LPC2148 based project with the USB Bootloader installed), a battery or power cable, a USB cable, the code you want to load onto your board and WinARM installed on your computer.
You can download some code for this tutorial here. The downloaded folder contains the code, makefile along with all the peripheral files needed to compile the code. When you've got the folder downloaded, open up the “main.c” file with the Programmers Notepad application. Programmers Notepad is a code editor that is included in WinARM, you can find it in the “pn” folder of the WinARM directory. Once you've got the file opened, click on the “Tools” option in the menu bar. You'll notice there are six different “Make” tools available. The only tool we are concerned with right now is “[WinARM_G] Make All” which should be at the top of the list. Click this tool to compile the code for the UberBoard. The code should compile without any errors, provided that you have not moved any files out of the folder you downloaded.
Now that your code is compiled, open the folder you downloaded again. Whoa! There are a bunch more files in there now! These files are all created in the compilation process; however the only one that we care about is the file name FW.SFE. This file contains the “machine code” (in binary format) for your program that needs to get loaded onto your board. Ready for the magic? Plug in the power cable to your UberBoard, but make sure the power switch is in the OFF position; now plug in the USB cable to your computer and to the UberBoard. Once the USB cable is plugged in, turn the power switch of the UberBoard to the 'On' position. Once you've provided power to the UberBoard, a Removable Disk Drive will be available. This drive represents the memory space on the SD card residing on the UberBoard. Copy and paste the FW.SFE file into this drive. Once the file has been copied to this new location unplug the USB cable from the UberBoard. The board will automatically reset, and your new code will be running. If you used the sample code included with this tutorial, you should see the LED cycling through all three colors.
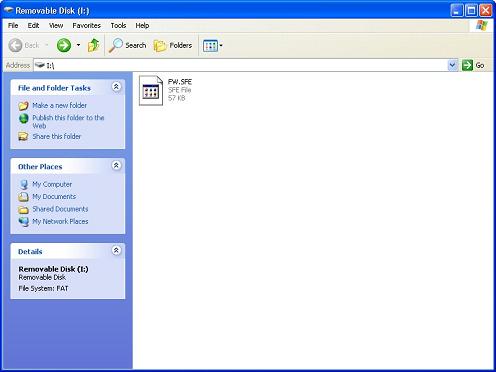
Drag and Drop the FW.SFE File onto the Removable Disk Drive
If your not using the UberBoard for this tutorial than you'll have to change the code in the “main.c” file a little bit for it to work on your project. The cool thing, though, is that as long as you write your code in the “main.c” file, the compilation and programming steps will be exactly the same. You can erase all of the code in the file, and replace it with your own code if you'd like. Then simply press the Make All button in the tools menu, and then copy the new FW.SFE file onto the SD card. You're good to go!
The rest of this tutorial is for those interested in the specifics regarding how to compile code for the bootloader. I'll go over the code in the main.c file, and detail what exactly is going on in the makefile that allows us to create the FW.SFE file for using the USB Bootloader. If all you want to do is write code for your USB Bootloader enabled board, and you don't really care about what's going on in the background, than you can stop reading now. You'll probably get bored with the rest of the material. However if your curious about how we can get this code to load at run-time, and you want to know more about what a makefile is and how the compiler works, than keep reading. You might find a few things that interest you.
Writing Code with the LPC2148 USB Bootloader
Let's start looking at some code (finally). Download the ARM Bootloader Tutorial Code folder here. This folder and code is not needed for normal bootloading. It's only here so that you can learn from and compile your own bootloader. You can put this folder anywhere on your computer. Once you've got the folder downloaded and unzipped, open up the file named “main.c” in Programmers Notepad (Programmers Notepad comes with the WinARM download, and is a good code editor). It's a pretty short program, in fact all we are going to do is blink the LED that is located on the UberBoard.
At the top of the file you'll notice that there is an external file included in the main file. “LPC214x.h” is called a header file, and it contains information pertaining to the LPC2148 ARM microprocessor (this is the microprocessor used on the UberBoard). You do not have to use this file to write code for the bootloader, nor do you have to use it when writing code for the LPC2148. It just makes life much, much easier. I've included the file for this program so that I can use the IODIR, IOSET and IOCLR functions that are inherent to the LPC2148.

Sample Code: Include files and macro definitions
The rest of the code is pretty straightforward, so I'll just quickly go over it. Right after the “include” section, we define a couple of pin locations: the Red, Green and Blue LEDs are located on pins P0.18, P0.19 and P0.20 respectively. We do this so that the code can be more readable; later on you'll see the code reference RED_LED; and whenever you see this you know that I am changing the state of the pin that is connected to the Red LED.
After defining the pins we declare the function prototypes. A prototype tells the compiler that we are going to be using a function in the code, and that the compiler needs to be ready when it sees a function with the given name. In this case we are declaring a function named “delay_ms.” Since the function isn't going to send any information back to us it is called a “void” function. When we use the “delay_ms” function though, we are going to want to tell the function how many milliseconds we want to delay. Since we want to give the function some information, we will send an input to the function. So the prototype for the delay_ms function will read: void delay_ms(int count); count will be the input and it will specify how many milliseconds we want to delay.
Now that we've declared our functions we can start writing the main code; the first thing to do is initialize the pins. All we need to do here is set the Red, Green and Blue LED pins to outputs. By looking at the schematic for the UberBoard, we can see that the pins used for the LED are on port 0, and they are on pins 18, 19 and 20. Once we've initialized the pins, we're set! We just run an endless loop, and turn the LED's on one at a time for 333 ms. That's the whole program. Let's get this code compiled.
One important thing to note about this code is that there were absolutely no exceptions we needed to make for the code to work with the bootloader!
Creating the Makefile for Code Using the LPC2148 USB Bootloader
We've got some code written; now how do we get the ARM to use this code? Unfortunately a microprocessor can't just take the code you've written in your text editor and run it; the ARM doesn't understand code until it is compiled into machine code. To do this we need to run a compiler on our code; the job of the compiler is to translate what we've written in 'C' code into machine code. However, when we compile code there are many different options that can be specified to compile code different ways. This is why we use a Makefile to tell the compiler how it should translate our code.
One nice thing about Makefiles is that once you have one that works, you can use it for all of your projects with very few changes. Plus, Makefiles are easy to come by. There are a handful of samples that come with WinARM, or you can just do an on-line search and find even more. The only thing you need to make sure of is that the makefile was written for the compiler you are using, and that it specifies the ARM microprocessor you are using. Luckily for you, if you use WinARM, the LPC2148, and the Makefile included with this tutorial then you are good to go. However, if you do not want to use the LPC2148 but you like the idea of a bootloader, one could easily modify this code and makefile to make it work for another microprocessor. We like the LPC2148 because of it's reasonable price, massive user community, and ease of use.
Once you have a Makefile that will use the processor you are using along with your compiler, there are still several options we have to specify to make the compiler create the files we need to use the USB LPC2148 bootloader. Open the Makefile with Programmers Notepad. Check to see if the Makefile is set for your ARM microprocessor; a variable named “SUBMDL” is on line #7; this variable should be set to “LPC2138.” I know, I know: we're using the LPC2148. Just leave it as 2138; the code will be compiled the same way for both processors. Next we need to tell the compiler the name of our top level code file. On line #27 in the Makefile you'll see a variable named TARGET. By default this variable will be assigned “main.” This will work properly as long as your top level code file is named “main.” If you've decided to change the name of your main C file, you also need to change the “TARGET” variable.
Next we need to tell the compiler which files need to be compiled. The “SRC” variable is located on line #31; you'll see that by default this will be assigned to “$(TARGET).c.” The SRC variable contains the list of files the compiler will translate. Using the $(...) will tell the compiler to use the variable in the parenthesis; so this assignment is equivalent of saying “SRC = main.c.” On the very next line you see the assignment “SRC += syscalls.c.” The command “SRC+=” adds the file “syscalls.c” to the list of files to be compiled. This file must be added to SRC for proper compilation. Syscalls.c is a collection of functions used to manage different aspects of the microcontroller during run-time.If it's not included, the program will not successfully compile.
You also need to tell the compiler what to use for startup code. Basically this code sets up the microprocessor to understand the translated C code from the compiler. This assignment is done on line #57 with the assignment “ASCRARM = Startup.S.” You'll need to have the Startup.S file located in the same folder as your Makefile and main code for this assignment to work.
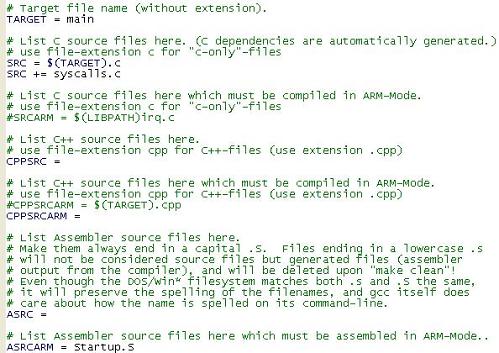
Sample Code: Makefile
Up to this point, none of the options we've specified are solely related to the LPC2148 USB bootloader. We would have had to make these specifications regardless of if we were using the bootloader or not. Now we'll discuss the changes that will make the compiler create the files needed by the bootloader. The first thing we need to do is change the linker file. The linker will take all of the compiled files and create one single program, but it will also dictate where in the memory of the ARM the program will be placed. This is very important for the LPC2148 USB bootloader - the compiler needs to know to run the code in the memory space outside of the bootloader space. If the compiler is not made aware of this code 'bump' to the new location then nothing will work. In the makefile we assign the linker on line #195 with the statement “LDFLAGS += -Tmain_memory_block.ld.” The file “main_memory_block.ld” is the linker file, in this file we've directed the linker to place the code at the location in RAM where the bootloader will know to look for it. The linker file must also be located in the same directory as the Makefile and the main code.
Note: This linker file assumes that a bootloader will be located in the upper memory block. If you are compiling code but you do NOT want to use the USB ARM bootloader, then definitely don't use this special linker file. If you're just compiling ARM code without the use of a bootloader then you'll want to use the default linker file that comes with WinARM.
Remember back when we were talking about the benefits of a bootloader and I talked about how it makes it easy to program because all you have to do is drag and drop a file onto the SD card and the LPC2148 will automatically re-program itself? When you turn your UberBoard on, the bootloader will start by looking for a file named FW.SFE; we need to tell the compiler to create this file. On line #286 of the makefile we tell the compiler what files need to be created. For our makefile we tell the compiler :build: elf lss sym hex FW.SFE. Now we need to tell the compiler what FW.SFE should look like. So on line #368-371 we tell the compiler how to build the file.
Alright, we're finally done with the Makefile; and if you endured all that I congratulate you! Remember, now that you've done all this legwork (or downloaded all this legwork, I should say), this makefile will work for all of your LPC2148 based projects. You may have to change the name of your target file, or add some more source files as your programs get bigger; but besides that this Makefile is ready for some copy and paste action. Just remember that whenever you use the makefile, the Startup.S , main_memory_block.ld and syscall.c files need to be placed in the same directory.
If you're still interested in how the bootloader is accepting the code and programming it onto the board, then click on! In part three of the tutorial we will dive into the code that makes up the bootloader and see how it works. We'll also look into how the hardware has to be configured in order to use the USB functions with the LPC2148, as well as the SPI setup for the SD card.
Parts one and two of this tutorial covered quite a range of topics, from what a bootloader is and why one would use a bootloader, to how to write, compile and load code for the SparkFun LPC2148 USB Bootloader. In the final section of this tutorial we are going to discuss how the code for the bootloader operates. We'll also discuss the hardware requirements that need to be met if you want to include the USB Bootloader on your own LPC2148 based project. Basically, if you're not using one of the ARM based SparkFun products that come with the USB Bootloader installed but you still want to take advantage of the bootloader, then this tutorial will show you how to get up and running. This tutorial assumes that you are somewhat proficient with code and makefiles, and that you know how to load code onto your LPC2148 based project without using a normal programmer.
Required Stuff:
You can of course choose to just read along with this tutorial to learn about how the bootloader is working, however if you want to play along too, then this is a list of stuff you'll need.
Software:
- WinARM (See part 1 of this tutorial to learn how to get/install this)
Hardware:
- ARM Microprocessor with access to USB and SPI pins (programming pins must also be available)
Tools:
- ARM Programmer (JTAG or serial bootloader)
Files:
- This folder contains a whole bunch of source code, including two subdirectories: LCPUSB and System, along with the startup assembly code (crt.S) and the linker file (lpc2138.cmd).
Hardware Requirements:
The whole point of the USB Bootloader is to give the programmer the ability to drag and drop a firmware file onto the removable flash drive using a USB cable. To do this, you need the essential pieces of hardware on your board: a USB connector and the support hardware for it, along with an SD card to provide ample storage space for the firmware file before it's programmed onto the board.
Luckily for us, the LPC2148 comes with support for USB. By scouring the web for examples it's not too hard to come by some trustworthy hardware examples for hooking up USB to your LPC2148. The best source is probably NXP itself, the manufacture of the ARM microprocessor. Let's look at one of the SparkFun schematics to see what we need to do for the USB hardware.
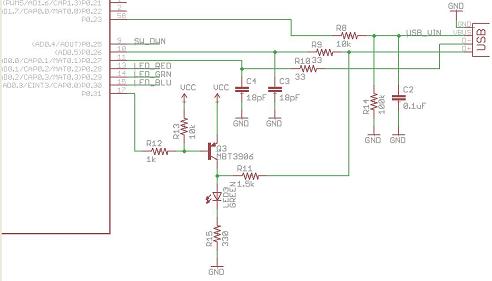
USB Interface Hardware for the LPC2148
As you can see, there are two signals required for USB communication: D- and D+. Vbus is actually just the voltage from the USB bus (nominally 5VDC). By connecting a USB connector to the LPC2148 in this manner, you will be able to use a standard USB driver to communicate with the computer (Not true) (Well kind of maybe). On pin 17 (or P0.31) there is a pull-up circuit. This is essential because the ARM will tell the connecting device of it's presence by turning this line high. If you do not connect the circuit so that D- is pulled high, the connecting device will not recognize the LPC2148 as a USB device.
It is important to use this exact pin-out for the USB and SD connections because the source code for the bootloader assumes the pins have been assigned to these specific functions. If you wish to connect the hardware differently, there are several code changes you will have to make to a few files. It can be done, but I don't recommend it.
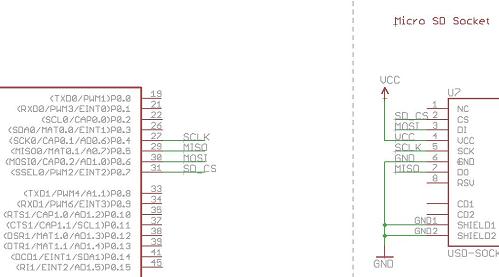
MicroSD Interace Hardware for the LPC2148
The second requirement for the hardware is to have an SD card interface. This ends up being pretty simple because the communication protocol used for SD cards is just SPI. SparkFun uses the SPI0 interface on the ARM (there are two SPI buses on the LPC2148). Again, you can certainly use the alternate SPI bus for communication with the SD card, but be prepared to have to make several code changes to the supplied source code as we wrote it to use the SPI0 bus. Here is a typical schematic using the SPI0 bus for communication with the SD card.
Note: SD and micro-SD have the same type of interface (SPI). We use the terms SD and microSD interchangeably. The socket is smaller for micro SD with slightly different pin locations depending on your socket manufacturer.
The Magic: Examining the USB Bootloader Source Code
To be fair (and honest and legal for that matter...) I have to give credit where it is due. The biggest portion of the USB Bootloader resides both in the USB driver firmware as well as the FAT16 library. Both of these portions were simply downloaded from the web, and are used under the terms of the GNU Lesser Public License. The USB device driver, specifically, was written by Bertrik Sikken.
Now let's talk about why their code was so useful to us in creating the USB bootloader. Download the LPC2148 USB Bootloader Source Code folder. Once you've downloaded the folder, open up the file “main.c.” This file is the bootloader; this is the code that will run on your board every time the power is supplied. At the highest level, the code is only doing three functions: first it checks to see if a USB cable is plugged in; if a cable is plugged in, then it checks to see if there is a file named “FW.SFE” on the removable storage device (SD card), if the file exists, then the bootloader reads the file and programs the contents into the memory of the ARM.
Let's see what libraries are included in the bootloader. At the top we have “LPC214x.h,” that's a given; we need the register names and pin assignments and so on. “Serial.h” and “rprintf.h” are for writing messages out through the serial port, mainly these are used for debugging and user notification. Next we have “firmware.h” and “system.h.” “System.h” contains functions used for initializing and resetting the ARM. “Firmware.h” is one of the key components of the bootloader. This library contains functions that will copy the code from the “FW.SFE” file from the SD card into the program memory of the ARM, as well as issue the command to exit the bootloader and run the code.
The next two libraries that are included are “rootdir.h” and “sd_raw.h,” both of these files are used for manipulating the FAT16 memory located on the SD card. Finally the library named “main_msc.h” is included; this file is the top level file for the USB device driver.
You'll notice that there are many other files in the LPCUSB and SYSTEM directories that are referenced by the libraries. You are free to peruse/alter these libraries. Be careful as each of these files are needed in order for the Bootloader to operate properly. We won't go into the function of each of these files in this tutorial though.
As we discussed in the first two sections of the tutorial, when the bootloader starts up it searches for a file named “FW.SFE.” After the libraries are included in “main.c” we define the firmware file with this name.
Now that we've finished including libraries and defining the firmware file, we get to the main code. The first function, boot_up(), just initializes the LPC2148 pins and sets up the UART (for debugging). The next thing we do is look to see if there is a high voltage on pin 23. Pin 23, if you remember, is hooked up to the USB signal Vbus. If the LPC2148 detects a voltage at this pin, then it knows that the USB cable is plugged in. If this is the case, then the function main_msc() is run. Main_msc() is the USB device driver. We are not going to go into the specifics of how this driver works, the important thing to know is that while the cable is plugged in, the USB communication will be kept with the connecting device and a removable drive will be present. Once the USB cable is unplugged, the main_msc() function exits and the rest of the bootloader code resumes.
After checking for the USB cable, the firmware initializes the SD card. Once the card is initialized, the root directory of the FAT16 structure is opened. With the root open, the firmware searches for a file named “FW.SFE.” If this firmware file is found, then the load_fw() function is called. This file opens up the binary firmware file and copies it's contents into Flash memory. Once the file has been copied into Flash, the bootloader is done. The last thing it does is call the function “call_fw.” This function simply sets the program counter to the address of the main code that was just loaded. At this point, the code will run as if the bootloader was never even present.
Compiling and Loading the Bootloader
If you read part two of this tutorial you may recall that we had to use a special linker file in order to compile the code if we wanted load the code through the bootloader. The reason for this is that a normal linker file will create the code at the beginning of the program memory (address 0x00), however the actual bootloader is going to take up some of the space on the ARM. In order for the bootloader to work properly, we can't overwrite the bootloader code with our new code so we placed the new code in a different section of memory.
Now that we are trying to write the actual bootloader, though, we don't have to make this special consideration. We will return to using a normal linker file, in this case the name of the linker is “LPC2138.cmd.” This file comes with the downloaded folder “ARM Bootloader Source Code,” and resides in the main folder. We will also use a different startup assembly file, this one is named crt.S. The included makefile is already configured to use these two files.
To get the bootloader onto your ARM project, open the “main.c” file from the LPC2148 USB Bootloader Source Code folder and compile. Once the code is compiled just load main.hex onto your board and you're finished. You can power up the board, with the USB cable plugged in, and see the removable disk drive. If you have problems, use a terminal to view the debug information coming out of the UART. The most typical errors occur if you have the SD card plugged into the wrong SPI bus, or if you haven't placed the USB pins properly.
That's It Folks!
Thanks for reading our tutorial on the USB ARM Bootloader. I hope I've answered any questions you may have had about what a bootloader is, why you would use it and how we here at SparkFun use the Bootloader. By all means, if you still have some unanswered questions about using the bootloader, or getting it set up on your own project, shoot us an e-mail. We'll be happy to help you however we can.
July 30th, 2008
Is there any way we can get the image links fixed?
All the comments are pretty old, but I hope someone sees it and is able to help. I am trying to compile the code in main.c but I keep getting this error: main.c:51: fatal error: opening dependency file .dep/main.o.d: No such file or directory. Can someone help me with this? Thank you.
hello, I compiled and programed the bootloader code in my lpc2148, the SD works good, but the usb only is detected by pc and show it but it can't open and I can't drag my code for programing. where is my error? my clock is 10Mhz and i configured el PLLCFG=0x25 for 60MHz.
I have a project using the Logomatic, a Li-Po battery and the Analog Devices ADXL 16227 (http://www.analog.com/en/mems-sensors/inertial-sensors/adis16227/products/product.html) to measure and record Vibration spectra.
In the process, I will be using the RTC to log the GMT when the accelerometer starts. In order to do this, I need the proper UTC from the PC OS to initialize the RTC. IF I understand the bootloader properly, the 'main_msc' command initializes the USB for mass storage control by placing the USB into slave mode on the LPC 2148. Is this correct and is it possible to insert another command to initialize the USB as a device first, then read UTC data transferred from the Host PC before involking 'main_msc"?
Or would I be better off not using the bulk transfer of 'main_msc' and writing code to use the DMA to transfer to the SD Card?
I hope you guys don't mind my trivial questions...
I can't use the bootloader!!!
I'm using the Logomatic V2, i put inside a 256 MB micro SD with FAT 16 format file. I power up the Logomatic V2 with a LIPO battery and i wait for a minute, then i power off and conect a USB cable, then i can access to the Logomatic drive but i can't see the LOGCON.TXT and LOG0.TXT files inside the Logomatic drive.
Please anyone can help me to give access to those files??
Thank you from Chile.
I have bought an LPC2148 development board from a local company which also has a SD card slot and the uC has a bootloader that burns the micro through UART0. Having read the above article, my hands are itching to try to burn the code in the uC using USB by overwriting the existing bootloader.
Now my question is, is there any way I can backup and later restore the original bootloader if things get messed up in trying to overwrite it?
The full error is:
Found the problem. I had some Symbian software installed and in the Path, these folders were being searched first. I changed the order that the WinARM folder was, in the path, so that it occured at the start and moved the Symbian stuff off my machine.
Hi There
I've downloaded and installed the WinARM package onto my C Drive, made the necessary changes in the path of the environment variable.
My operating system is XP, however when I "make all" I get the following error
the error is:
Had similar problems to a number of others with logomatic not reading the SF.SFE file.
It turned out the problem was the SD card format.
Reformatting the card using the formatter at http://www.sdcard.org/consumers/formatter/
and selecting "resize card" which sets the format size to an exact clyinder boundary fixed the problem.
Hi I have installed the downloaded WINARM package in my C Drive
and also made the neccessary changes in the path of the environment variable.
Actually i am using windows 7and I am getting following error during the cmpilation of your source code.
the error is:
" the procedur entry point cygwin_create_path could not be located in the dynamic link library cygwin1.dll"
Actually before that I was getting the error related to the " cygintl-3.dll" , but I downloaded this dll and paste it in the windows\system32 and also in the bin directory of the cygwin folder in the C drive .
so please tell me the reason for thaat and how should I corect it.
Please help
thank you
cena 007
So I have one (two actually) of your dataloggerv2 boards and somehow messed up the bootloader when programming using the FW.SFE file on the SD card. (I.e. the device still shows up as a MSD but does not actually self program after disconnecting and power-cycling) and when using the serial programmer I am able to program the bootloader source onto the board again but it still has that same problem, do you guys (anyone, but mainly SF) have any idea why this might be the case and any ways to fix it?
Actually, nevermind, After much more searching through the forums, I found that it was the formatting of the card. I'm still puzzling out exactly how to format the card (I just found another uSD laying around and it worked, but when i format the older cards using FAT and between default,16 KB,32 KB,and 64 KB allocation units they do not work).
This bootloader rocks! Thanks SparkFun!
If anyone's interested in using the bootloader on the imagecraft C compiler for the ARM, I posted a ported version on my blog: blazzing.wordpress.com
Anyone knows a way to compile the MP3 source code in Mac OS X using the arm toolchain. The source code has references to -D__WinARM__. After compiling and installing the new firmware, nothing happens in the LCD but you can hear the music. Think that's because the compiling flags are different if you don't use winarm.
I am trying to work through using the USB bootloader with the logomatic V2. Windows will not recognise it as a USB device. The mini SD has been formatted and the config files are present. I can't find any mention of USB drivers in the literature. Please help.
I've tried this led-on application and it works great. But I've tried a more complicated one, with interrupts enabled. And those interrupts are not serviced. I guess that the IVT (interrupt table) is not redirected to the position 0x10000, where the application code starts.
The question is...how can I use interrupts in the application?
Download the firmware for the KinetaMap. In the bootup() function of the main code there are a couple of interrupts initialized. This should give you an idea of how to assign the interrupt locations.
I checked up the KinetaMap and I could check it was not an interrupt problem. I'm using the EFSL library and when I run my project from address 0 (without this bootloader), the filesystem works. When using the bootloader and the application starts at address 10000, when we run the initialization of the sd card (send 100 times a reset command),there is no response from the card.I guess that it has to be related to that the filesystem initialization has already been done by the booloader.