In my previous Enginursday post, I was just getting my feet wet using the Raspberry Pi as a time-lapse camera for my aquaponics system. After trying out different settings, different enclosures, and using both the standard Raspberry Pi Camera Module with the Pi NoIR Camera Module, I'm here to report my findings. In this post, I'll talk about the differences and similarities between the two camera modules, go over the different settings I've used for each, show you how to add infrared light to your Pi NoIR setup, and discuss some of the enclosure options available for the camera modules.
Night Vision
About the time I wrote the previous post, the Pi NoIR camera had just been released. I was eager to get my hands on one and see how well it performed in the dark. If you recall from my Automated Terrarium project, I am always interested in observing Nature and all her fascinating critters, day or night. The first thing I did was replace the camera module in my aquaponics time-lapse with the NoIR. As soon as I did, it occurred to me that there were no IR LEDs anywhere on the module. Foiled again! Luckily, I still had the IP camera I used in the terrarium, and it does have IR LEDs. While the setup was a bit elaborate (one camera to provide light for another), it worked for the time being. However, I knew I had to add some IR LEDs to the Pi. We'll get to that in a minute.
With my double camera rig setup, it was time to experiment with some settings. There was a lot of great advice offered in the comments on the previous post. The first issue I wanted to address was the black lines that appeared horizontally across my photos. I also wanted to see how well the NoIR worked during the day since it lacks the IR filter present in the standard Pi Camera. The Pi NoIR user guide had all the info I needed. It should be noted that I am in no way a photographer, nor do I consider myself one. That said, it made sense that the exposure and auto white balance settings would make the biggest difference. For night photos, I use -ex night and -awb off. Pretty easy. For the daytime shots, I tried a variety of awb settings and just kept the ex to auto. I went back and forth between the -awb sun and -awb fluorescent settings. Unfortunately, my system gets both natural light from the nearby window and artificial light from the fluorescent lights hanging above, so there was no one setting that worked consistently over the course of the day. As you'll see in the video below, there is still room for improvement, but the results were a lot cleaner than my first attempt.
ReplaceMeOpen
ReplaceMeClose
I included the footage from the first time-lapse for a sense of growth over time. Instead of iMovie, I used Time Lapse Assembler, which is very simple to use and free. I also increased the framerate to 60 fps to make it more watchable. The new footage begins around the 25 second mark. Then, at about 43 seconds, you can see the quality of the daytime photos decrease slightly and the introduction of the nighttime shots begins. All-in-all, the NoIR still takes good daytime photos, but the original camera module seems to be superior in that realm.
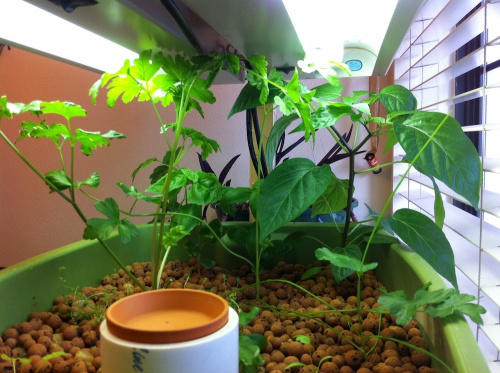
And, just for kicks, here is a more recent photo for comparison, since the last shot in the video was on January 10, 2014.
The plants as of February 11, 2014.
IR LED Ring
The next task was to add some IR LEDs. Using a slew of SparkFun parts, I whipped up a ring of IR LEDs to mount around the camera. All the parts I used, minus some hookup wire and resistors, can be found in this wishlist:
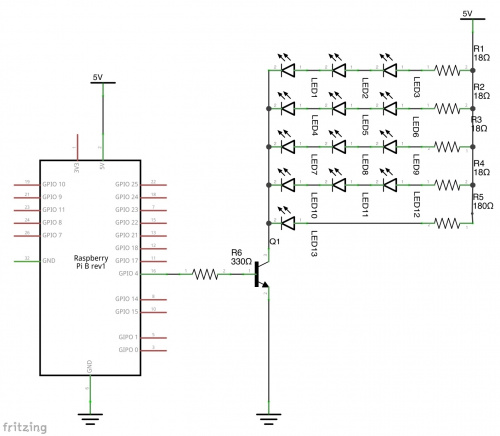
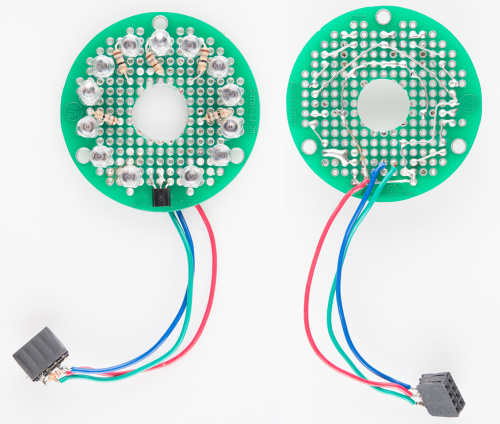
I started by finding the largest drill bit I could and drilling a hole in the center of the round protoboard. From there, I started adding LEDs in a circular fashion. Once all the LEDs were in place, I figured out my wiring scheme. I decided to go with four sets of three LEDs wired in series, and one lone LED, all wired in parallel. Last, I added an NPN transistor to allow the LEDs to pull more current from the power supply than they would be able to from any of the Raspberry Pi's GPIO pins. Here is a schematic and a wiring diagram to follow along with at home.
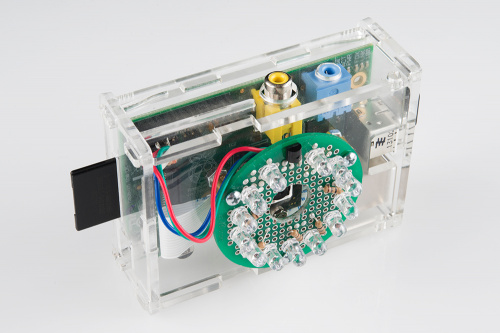
Here is the finished product. It's not much to look at, but it gets the job done.
Next, I needed to modify the python script to turn on the LED ring during night time photos. Using the information found in this tutorial, I added GPIO.setmode(GPIO.BOARD) and GPIO.setup(7, GPIO.OUT) right after all the import declarations. Then, in my else statement that runs at night, when the grow lights aren't on, I added GPIO.output(7,True) before the camera is activated. The lights are then turned off after the photo has been taken using GPIO.output(7,False).
The software was working great, but I still had hardware that was flopping about. The masking tape had served its purpose, but I needed something a little more refined. I needed an enclosure for both the Pi and the camera.
Finding the Right Enclosure
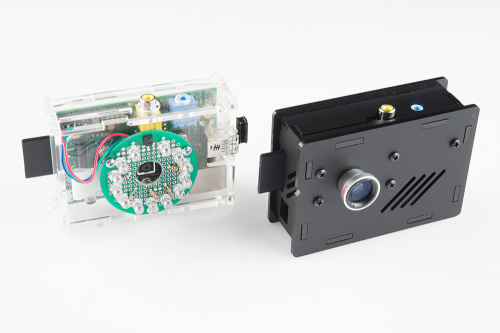
I had seen enclosures for just the camera modules, such as this one. However, I wanted one that would enclose the entire raspberry pi as well as the camera. After searching the Interwebs, I settled on two choices. The first was a remix of a remix of the Adafruit Pi Box, which I will refer to simply as OpenBox. The second enclosure I chose was the $18.00 Nwazet Pi Camera Box.
OpenBox
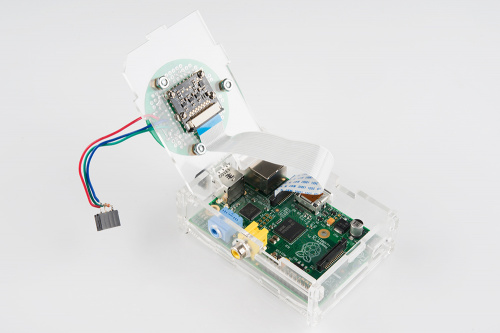
The fist big plus for the open box is that it's open source. Anything that I can download and make myself always gets points in my book. The second big plus is that this enclosure doesn't require any additional hardware to assemble, except for mounting the camera module. It snaps together and is a pretty easy build. The only trouble a ran into was finding hardware small enough to mount the camera. The hole sizes are M2, which is pretty tiny. I didn't have any M2 nuts, but, luckily, these 2-65 nuts and screws were a close equivalent. I also needed to add some washers to allow the camera to sit parallel with the enclosure lid. After building one of these, I decided to make a few modifications of my own to mount the LED ring to this enclosure. On the lid, I moved the camera mount to the middle and added three mounting holes around it for the round protoboard. You can use the hardware from the wishlist above to mount the ring to the enclosure. The Illustrator file for the modified lid can be downloaded here.
The results...
And, the inside...
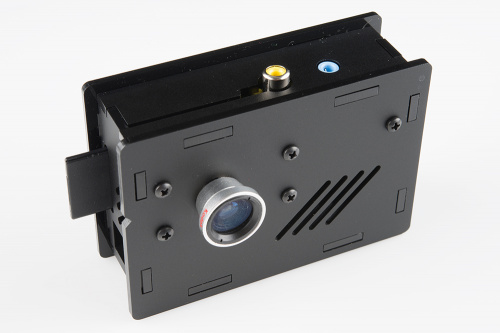
Nwazet Pi Camera Box
I was skeptical of spending $18 on something that I had just created for the cost of the acrylic I used. However, once I got my hands on it, I was impressed. Not only is the enclosure well designed, but it includes all the hardware you need to assemble it. And, the means in which the camera is mounted to the lid allow for the same hardware to be used for the entire enclosure. There was also a circle etched around the camera view port allowing for external magnetic lenses to be attached. I had a lens from my Kodak Zi8 that wasn't getting much use, so I adhered it to the case. You can get the enclosure, a lens, and a mount all as one kit from the same site as well.
Conclusion
All things considered, I think both enclosures have something to offer. If you have access to a laser cutter or 3D printer, it's worth it to make your own enclosure. They're customizable, tested, and usually free (minus the cost of materials and time). My one suggestion for using the OpenBox with the Pi NoIR is to not use clear acrylic. The status LEDs on the Pi, illuminate the subject(s) too much in complete darkness. Also be careful when assembling it, I broke a tab or two during my first assembly. For those who don't have access to a laser or printer, the $18 was definitely worth the convenience and quality associated with the Nwazet box. All you need is a tiny screwdriver to assemble it, and you're up and running in seconds.
One last tip, don't forget to change the rotation using the -rot <value> command if your camera is oriented on its side or upside down.
Going Further
What's next? I hope to add one of these enclosures to a servo pan/tilt rig, so that I can time-lapse both of my grow beds (yes, I've already built a second aquaponics system). It would also be cool to add a luminosity sensor to be able to tell if the photo is going to be lit by mostly fluorescent light or mostly sunlight and then take a picture with the appropriate settings. Or, if you want to take this show on the road, you could use one of these battery packs to power the Pi anywhere there's something worth time-lapsing. Until next time....
P.S. if you're in the Denver/Boulder area and want to get more hands-on with aquaponics, check out our Meetup group, Boulder Aquaponics Enthusiasts. Thanks for reading!



Just wondering..... how do you change your name and picture. <<<
You can use a Gravatar account and link it to your SparkFun account. At least that's how I do it. Go to Your Account -> Manage Account, then click on the Profile tab. There will be a check box to associate Gravatar with your account.
Those don't look like the correct plants to be growing in Colorado
That's right! Around here, we grow Rocky Mountain Columbines.
I would LOVE to see an outside NoIR photo taken, i'm on the edge of buying one of these.
I'll see what I can do.
Thanks
It's called the NoIR because there is no IR filter. Although, it applies to the LEDs just as well.
It stands for no infrared filter.