I've been spending most of my time these days working with two relatively power-hungry WiFi/MCU SoC's: the ESP8266 and the Photon. In different ways each of those projects has forced me to focus on battery-powered operation -- designing the ESP8266 Thing with its integrated LiPo charger, and working on the Photon Battery Shield. That means, to really vet them out and see how they'd work (and last) in projects, I had to learn how to put them to sleep. In my Enginursday blog post I wanted to share some of my deep sleep adventures.
(This is mostly pertaining to my recent project and work experience; there are obviously lots of other options out there for low-power projects. The MSP430 products are top-of-the-line in ultra low-power operation. The ATtiny is an expert hibernator, as demonstrated in products like the Wake on Shake. And even the good ol' ATmega328 can pull off low-power operation. The ESP8266 and Particle Photon, of course, also give you WiFi connectivity, which takes the low-power capability to a whole new level.)
Sleeping the ESP8266
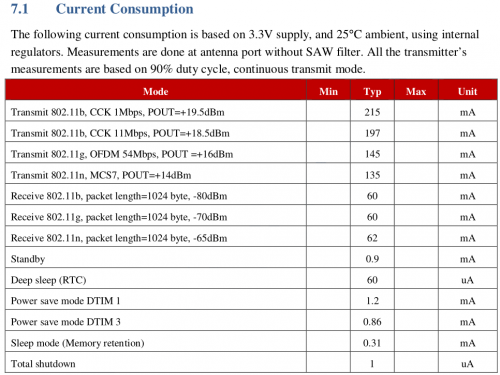
The ESP8266 has become one of the most popular WiFi-enabled microcontrollers out there -- mostly because of its pricetag. Less than $7 for a programmable WiFi-capable microcontroller?! Craziness. Unfortunately, the cost of the chip can, at times, be mirrored in the documentation made available. There's not a ton of information to be gleaned from the ESP8266's technical documents about its sleep mode(s), but there is this:
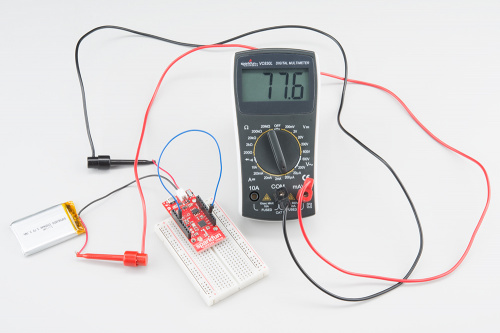
In deep sleep mode, the ESP8266 maintains its RTC but shuts everything else off to hit about 60 µA. Respectable, if not MSP430 levels. It can pull upwards of 200mA while it's transmitting, and I usually measure an average of about 75mA in normal operation. In deep-sleep mode I can get the ESP8266 Thing down to about 77µA.
There are a few modifications that need to be made -- both in hardware and software -- to get the Thing's current consumption that low. On the firmware end, the Espressif SDK has made a system_deep_sleep([uint32_t time_in_us]) function available, which puts the ESP8266 to sleep for a specified number of microseconds. When it wakes up, it begins running the user program from the very beginning. If you're using the ESP8266 Arduino IDE, they've wrapped that function and another into a very nice ESP.deepSleep([microseconds], [mode]) function. Here's a quick example Arduino sketch for the ESP8266 that blinks the on-board LED 10 times, sleeps for 60 seconds, then repeats. A silly sketch, but it's easily expandable.
#include <Ticker.h> // Ticker can periodically call a function
Ticker blinker; // Ticker object called blinker.

int ledPin = 5; // LED is attached to ESP8266 pin 5.
uint8_t ledStatus = 0; // Flag to keep track of LED on/off status
int counter = 0; // Count how many times we've blinked

void setup()
{
  pinMode(ledPin, OUTPUT); // Set LED pin (5) as an output
  blinker.attach(0.25, blink); // Ticker on blink function, call every 250ms
}

void loop()
{

}

void blink()
{
  if (ledStatus)
    digitalWrite(ledPin, HIGH);
  else
    digitalWrite(ledPin, LOW);
  ledStatus = (ledStatus + 1) % 2; // Flip ledStatus

  if (counter++ > 20) // If we've blinked 20 times
    ESP.deepSleep(60000000, WAKE_RF_DEFAULT); // Sleep for 60 seconds
}
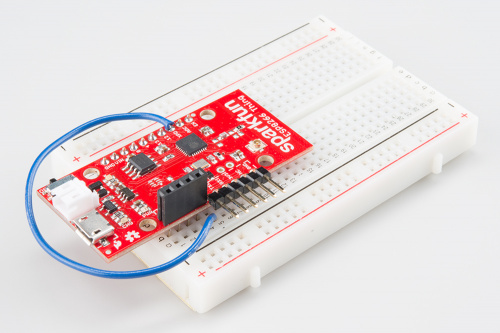
On the hardware end of things, there are couple modifications to be made: one required, one suggested. To wake itself up, the ESP8266 uses the XPD pin to trigger its reset line, so those two pins need to be connected together. If you've got the Thing, wiring up XPD to DTR works.
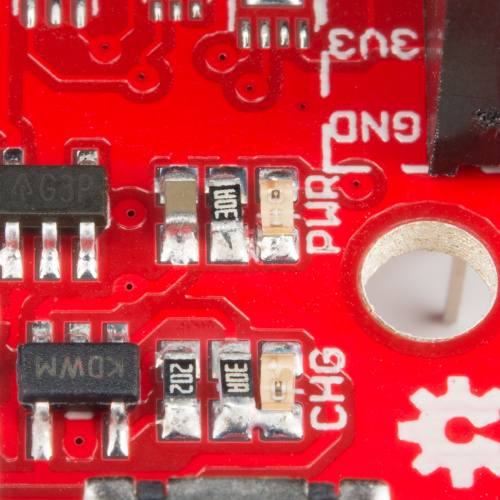
Then there's the issue of the power LED indicator: The LED serves an important purpose in verifying that the chip is receiving power, but it also pulls upwards of 8mA -- 100 times more than the chip itself pulls while it's sleeping. If battery power is really critical to your project, as crazy as it sounds, you may want to either remove that LED or cut a trace. There's a trace running between the resistor and LED that's pretty easy to hit. It's also relatively easy to short back up with solder, should the need arise.
Cut the trace between the limiting resistor ("30A") and the "PWR" LED to save lots of power.
The on/off status may be tough to identify, but you can at least rest easy knowing your ESP8266 is pulling about 80µA while it soundly sleeps.
Sleeping the Core/Photon
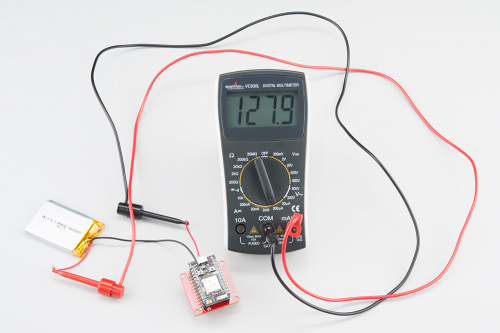
Particle's Core, and more recently, the Photon, exist in the same realm of inexpensive, awesome WiFi-enabled microcontrollers. The WiFi/MCU combos are a joy to work with, but they can be relatively power hungry. Fortunately, they both have very well executed sleep modes, which drop the current consumption down to the low µA range. The Core is said to pull around 3.2 µA in deep sleep, and, according to its datasheet, the Photon pulls around 160-187 µA. I actually measured about 128 µA while my Photon was sleeping.
A sleeping Photon paired with our Photon Battery Shield.
Unlike the ESP8266, the Photon and Core don't require any hardware changes to enable deep sleeping. All you really have to do is make some calls to the System.sleep(SLEEP_MODE_DEEP, [long seconds]) function. Here's more example code!
int ledPin = 7; // Photon's lone, blue LED is on pin 7

void setup()
{
    pinMode(ledPin, OUTPUT);
    blink(10, 250); // Blink 10 times
    System.sleep(SLEEP_MODE_DEEP, 30);
}

void loop()
{

}

void blink(unsigned int count, unsigned long period)
{
    for (unsigned int i = 0; i < count; i++)
    {
        digitalWrite(ledPin, HIGH);
        delay(period / 2);
        digitalWrite(ledPin, LOW);
        delay(period / 2);
    }
}
The Photon's sleep functionality is great, but it can be a little finicky if you're trying to do an OTA update while it's sleeping. You've either got to catch it while it's awake, or manually reset it -- which means being close enough to press a button. Sounds like an issue they're tracking.
I've been having a great time exploring the sleep modes of the ESP8266 and the Photon. A good sleep mode is a small, but critical piece to any battery-operated project. As I begin work on a solar-powered home weather station, that's quickly become evident. Watching my station wake itself up at 60 seconds on-the-dot, read some sensors, post to data.sparkfun.com, and go back to sleep for another minute is so, so satisfying -- and the steadying state of battery charge is even more so!
Both the Photon and the ESP8266 are awesome, easy-to-develop on, and available at an incredible price point. If you've got any plans for an IoT or other WiFi-based project, I would recommend either as an excellent foundation. Their deep sleep modes should go a long way towards making projects based around them even more powerful.


Thanks for the post. It is really helpful.
Regarding ESP8266 code: I didnt quite understand the purpose of using the attach function and calling it every 250ms and putting the device to deep sleep for 60secs.
My understanding is: On the first iteration, attach function gets called , led blinks for 20 times, then the uC goes to deep sleep for 60 secs. Then wakes up in default mode which means (as per datasheet) it would run the program from void setup() and reach attach function. Then again it will do the blinking and go back to sleep. Now, where is the role of 250ms in the attach function here? What happens to the interrupt which is generated after 250ms, when the device would be sleeping. Will it be considered dont care or will it wake up the device ?
One other point, the deepsleep function automatically wakes up the device after 60s, so why bother giving an interrupt every 250ms? Any particular reason?
Will the power performance in the following code and your code be the same?
Please let me know. Thanks!
Great post, very helpful information. Can you tell us which sleep modes on these boards can still wake from an external interrupt (something like a motion sensor that may see long inactive periods between very short events)? A few tips on the best way to handle this scenario with a WiFi enabled board would be appreciated! Thank you!
Thanks for the post. I find it really informative on deep sleep mode of ESP8266.
I have put this post on ESP8266 Forum with full credits , In the Wiki page -Hope this is OK -email me if not I'm in your buyer database
I put an LED on one of the GPIO pins and code it to flash 4 times on startup or continual on error which is OK unless you are short on pins . Is your code available? Mine is here for ESP8266 ESP12 board to Sparkfun data Thanks Jimbo