My first few blog posts of the new year will focus on the high-tech tools that might assist in keeping some classic New Year's resolutions. If you missed the first one on vaping and smoking cessation please check it out! Also, this article serves as part 2 to my IoT Smart Pantry project from September.
-Nick
Last year I wrote about a project that I was working on for organizing foodstuffs and tracking their nutritional value. That post was mainly about the hardware build so this time around, I want to talk more about the software. You may remember I was planning to use the Nutritionix API to search product UPCs and return their nutrition facts. Let's hack together a little javascript to interact with the Nutritionix service and maybe we can start building a nice display in the process.
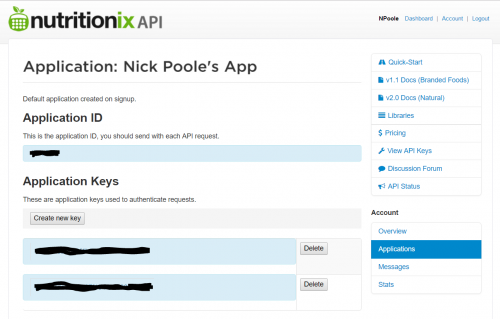
Looking into the Nutritionix docs, I found out that I could sign up for free and request up to 50 UPC searches per day. In order to do that, I had to sign up for an application ID which was pretty simple. After my first sign in, I was presented with this page:
I blacked out my ID stuff so you weasels don't go maxing out my free account
This is all of the info that I need to start poking at the API. According to the UPC Scanning quick-start guide, UPC searches are performed using a GET request formatted as follows:
https://api.nutritionix.com/v1_1/item?upc=[UPC]&appId=[ID]&appKey=[KEY]
And when I do that, I should get a response that looks something like this:
{
   "item_id": "51c3d78797c3e6d8d3b546cf",
   "item_name": "Cola, Cherry",
   "brand_id": "51db3801176fe9790a89ae0b",
   "brand_name": "Coke",
   "item_description": "Cherry",
   "updated_at": "2013-07-09T00:00:46.000Z",
   "nf_ingredient_statement": "Carbonated Water, High Fructose Corn Syrup and/or Sucrose, Caramel Color, Phosphoric Acid, Natural Flavors, Caffeine.",
   "nf_calories": 100,
   "nf_calories_from_fat": 0,
   "nf_total_fat": 0,
   "nf_saturated_fat": null,
   "nf_cholesterol": null,
   "nf_sodium": 25,
   "nf_total_carbohydrate": 28,
   "nf_dietary_fiber": null,
   "nf_sugars": 28,
   "nf_protein": 0,
   "nf_vitamin_a_dv": 0,
   "nf_vitamin_c_dv": 0,
   "nf_calcium_dv": 0,
   "nf_iron_dv": 0,
   "nf_servings_per_container": 6,
   "nf_serving_size_qty": 8,
   "nf_serving_size_unit": "fl oz",
}
So, make a GET request and get a JSON response with all of the product information neatly organized – perfect! This is going to be easy to handle with Javascript! Let's start by putting a few basic inputs on a web page and use them to make the GET request to Nutritionix. Ideally, I'd like to be able to enter the UPC of a product into a text box and view the JSON report that comes back; that means I'll at least need a text input, a button and a text field. The HTML looks something like this:
<input name="upc"/>
<input type="button" name="search" value="Food Me"/><br/>
<textarea name="results" style="width: 222px; height: 350px;"></textarea>
I couldn't help but style things a little bit, but the basics are all there: a few elements with unique names so we can script them, and a clearly labeled button. Now that we have our page built, let's add script to do the work. At the top of my Javascript, I'm going to declare two constants: appKEY and appID. This way I can reference them throughout this post without giving away the actual keys. The next order of business is to actually construct our GET request.
In Javascript, it's best practice to write asynchronous code so that if a function takes longer than expected to execute, it doesn't disrupt the user experience or produce unexpected results. In our case, that means we want our script to send the request and then go on managing other things until the response comes back from Nutritionix. The way we achieve this is by using callbacks. Callbacks, or callback functions, are essentially just a way of telling one function to hand off to another function when the first is finished. You can set a callback in Javascript by passing the name of your callback function as the "callback" parameter of another function. I know it can sound confusing, but have a look at our code below:
function upcGet(upc, callback)
{
        var getURL = "https://api.nutritionix.com/v1_1/item?upc=" + upc + "&appId=" + appID + "&appKey=" + appKEY;

    var xmlHttp = new XMLHttpRequest();
    xmlHttp.onreadystatechange = function() {
        if (xmlHttp.readyState == 4 && xmlHttp.status == 200)
            callback(xmlHttp.responseText);
    }
    xmlHttp.open("GET", getURL, true); // true for asynchronous
    xmlHttp.send(null);
}

function postResults(response)
{
$("[name='results']").html(response);
}
In this case postResult() is our callback function, and all it does is find the element with the name "results" and change the html inside that element to match the variable called "response," which gets passed to it. The function called upcGet() is the function that we expect to take some time. You can see that we're passing two parameters to upcGet(): upc and callback. The parameter named upc is what we'll use to pass in the contents of the upc entry field; the "callback" parameter will be used to pass the callback function. In this context, whenever we call the function callback(), it actually calls whatever function name that we passed in as the "callback" parameter.
The first line of the code in upcGet() simply concatenates a bunch of strings together to format a valid GET request. Included are our variables for upc, appID and appKEY. Next, we create an object called "xmlHttp" to represent a new Http request. Then we set up an event handler, so that we can tell the script what to do when the ready state of the request changes. In this case, we check to see if we got a good response and we launch our callback function. Now that our event listener in ready to catch the response, we can finally launch our request! We do this using the .open method.
The last thing to do is to make the button kick off this process:
$(document).on("click", "[name='search']", function(){
upcGet($("[name='upc']").val(), postResults);
})
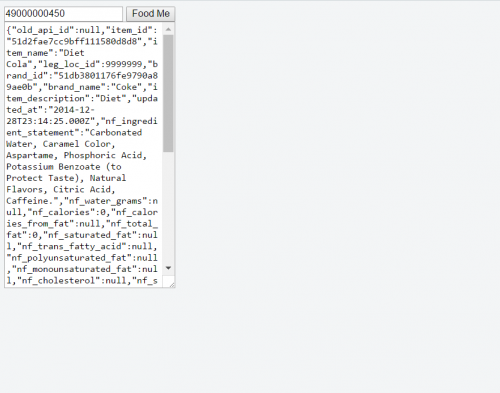
Here we're just using the JQuery .on() method to attach an event to our button. When the button is clicked, the upcGet() function will get called with the value of our text input named "upc" as the first argument, and the name of our callback function as the second argument. When we spin this all up and enter a UPC, it looks a little like this:
May not look like much, but it's got it where it counts
Not a bad start - but that JSON response looks like a real mess. What if I just want to pick a few values from this list and display them? Well, first we need to modify our form so that there are fields for each of the line items that we want to isolate:
<input name="upc"/>
<input type="button" name="search" value="Food Me"/><br/><br/>
<textarea name="calories" rows=1 style="width: 153px;"></textarea> Calories<br/>
<textarea name="fat" rows=1 style="width: 153px;"></textarea> Fat<br/>
<textarea name="sodium" rows=1 style="width: 153px;"></textarea> Sodium<br/>
<textarea name="sugars" rows=1 style="width: 153px;"></textarea> Sugars<br/>
As you can see, we now have a text area for each of four separate values: calories, total fat, sodium and sugars. That's easy enough, but the real challenge is teasing out each of those values and slotting them into those fields... or is it? Since our response is received in JSON format, it's actually trivial to pick particular values out of the list by using the JSON.parse() method. We just need to make a few minor adjustments to our postResults() function:
function postResults(response)
{
    var calories;
  var fat;
  var sodium;
  var sugars;

  var foodItem = JSON.parse(response);

    $("[name='calories']").html(foodItem.nf_calories);
    $("[name='fat']").html(foodItem.nf_total_fat);
    $("[name='sodium']").html(foodItem.nf_sodium);
    $("[name='sugars']").html(foodItem.nf_sugars);
}
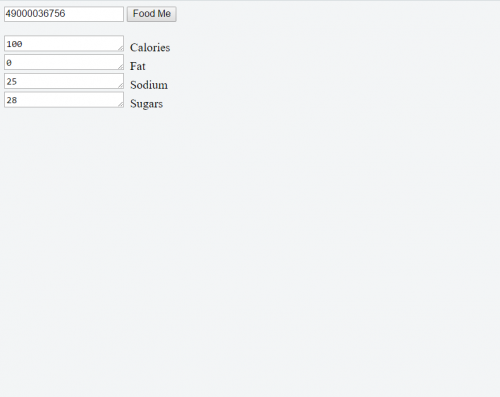
Notice how by creating a new object called "foodItem" to contain the parsed JSON data, I was able to reference each of the values by appending the key name to my foodItem object. The key-value pairs in our JSON document were turned into a Javascript object such that, in this case, foodItem.nf_calories is now equal to the number of calories in the food item. And now our page looks like this:
Hey! It works!
Alright, now our page really does something. But before we call it a day, why not make it look pretty? We can replace the boring text area fields with flashy dials using the jQuery-Knob library. All we need to do is replace our text area tags with input tags of the class "dial." But there's a little more styling we can do; here's what the markup ended up looking like:
<div style="text-align: center;">
Enter a UPC
</div>

<div style="text-align: center;">
<input name="upc"/>
</div>
<br/>

<div style="text-align: center;" name="productName">

</div><br/>

<div style="text-align: center;">
<div style="text-align: center; display: inline-block;">
Calories<br/>
<input type="text" name="calories" class="dial" data-min="0" data-max="500" data-fgColor="#66CC66" data-angleOffset="-125" data-angleArc="250" data-readOnly="true" data-width="100">
</div>

<div style="text-align: center; display: inline-block;">
Fat
<br/>
<input type="text" name="fat" class="dial" data-min="0" data-max="500" data-fgColor="#66CC66" data-angleOffset="-125" data-angleArc="250" data-readOnly="true" data-width="100">
</div>

<div style="text-align: center; display: inline-block;">
Sodium
<br/>
<input type="text" name="sodium" class="dial" data-min="0" data-max="500" data-fgColor="#66CC66" data-angleOffset="-125" data-angleArc="250" data-readOnly="true" data-width="100">
</div>

<div style="text-align: center; display: inline-block;">
Sugars
<br/>
<input type="text" name="sugars" class="dial" data-min="0" data-max="500" data-fgColor="#66CC66" data-angleOffset="-125" data-angleArc="250" data-readOnly="true" data-width="100">
</div>
</div>
Part of the reason that this seems like a lot more markup (even though it really isn't) is because the JQuery Knob library makes liberal use of data-* attributes in order to style the dial elements. I've also added the "productName" block, deleted the search button and wrapped everything into a number of other blocks to better organize it. Once the library itself has been included in the page, there isn't a lot of code modification that has to happen. First, removing the search button means I have to trigger the getUPC function some other way. Personally, I like when you can hit the 'Enter' key on a form:
$(document).on("keydown", "[name='upc']", function(e){
console.log(e);
if (e.keyCode === 13) {
        upcGet($("[name='upc']").val(), postResults);
    }
});
In this chunk of code, all I'm doing is checking every time a key is pressed in the upc field, whether the key that's pressed is the 'Enter' key. When it is, I launch my function. The next thing to do is to initialize the JQuery Knobs:
    $(function() {
        $(".dial").knob();
    });

 $('.dial')
        .val(0)
        .trigger('change');
This is just attaching the hooks from my .dial class elements to the Knob library. Then I set all of them to 0 so they have a consistent look. Finally, we make a minor change to the postResults() function:
function postResults(response)
{
    var calories;
  var fat;
  var sodium;
  var sugars;

  var foodItem = JSON.parse(response);

    $("[name='calories']").val(foodItem.nf_calories);
  $("[name='calories']").trigger('change');
    $("[name='fat']").val(foodItem.nf_total_fat);
    $("[name='fat']").trigger('change');
  $("[name='sodium']").val(foodItem.nf_sodium);
  $("[name='sodium']").trigger('change');
  $("[name='sugars']").val(foodItem.nf_sugars);
  $("[name='sugars']").trigger('change');

  $("[name='productName']").html(foodItem.item_name);

}
Now, instead of posting the results to a number of text fields, we're posting the results to our newly created dial elements. We're also extracting the product name from the JSON and displaying it in the productName block. We can further customize the look of our page by adding a stylesheet:
@font-face {
  font-family: 'Varela Round';
  font-style: normal;
  font-weight: 400;
  src: local('Varela Round Regular'), local('VarelaRound-Regular'), url(https://fonts.gstatic.com/s/varelaround/v8/APH4jr0uSos5wiut5cpjrugdm0LZdjqr5-oayXSOefg.woff2) format('woff2');
  unicode-range: U+0000-00FF, U+0131, U+0152-0153, U+02C6, U+02DA, U+02DC, U+2000-206F, U+2074, U+20AC, U+2212, U+2215;
}

*{
  font-family: 'Varela Round';
  font-size: 110%;
  color: #66CC66;
  background-color: white;
}

input[name="upc"]:focus,
input[name="upc"]{
  background-color: transparent;
  border: solid;
  border-width: 0 0 5px 0;
  outline: 0;
  -webkit-box-shadow: none;
          box-shadow: none;
  text-align: center;
}
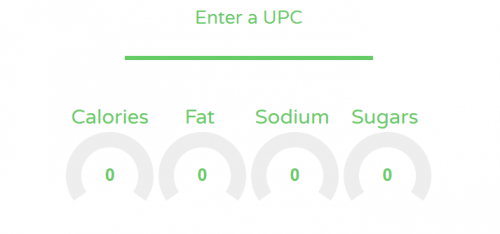
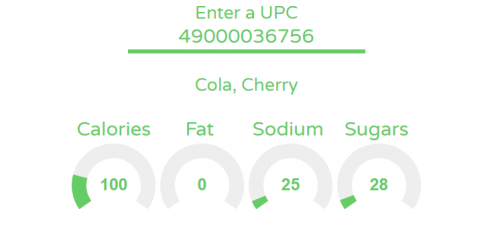
This stylesheet adds a Google font, removes the borders from our upc field and changes the color of a few elements. Let's see what the page looks like now:
Pretty solid, but does it work?
It does!
I'd say we know pretty well how to interact with the Nutritionix API now! My next step is going to be installing nodeJS on a Raspberry Pi and integrating our little page with input from the hardware. I'll dig into this in the next installment of this project but in the meantime, I'd be happy to talk Javascript in the comments section! We sometimes gloss over web programming here on the SparkFun blog, but with IoT rising in popularity, it's going to become more and more important even to makers who stick to embedded platforms. What are your feelings about Javascript/nodeJS? Is it the new hotness, or just another language/toolset?



I am a NodeJS convert. The implementation is clean and it runs stuff with dirt-simple calls. Have you accepted Node as your personal coding language?
Recommendations for a good primer or set of tutorials?
For strictly software implementation: http://nodeguide.com/beginner.html
For fun hardware stuff: http://johnny-five.io Many thanks and full honors to Rick Waldron for making JavaScript and Hardware so easy to work with.
Hey Nick, I saw this and kinda got carried away... working demo with camera based UPC input... Be forewarned the code is a hot mess right now. My uses for the API are probably gone at this point as well.
Tested working on my Pixel phone, although it defaults to the forward-facing camera and starts trying to scan my ugly mug for barcodes.
I think in the library ( quaggaJS ) I used for the barcode scanning there is an option for selecting which camera to use if you have mutiple input sources. That said I was just trying to get a proof of concept to work on my laptop and wasn't overly concerned with phones.
This is excellent, dude
Nick, any chance you might be able to do a post on GUI options for connect to Arduino, Teensy, etc. (embedded platform)?
That's a good idea, I'll see what I can do!
I second this request. I struggle when it comes to building phone apps or webpages to make my projects more interactive, without relying on an external service like Blynk.
This is great! One thing I've always wondered is how people go about finding these amazing libraries. I always struggle with the fact that I literally don't know what I don't know, so coming up with the right question to ask is difficult. For example, I never would have even known to look for that Knob library. Is this something that just comes from experience? Is there some secret repository of programming libraries that I don't know about?
As far as JavaScript goes, I love it! It's easy for me to use and understand. I was able to get started making apps for my Pebble in only a few hours. I'm currently working through some online resources to further my education.
Thanks again for the great writeup, and keep up the good work! I'm interested to see where this project goes.
I presume the 500 max you used for the dial/knob elements was arbitrary. But visual representations like that are displaying a ratio, and if the metric the ratio is applied against is arbitrary the actual ratio itself is then arbitrary. It looks nifty, but really doesn't inform.
This begs the question, what would a more informative max be? Twice daily recommended so TDC of the dial would be the daily recommended value? Personal goal? Something else?
Just out of curiosity (I'm not familiar with these elements), what would the dial/knob look like when over ranged?
Yes, these were intended to be ratios of Daily Requirements but I didn't get around to looking up those numbers before I had to write it up. Although, you make an interesting point that perhaps it should be double. I also wanted to implement a color change depending on which position the dials are in but, again, I ran out of time. Perhaps in the next post.
By default, on overflow, the arc just keeps following a circular path eventually joining itself. I believe there are data-* attributes that can be used to set a different behavior. Here's the demo page for the library that I used, it's really flexible and will do a lot more than what I have it doing here.
Yeah, deadlines seem to get in the way of properly finishing often.
Such is the job. Well, luckily it was just a writing deadline and I can always keep working on the project and write another post about it!
A few months ago I was looking into barcode scanning and gave up because it looked like it was going to be a major pain to add that into the project... If you're taking suggestions, I'd love to see you hook up the hardware of a barcode scanner into what you've got started here. Especially if that barcode scanner was doing more than just acting as a keyboard input over USB, and you could use that barcode data directly in an Arduino or Pi...
Could try a shortcut like this to simplify development: http://www.sunrom.com/p/usb-keyboard-decoder-serial-output
It never crossed my mind that something like that would exist... Thanks for sharing!
Oh, That's really interesting. I've never seen a thing like that before but I can definitely imagine how it would be useful... Thanks for the tip!
My original plan was to just use the barcode scanner in keyboard emulation mode. That way, I could have javascript periodically give "focus" to the upc field and then trigger on the linefeed character instead of 'enter' (or whatever it is that the barcode scanner uses as a line-end character) But now I'm thinking it may actually be difficult to automatically give focus to the browser window that's running the dashboard for my application from boot without user intervention.
It would probably be more reliable to process the barcode inputs from a virtual serial port using the NodeJS serialport package. I'll have to see if that mode is available on the barcode scanner I'm using.
Great project Nick, thanks for sharing!
P.S. sorry for overreacting and acting like an a*shole, i.e. (Enginursday: The Hot Seat)
Thanks! Glad you're still reading the blog!