×
SparkFun will be closed on Tuesday, December 24th, and Wednesday, December 25th, in observance of the Christmas holiday. Any orders qualifying for same day shipping placed after 2:00 p.m. (MST) on Monday, December 23rd, will be processed on Thursday, December 26th, when we return to regular business hours. Wishing you a safe and happy holiday from all of us at SparkFun!
Please note - we will not be available for Local Pick up orders from December 24th-December 27th. If you place an order for Local Pick-Up we will have those ready on Monday, December 30th.
Over the Christmas break, my parents were out of town to celebrate the holidays. When they came back, they saw something every homeowner fears – a flooded basement. In a basement, there are pipes that collect water from around the foundation and bring it into the sump pit, which pumps it out away from the house. When the sump pump fails, water has no way to leave the basement and it floods.
I recently bought my first house, so this horror story is still weighing heavy on my mind. Our basement has a sump pit, but there isn't a pump in the hole. Being the paranoid person I am, I saw two options: I could either poke my head down in the basement every time there's a storm, or I can place a sensor near the pit to alert me.
Water alarms are nothing new; there are plenty of cheap ones on the market that will alert you with a loud piezo alarm when water touches the two sensing pads. But what if you're out of town, or just out of the house? For that reason, I decided to make the ESP32 Water Alarm. Just like a standard water alarm, there are two electrical contacts that sense the presence of water, but instead of turning on audible alarm, it will send you a text message.
How does it work?
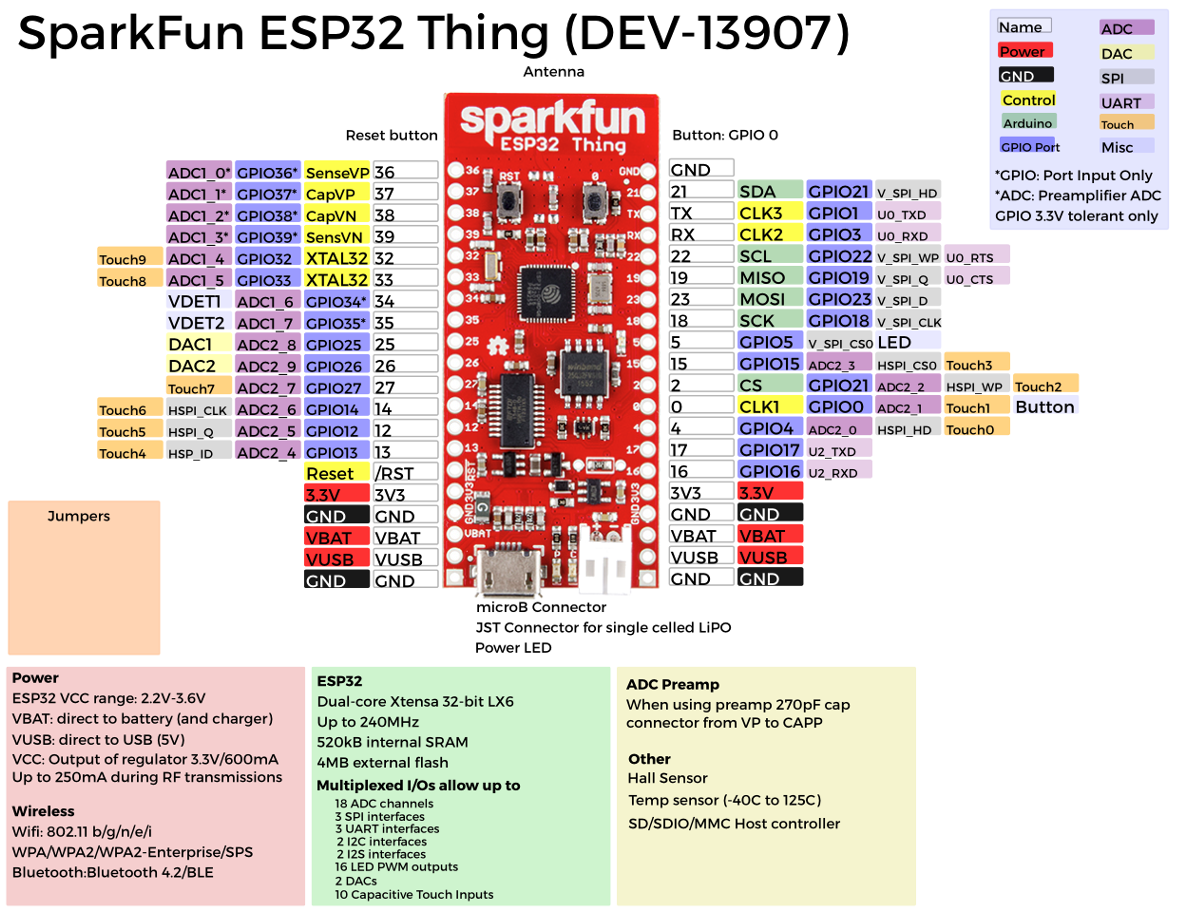
For this project, you can use either the ESP8266 Thing, or the ESP32 Thing. One of the many improvements made on the ESP32 is the capacitive touch circuitry built in to ten of the IO pins (we can see the pins capable of capacitive touch in the datasheet below). It should be noted though, that Touch1 cannot be used as capacitive touch sensor because of the pull-up resistor connected to GPIO pin 0. With the capacitive touch, we'll be able to sense water with just two pins; the first will be connected directly to a capacitive touch pin, and the second will be connected to ground.
To receive a text message, I used the free (and beautifully simple) service If This Then That (IFTTT). IFTTT gives you a huge amount of control, from devices like smart switches and thermostats, to sending or receiving emails, to interacting with Twitter and much more. I combined two services: Maker, which receives a HTTP post from the ESP32, and SMS, which will send an SMS text message to the phone number you provide.
Setting up IFTTT
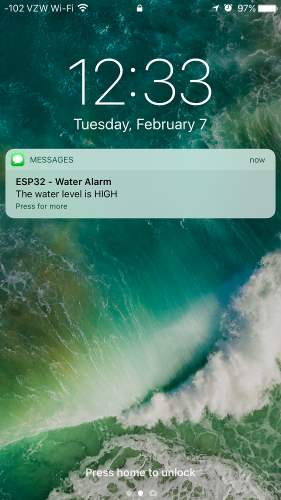
To make the IFTTT applet, I created a free account and selected "New Applet" from the pull-down menu next to the user name. I clicked on "+this" and searched for "Maker." I then selected "Connect," followed by "Receive a web request." The ESP32 will issue a web request for an event trigger, which I called "ESP," so whenever the ESP32 senses water it will trigger the SMS message. I then clicked on "+that", and searched for "SMS." Again, I clicked on "Connect," entered the phone number I wanted to send a message to and pressed "Send PIN." I entered the pin that was sent, and pressed "Connect" again. I next chose "Send me an SMS," set the message to "The water level is {{Value1}}" and created the action, which is all I need for IFTTT to text my phone.
"Value1" is a JSON object I can fill in from the ESP32 to let me know whether the water is high or has returned back to low. The only other piece of information I needed was the key to my Maker channel, which are the random letters and numbers at the end of the URL of the Maker settings. I used this key in the code that I put on the ESP32 Thing. You can see where your code will be in the image below.
ESP32 Code
The code is relatively simple and straightforward; you can see it here. If you'd like to create your own ESP32 Water Sensor, or just want to figure out how to program the ESP32 from the Arduino IDE, check out this hookup guide.
The ESP32 connects to my wireless access point and the connection is checked at the beginning of the main loop. Next, it checks the water sensor a few times by calling touchRead(pin), and the readings are averaged together to minimize any false readings. If there is a change in water presence, the ESP32 sends the request to IFTTT, which then texts me. The request is made using an HTTP POST method containing the key we received from Maker and the value of the water sensor. With the code uploaded, I'm able to open my serial monitor, make sure I'm connected to the local wireless access point and test it out.
Changes I'd Like to Make
While I'm happy with how easy it was to get working, there's been one problem that's been staring me in the face: What happens when the power is out? If there's a severe enough storm that the sump pit is filling with water, there's a real chance that I might also lose power. I could attach a backup battery and sense if the power is out, but that means my wireless router and modem are also most likely without power. And what if the power is out because a tree fell on the power line? In that case, even if I had backup power for my modem and router, the the cable line on the pole is also likely damaged. For those reasons, I'd really like to eventually add a cellular shield with a preloaded SIM card to serve as a backup in the event of a power outage. Honestly, going with the cellular shield and some sort of pay-as-you-go SIM card would probably be a safer and more reliable option. But if you'd like to minimize the cost, the ESP32 is a great way to go.



I just finished a very similar project. I used a water level sensor instead of a binary detector: http://www.hotmcu.com/water-level-sensor-liquid-water-droplet-depth-detection-p-113.html
I also used this great gmail e-mail library http://www.instructables.com/id/ESP8266-GMail-Sender/step2/Edit-sketch/
most carriers allow you to send a text via e-mail <number>@vtext.com for example This allows you to get a text message without using a third party service such as IFTTT.
one caveat is that the ESP8266 ADC has a 1v max value, so i only get about a fifth of the sensor as useable for level readings.
More than just a binary response would be great; at a minimum, sensors at two levels and the time difference between the two can signal a time until catastrophic failure. Just a thought.
Great write-up, thanks! I think this is exactly what I need. Noob question: if I wanted to locate the board remotely from the sensor bolts, with 10' (3m) of wiring or so, would this still work? Any considerations re. type of fasteners, wire gauge, the like? I have only basic electrical knowledge and don't know anything about "capacitive touch" aside from what I just read in the author's comment below. Thanks!
I just build it with two "touch" sensors (Pin 4 and 13), LEDs and a buzzer. One blue LED for connection info (blinks when trying to connect, lights when connected). One green LED for status OK Two red LEDs for warning (both on on first level, opposide blinking on second level) Buzzer beeps every 10 min. on first, dual tone on second level. On second level it's sending the SMS. Build in a small waterproof housing 50cm above pump
Thanks for this Idea!
I just checked on IFTTT and nothing comes up for "Maker", did this stop working? Is there another similar service to use for this? Thx
This is interesting, but why does this require a "touch pin". Would this not work with any microcontroller pins? For example, if one of the probes was on VDD and other probe was an input pin and you're just looking for ~VDD on the input pin? What is it about a capacitive touch pin that makes it more reliable/better?
The "touchRead(touchPin)" function is new to me. But it looks like it's just an analog voltage reading, right?
Capacitive touch works by having a large impedance resistor charge a capacitor and measure the voltage drop. The problem with a normal digital pin is that the resistance is too low to have the resistance of the water affect the voltage on the pin.
The touchRead function does return an analog value, and while you could build a capacitive touch sensor as used in this Arduino library, I'm able to use the hardware capacitive touch for a more robust design.
In the first sentence of the "How does it work?" section you state it will work with ESP8266. I'm struggling to get the code to work with that board.
After updating the Wifi library and a few other things, I'm stuck on the touchRead(). After a little research, I'm learning ESP8266 does not have a touchRead(). Is that accurate? What code would you suggest detecting the water with the ESP8266? Thanks
The thing I would worry about the most: reliability of this sensor. You can't really afford false negatives here, and if the probes oxidize they will stop conducting and fail with a false negative. I think you're better off with a non-contact water level sensor, or at least using a non-contact sensor as a backup.
you could even go the amateur radio route for the telemetry — APRS is commonly used for weather stations and I'm sure there are other options.
A useful extension of this that I just did in my basement is to have multiple sensors connected to one microcontroller. I have one by the corner of the basement where I once got water penetration, one by the water heater, one by the boiler, and one farther along near the floor drain. So I can know what is leaking, and how far the water is penetrating.
Could it not just be set up more simply using Blynk notify?
Absolutely, but where's the fun in that? :)
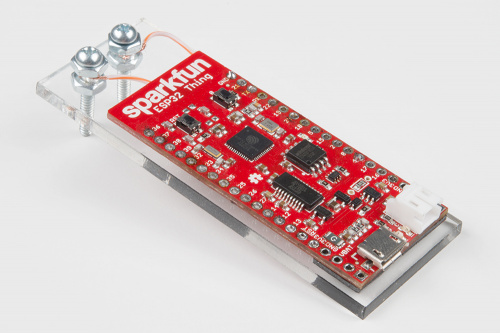
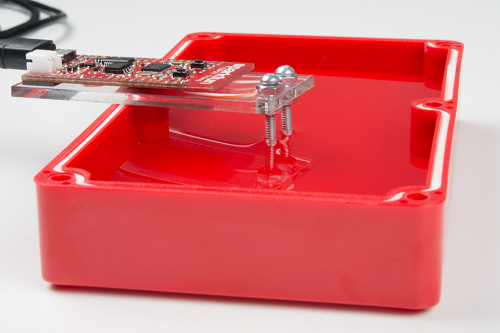
How do you plan to actually implement the probe part of this? Do you plan to have the ESP32 near the water like you pictures show? If so then how to you keep the ESP32 from getting flooded as well?
Most sump pits have a cap of some sort. With mine, I have a plastic dome cap, and the cap is around an inch above the concrete floor. The pump should only let the pump fill around half way or so if it's working properly, and with longer bolts of threaded rod, I can set the probes in the pit a few inches, that way I'm alerted before the water even leaves sump.