With the weather getting better I find myself deploying more projects outside, which means more projects that need to be enclosed and protected from the elements. There are a number of DIY options these days when it comes to project enclosures: 3D printing, laser-cut acrylic, etc. I have access to most of those options, but I am also someone who doesn’t want to reinvent the wheel.
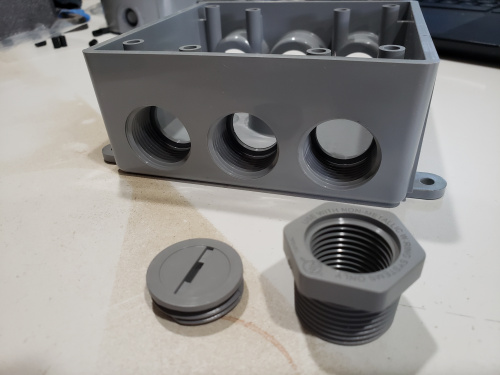
I decided to explore what my not-so-local big box hardware store had available. With an open mind and a few sensors and different boards for rough size and test fit, I found a couple of options, but one I really like and stood out to me: external weatherproof electrical junction boxes. I know, not super creative, but here are a few reasons that I went this direction.
Form Factor Options
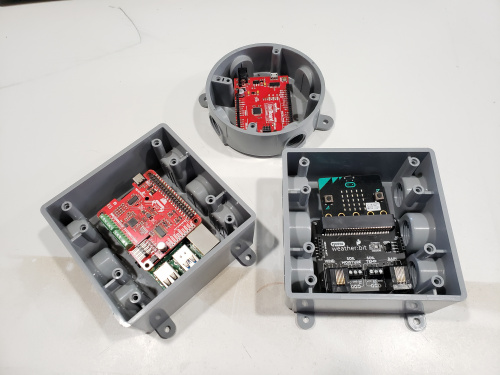
I picked up a number of different sizes and shapes and found that each one seemed to fit different form factors nicely.
From the Raspberry Pi and Arduino Uno form factor, to our Thing+ and even the micro:bit with a carrier board, it seemed like most factors found a cozy home with enough space to add a peripheral boards like shields, PHATs, or access to a Qwiic connector to leverage the Qwiic System.
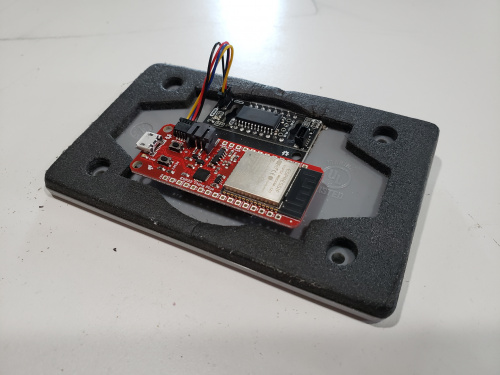
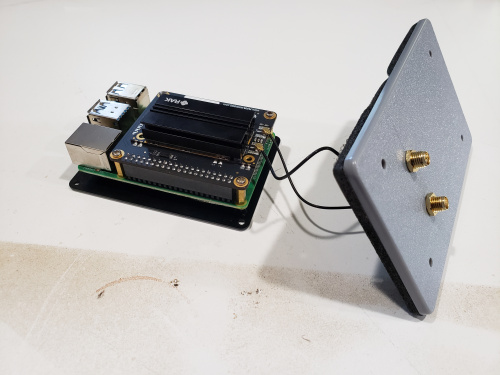
One issue I did find with the snug fit of these enclosures was access to USB for power and/or programming once the project was put together. I solved this by reversing my thinking about mounting the boards in the enclosure. Instead of the project facing “out” from the box, I mounted the development boards to the enclosure lid. This had a number of benefits.
Attaching the majority of my project to the lid makes it removable from the project for reworking/reprogramming at my desk, while the enclosure can stay attached to wherever I mounted it.
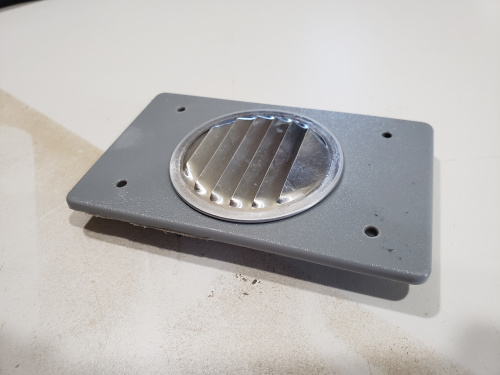
You can buy the lids for most brands of external enclosures separately from the enclosure housing itself. This means I can mount different projects or versions of the same project to different lids and swap them in and out as I see fit. The benefit of the different lid system also means that it becomes an area that I am comfortable with modifying, cutting, sanding, etc., because it is easily replaceable if I mess up.
Industry Standard External Connections
The wonderful thing about using off-the-shelf enclosures is that they meet industry standards, so different boxes can connect to one another, with wiring passing from one to the other, in an easy to assemble way that is still dry and weather-proof.
Trying to figure out how to drill holes, seal them up again for passing sensor wires through the enclosure wall, and then figure out an elegant way to seal things up again is always a challenge. With external enclosures, penetration points are already molded in and you can connect things via weatherproof wiring or even a fully enclosed conduit system to keep things dry.
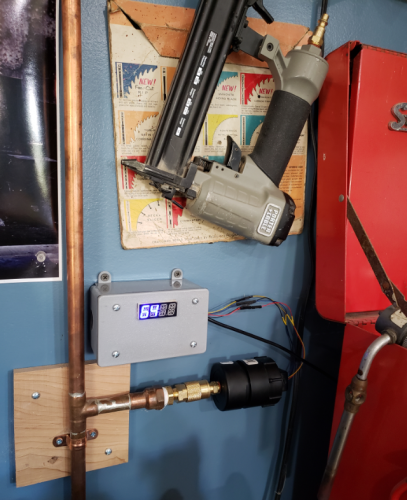
In a project I just completed, I needed to connect to an external sensor as well as power. With the project being in my shop, it didn't need to be weatherproof, but I did find a connector that clamped the wires for strain relief, which is always a plus in my book. You can find so many options to benefit your project here!
As a hard-learned side note... electronics tend to get warm in enclosed spaces, so I moved my temperature sensors into a short piece of conduit with small holes drilled into it.
Durability
I think this can be read between the lines in this post, but the thing that stands out with using these boxes as enclosures for projects is the durability they offer your project at relatively low cost. These boxes are designed to be outside, to be rained on, to be in the sun, to be hit with an errant baseball, etc. This durability comes from the expectations that come with these being external use, and because of that I use them in many indoor projects where the project may get bumped, dusty or dropped. It takes a lot to crack or break these things!
Range of Price and Quality
Now, I know that these enclosure options come with a price tag. No doubt I could have 3D printed a relatively weatherproof enclosure or even made one with basic shop tools, but I went this route because they were readily available and will stand up to the elements, let alone saving me the time it takes to design and build an enclosure.
That being said, what you are protecting your project from and how long it will be exposed, as well as the permanence of your project, will dictate the level of investment for you. Many times my projects fall into the tupperware-and-tape category for enclosures, but the projects I have been doing recently have been more permanent, and so I went for higher quality. It’s all up to you, but I have found using these off-the-shelf boxes as enclosures are a huge savings in time and effort to get a project deployed.
So far things have worked out well for me using this method, and I keep finding ways to build out DIY systems around my home and yard, from data collection in my garden to a control system for my air compressor. The next time you are in the hardware store, take a moment to stroll down the aisles and see what you can find.
How about you? Have you gone this route with enclosing projects? What other off-the-shelf parts and bits have you used from the hardware store for your projects around your home or office?



I'm guessing that such enclosures need ventilation to prevent condensation in the box? what's your advice on this?
But what do you use to actually attach the boards to the lid/enclosure? The pictures show the boards sitting in the enclosure or on the lid but not attached. :\ I've had difficulty locating screws small enough to fit through the mounting holes and then I also don't want the boards attached directly to the enclosure, i.e., stand-offs. What do you use?
I use 3M Dual lock for a lot of my projects and this being one of them. Allows me to remove electronics without tools and unless the project is being moved around or jostled a lot everything stays put really well.
Thanks for the tip. But what about longevity? Does the dual lock hold up? I suppose it depends on the quality of the glue used and the environment where it is used. I'd just be afraid it would let release and things would come loose.
It all depends on conditions (temperature fluctuation, vibration, etc). In the case of the photo it is indoors and mounted to the wall with 0 movement. I feel pretty comfortable that its would stay put. If I had this outside where it would be in the sun and then cold, or getting moved around, I would put the board on standoffs and then epoxy the standoffs to the inside of the lid rater than making more penetrations into the box for water to get in.
I used an outdoor single gang outlet box with a hinged cover. The cover has a clear plastic insert which I removed and replaced it with some pool cage screen. So it could get air flow. Inside it is a Photon on the Weather Shield. It works out great! Its in a place where it doesn't get wet but is outdoors and wiring runs from it to the weather meters mounted to the top of the pool cage.
If you need something that doesn't quite fit what the "big box" hardware store has, it might be worthwhile to check an electrical supply place. They'll likely have even more variety, especially if you need something larger than what the "big box" has. They cater to professional electricians, who do more than the normal residential/small commercial type wiring.
For weatherproof connections, there is something called a "gland" that seals the wires as they pass through one of the standard external connections. (Some boxes even come with glands.)
Heat buildup can be an issue in any small enclosure that has an "active" board. Ventilation can certainly help, though also considering a metal box (assuming you're not trying for wireless communications) can help -- or look for boxes that can be had in both metal and plastic of the same size and "mix and match", and use the metal portion as a heat sink to the outside.
One other thing: I STRONGLY encourage that you clearly mark any project that has any permanence as to what it is, and what all the controls are. A while back, I found a project that I built maybe 30 years ago, and had quite neatly wired, etc., but had neglected to label. I think I know what it was, but haven't had time to look up the magazine that I think I got the design from just to make sure.
I agree with marking projects, but would also add to mark your software. One thing I've started doing in Arduino Sketches is to open a serial port and send out a brief description of the program in setup(). In addition, I may respond to receiving a '?' with the description (or a more detailed description).
Although in many cases, it may be a pretty good idea, I've had "sketches" where I had to carefully go through and "reduce" code to get it to fit into the Arduino's memory. (This isn't to say, though, that you shouldn't have plenty of comments in the code!) You may end up with something very short, though having an ID with a version and maybe a date could be helpful!
MIND BLOWN! That is an amazing idea and never thought to utilize the Serial.print() option like that!!! It 100% makes sense and why we dont do that more seems crazy.
Hello and thank you for the feedback! I have actually used glands before but at the time of writing I didn't have the name for them, so thank you! You learn something new every day.
Labeling projects is a huge pointer as well! Maybe a sticker or something on the inside of the lid would be good. As someone who deals with older projects built and left by other people at times, I see a huge value in that.
A sticker inside is a very good idea. For something that's going to live "indoors" (such as the one pictured under the nailer) a label on the outside, made with a label maker (maybe saying "Compressed air pressure log - current PSI displayed") would add a nice touch, and lets visitors know what it's for (and impresses them with your talents!).
A thought that just occurred to me is that for projects that you've done some documentation for, and especially if you've put it on, say, Github, include a pointer to that on the "inside label". But having been in this business for more than half a century, I'd be inclined to also print a copy out on paper of the "final" (or at least the "current") version and keep it in a notebook somewhere. (Photocopies of magazine projects could be helpful, too.)
Ha, yeah! I just had a visitor to my shop point out that it wasn't 21 degrees in the shop and I gave them an odd look and they pointed at the display for the compressor... I then had to explain. It's funny what you leave out when you build things for yourself and not "public consumption"
Nearly 40 years ago, before digital radio displays were at all common, I had a small gathering at my house, and someone pointed to my stereo (which I had turned on for some background music) and said "there's something wrong with your clock: it's said 1013 for at least the last twenty minutes" -- I had to point out that it was tuned to 101.3 FM... ;-)
Hmm... I should tell on myself -- I recall, back in the 70s, getting a tour of an observatory, and commenting that the clock was "wrong" -- turned out it was correct, to sidereal time.
I just looked, and found that Adafruit carries a few glands here, here and here.
Hello and thank you for the feedback! I have actually used glands before but at the time of writing I didn't have the name for them, so thank you! You learn something new every day.