Years ago while still living in NYC, I worked on several in-house videos for a large company. The director was a great guy who loved Halloween - so much so that every year he used all of his vacation time in October to create the greatest Halloween home imaginable. He started planning in February, meeting with scenic designers and landscapers (yeah, that’s the level of commitment we’re talking about here), so every year when October rolls around and I haven’t even thought about building props or wearables for Halloween, I feel like I'm shirking my maker responsibilities.
This year, however, promises to be different. Because I’m more prepared? No, of course not! But because creating scary scenes has gotten easier, thanks to some recent additions to SparkFun’s Qwiic line of products. While our products have always been great for small scary builds and wearables, recent upgrades and additions to our line of Qwiic relay boards now make it simple to control larger components like strobe lights, fog machines, projectors, and a myriad of other AC-powered devices.
A ghoul and a few tombstones, then a smoke machine, strobe light, string lights, and you're all set!
Since the idea was to demonstrate how fast and easy a Halloween build could be, I simply used a few parts that I had on hand. Luckily we just released the Qwiic Dual Solid State Relay, and I had a Qwiic Quad Solid State Relay from its recent release. A couple of sensors and one of my perennial favorites, the Qwiic MP3 Player, and I was set.
Since, as I’ve pointed out on several occasions, working with the AC side of a relay can be dangerous, I set out to create a safer way to connect high side components. Having done electrical work, my first thought was just to pick up a junction box from Lowe’s and throw something functional together. But then I thought, why not add a little form to the function? Planning to use both a Qwiic Quad and Qwiic Dual Relay, I knew I might want up to six controllable AC outlets, so I picked up an appropriately-sized power strip.
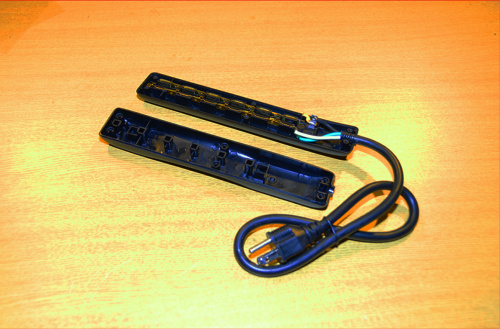
When opening up a power strip you may find security screws. The right tool kit should get you in.
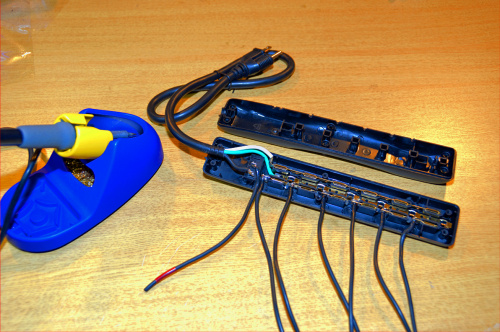
Opening it up and looking at the internals, it almost appeared as if the rails were designed to be modular. At each of the six outlets, there was a hole in the rail as if it were designed to accept an incoming soldered line. There were also vertical indents between each outlet, indicating to me that the rails were meant to be cut to varying lengths, so that’s what I did. By isolating each outlet on the hot rail, and leaving the other two intact, I can now safely control each outlet individually with the Qwiic Relays.
You're playing with high power here, so proceed with caution.
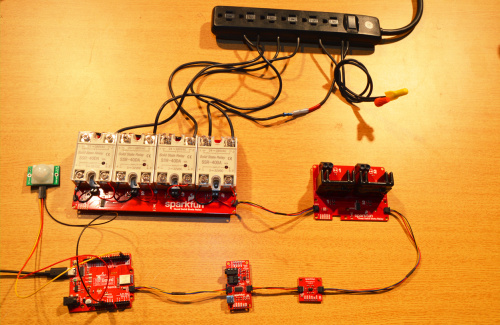
In the end, I went with four relays controlling AC outlets, and the other two relays controlling low voltage DC lines. If you’re planning on doing something like this and wind up not using all of the outlets on your power strip, I definitely recommend throwing a wire nut on the ends of the wires not running to a relay. While the lines are in fact isolated, it’s just not good form to leave wire ends exposed, hot or not.
The components for the Halloween build, Qwiic and simple!
The code is very straightforward. The PIR starts the MP3 Trigger and turns on the walkway lights (Relay 1 on the Qwiic Quad Relay). Following that, the proximity sensor triggers the remaining five relays as the victim - I mean, the happy Halloweener - gets closer. The cross-light on the tombstones, the fog machine, the strobe light, the up light on the ghoul, along with his green eyes all fire at predefined distances. I tested the system using very short distances that I could trigger at my workbench using my hand, then increased those values for the final build. Additionally, since each relay has a status light, I was able to test the entire setup with nothing on the high side.
/*
 * Qwiic & Easy Haunted House
 * By: Rob Reynolds
 * SparkFun Electronics
 * September 2020
 *
 * This build utilizes the SparkFun Qwiic Solid State Relay Kit
 * along with the Qwiic Distance Sensor (VL53L1X).
 * SparkFun labored with love to create this code. Feel like supporting open source hardware?
 * Buy a board or two from SparkFun!
 * SparkFun Qwiic Solid State Relay Kit - https://www.sparkfun.com/products/16833
 * SparkFun Distance Sensor (VL53L1X) - https://www.sparkfun.com/products/14722
 * SparkFun Qwiic MP3 Trigger - http://librarymanager/All#SparkFun_MP3_Trigger
 *
 * License: This code is public domain but you buy me a beer if you use
 * this and we meet someday (Beerware license).
 */

#include <ComponentObject.h>
#include <RangeSensor.h>
#include <SparkFun_VL53L1X.h>
#include <vl53l1x_class.h>
#include <vl53l1_error_codes.h>
#include <Wire.h>
#include "SparkFun_Qwiic_Relay.h"

#define RELAY_ADDR 0x08 // Alternate address 0x6C
#define DUAL_RELAY_ADDR 0x0A //Alternate address 0x0B
Qwiic_Relay quadRelay(RELAY_ADDR);
Qwiic_Relay dualRelay(DUAL_RELAY_ADDR);

#include "SparkFun_Qwiic_MP3_Trigger_Arduino_Library.h" //http://librarymanager/All#SparkFun_MP3_Trigger
MP3TRIGGER mp3;

#include "SparkFun_VL53L1X.h" //Click here to get the library: http://librarymanager/All#SparkFun_VL53L1X

//Optional interrupt and shutdown pins.
//#define SHUTDOWN_PIN 2
//#define INTERRUPT_PIN 3

SFEVL53L1X distanceSensor;
//Uncomment the following line to use the optional shutdown and interrupt pins.
//SFEVL53L1X distanceSensor(Wire, SHUTDOWN_PIN, INTERRUPT_PIN);

const int motionPin = 2; // Pin connected to motion detector
int proximity = 0;

void setup(void)
{
  Wire.begin();

  Serial.begin(115200);
  Serial.println("Halloween Build 2020");

  if (distanceSensor.begin() != 0) //Begin returns 0 on a good init
  {
    Serial.println("Sensor failed to begin. Please check wiring. Freezing...");
    while (1)
      ;
  }
  Serial.println("Sensor online!");

  // Let's make sure the relay hardware is set up correctly.
  if(!quadRelay.begin())
    Serial.println("Check connections to Qwiic Relay.");
  else
    Serial.println("Qwiic Quad Relay checks out!");

  if(!dualRelay.begin())
    Serial.println("Check connections to Qwiic Relay.");
  else
    Serial.println("Let's haunt this house!");

   //Check to see if Qwiic MP3 is present on the bus
  if (mp3.begin() == false)
  {
    Serial.println("Qwiic MP3 failed to respond. Please check wiring and possibly the I2C address. Freezing...");
    while (1);
  }

  mp3.setVolume(25); //Volume can be 0 (off) to 31 (max)

  pinMode(motionPin, INPUT);
  pinMode(LED_BUILTIN, OUTPUT);

  delay(6000); //Give the PIR a chance to get settled
}

void loop(void)
{
  proximity = digitalRead(motionPin);
  distanceSensor.startRanging(); //Write configuration bytes to initiate measurement
  while (!distanceSensor.checkForDataReady())
  {
    delay(1);
  }
  float distance = distanceSensor.getDistance(); //Get the result of the measurement from the sensor
  distanceSensor.clearInterrupt();
  distanceSensor.stopRanging();

  Serial.print("Distance(cm): ");
  Serial.println(distance);

  if (proximity == HIGH) // If the sensor's output goes high, motion is detected
  {
    mp3.playTrack(1);
    digitalWrite(LED_BUILTIN, HIGH);  // turn LED ON for testing purposes
    quadRelay.turnRelayOn(1);         // Turn on runway lights
    Serial.println("Relay 1 is hot.");
    pinMode(motionPin, OUTPUT);
    delay(50);
  }

  //NOTE: If the following values are not bracketed to a apecific range
  // and you're using < x, your "else if" statements need to be in
  //ascending numeric order

  if (distance < 1000){
    quadRelay.turnRelayOn(4); //Ghoul uplight
    dualRelay.turnRelayOn(2); //Ghoul Eyes
    Serial.println("Relay Q4 and Relay D2 are hot.");
    delay(50);
  }

  else if (distance < 2500){

    quadRelay.turnRelayOn(3);       // Turn lightning on
    Serial.println("Relay 2 is hot.");
    delay(750);
    quadRelay.turnRelayOff(3);      //Turn lightning off
    delay(250);
  }

  else if (distance < 3000){
    dualRelay.turnRelayOn(1); //Turn on hacked Fog Machine trigger
    Serial.println("Relay D1 is hot.");
    delay(3000);
    dualRelay.turnRelayOff(1);  // Turn off hacked Fog Machine trigger
    delay(50);
  }

  else if (distance < 3500){
    quadRelay.turnRelayOn(2); //Tombstone sidelights
    Serial.println("Relay Q2 is on.");
    delay(50);
  }

  if (mp3.isPlaying() == true){
    Serial.println("Your song is currently playing.");
    Serial.println();
    digitalWrite(LED_BUILTIN, HIGH);
    pinMode(motionPin, OUTPUT);
  }

  else if (mp3.isPlaying() == false && distance < 4000){
    Serial.println("Your song is no longer playing");
    Serial.println("but the room is still occupied.");
    Serial.println();
    digitalWrite(LED_BUILTIN, LOW);
  }

  else if (mp3.isPlaying() == false && distance > 4000) {
    Serial.println("Your song is not playing.");
    Serial.println("The room is empty.");
    Serial.println();
    digitalWrite(LED_BUILTIN, LOW);
    pinMode(motionPin, INPUT);
    quadRelay.turnAllRelaysOff();
  }


  delay(500);
}
Once I had it loosely working, I set it up at full scale and filmed it...and found some issues (really, one issue in particular). The readings from the VL53L1X Distance Sensor seemed to be hopping around quite a bit, setting off relays at unexpected times. But overall, for a single day build of an initial layout, I think it’s a pretty solid proof of concept.
If I were to continue with this project and set it up outside my house for trick-or-treaters, there are definitely some changes I would make. The VL53L1X Distance sensor is only good for about 4 meters, so I would probably change that out and use a longer range sensor, probably something like the LIDAR-Lite v3HP. Additionally, I would probably figure a different playback method for the music. I would like to have music start when it senses a presence, then have thunder to accompany the lightning, as well as some howls or screams as the subject wanders through the room or gets closer to my front door. Since the Qwiic MP3 Trigger isn’t polyphonic, I would either need two MP3 Triggers (using a Qwiic MUX), or perhaps I could add an external audio player to the first relay. There are options.
Of course, since this Halloween will look nothing like any Halloween any of us has ever seen, and trick-or-treating has already been cancelled in municipalities across the country, perhaps my next four weeks would be better spent building a mechanism that launched candy bars from my front porch out to the street, basing the force of the throwing arm on information garnered from the proximity sensor. And if that goes well, who knows, maybe next year I can bring in the landscape architects.
Interested in learning more about distance sensing?
Learn all about the different technologies distance sensors use and which products will work best for your next project.
Take me there!


If you take several distance readings and then average them, you can avoid some of the jumpiness.