×
SparkFun will be closed on Tuesday, December 24th, and Wednesday, December 25th, in observance of the Christmas holiday. Any orders qualifying for same day shipping placed after 2:00 p.m. (MST) on Monday, December 23rd, will be processed on Thursday, December 26th, when we return to regular business hours. Wishing you a safe and happy holiday from all of us at SparkFun!
Please note - we will not be available for Local Pick up orders from December 24th-December 27th. If you place an order for Local Pick-Up we will have those ready on Monday, December 30th.
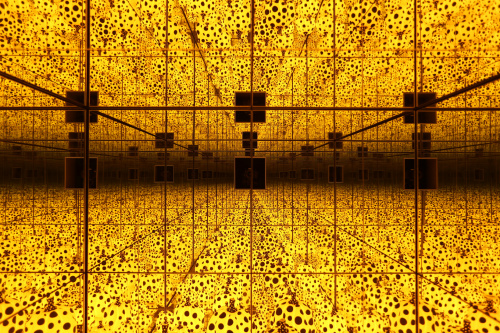
LEDs are great, and can make almost any project better. Well, unless you’re building discreet spy equipment, in which case you probably shouldn’t put a 3 mm PTH red or green LED on it (I’m looking at you, Hollywood!). And the more LEDs you can put on a project, the better, right? But did you know that you can create the illusion of way more LEDs than you actually have? Of course you know that, because you’re reading SparkFun’s blog post, which means you are no doubt fully aware of infinity mirrors. From @the_gella’s Infinity Mirror Heart Heels here at SparkFun to Yayoi Kusama’s Infinity Mirror Rooms at London’s Tate Modern (opening at the end of March and remaining there for a full year!), infinity mirrors are mesmerising, because they create the illusion of space beyond where it exists.
One of Yayoi Kumasa's infinity mirror rooms. I'm going to start a bit smaller than that.
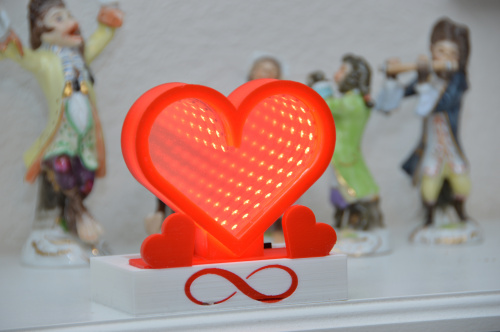
So I decided it was time for me to create one of my own. But I had other things I wanted to do as well. I like controlling things remotely, so I thought I should have some type of wireless control for the project. I also wanted to get familiar with MIT’s App Inventor. And of course, I’m always down to design and 3D print something new. Given all the things on this wish list, I decided to go with an infinity mirror with a microcontroller and either WiFi or Bluetooth (or both?), controlled via a simple and fairly uninteresting phone app that I would create, in a frame that was more than just a plain rectangular mirror. With Valentine’s Day just around the corner, I knew just what to do. I would create something that allowed me to send little visual messages up to my wife to let her know I’m thinking of her. Allow me to share with you the “I Heart You Infinity”!
My "I Heart You Infinity" build. See, because it's a heart, with infinity mirrors, and, well, you get it.
INFINITY... AND EVEN MORE INFINITY!
A two-plane infinity mirror like this is about as simple as infinity mirrors can get. A quick internet search will show a myriad of infinity pyramids, infinity cubes - even infinity dodecahedrons. But no matter how many sides or edges, they all do the same thing, They create the illusion of many rows of lights from just a single row. For most makers, this means a strip of addressable LEDs. This allows for more than just a simple “lights on/lights off” display. A strip of RGB LEDs allows for a quarter of a million colors, along with movement effects like theatre chases and rainbow fades. Since I’m trying to keep my build fairly compact, I decided to use our Skinny RGB 144 LED strip.
Many of my builds are predicated on what board is the closest. For this build, I had a SparkFun ESP32 Thing well within arm’s reach, so that’s what I used...and that's the entire parts list. A Thing Plus and a strip of addressable RGB LEDs. I’m also using a 2 Ah Lithium Ion Battery, but this could just as easily be powered by a wall wart.
THE CODE
There is nothing spectacular or earth-shattering about the code. Create a Bluetooth instance, connect, then wait for incoming signals. When a signal is received, do what it says. Since I didn’t know what effects I wanted when I started coding this project, I simply set it to receive numbers in the if statements, figuring I could just name the functions as I created them. If you want to take a closer look at the code, it's in my GitHub repo.
THE APP
While I’ve done some app work the old fashioned way, I'd been hearing more about the MIT App Inventor and wanted to give it a shot. Turns out it’s an incredibly fast and simple way to develop apps, from initial layout all the way through to publishing. The interface is intuitive and user friendly, with two primary screens with which you’ll interact.
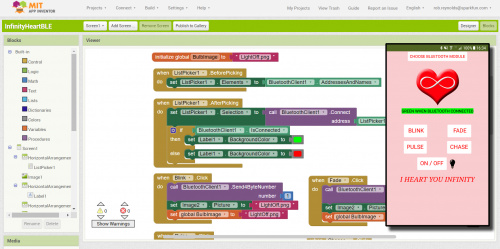
The coding screen of MIT's App Inventor, with a screenshot of the app on my phone.
The first is the Designer screen, where you’ll insert all of your components, both visible (such as images, buttons, etc.), and non-visible (like lists and sensors ), and create the layout that you want. From there, it’s over to the Blocks screen, where you’ll do all of the programming for your components. Even though you’re using the fairly simple style of block-based coding, the App Inventor allows for quite complex functions. Aside from the standard built-in functions, each component type has its own list of functions that you can use.
My app build was super simple, as I wasn’t sure how long it was going to take me to implement. I drew up a quick logo of a heart with the infinity symbol inside it just to give the app some imagery (I also used it for the app icon), then added five buttons - one that’s a simple on/off toggle button, and four others that each trigger a different function for the LEDs. Next to the on/off button, I added a small light bulb icon that is bright yellow when the LEDs are on, and black when they are turned off.
Since this is my first build with App Inventor, it’s extremely primitive. However, I can see potential for some pretty advanced apps using this tool. One thing to note is that, sadly, at this point projects built in the App Inventor cannot be ported to iPhones, although that is something that they’re continuing to pursue.
THE BUILD
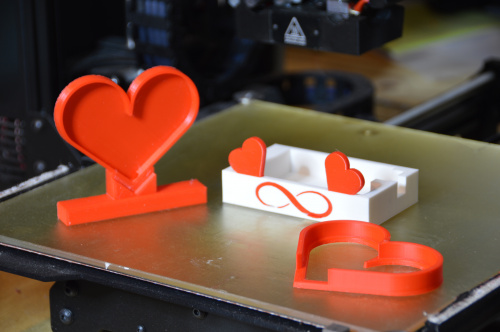
The build of any simple infinity mirror is quite straightforward. At the back, I have 6-millimeter mirror acrylic; at the front, 3-millimeter clear acrylic with one-way mirror film. Sandwiched in between are my RGB LEDs. With no light on the inside, the mirror film acts just like a mirror to anyone looking at it. However, once the LEDs are illuminated, they become visible through the mirror film. Their image bounces back and forth between the two mirrors for infinity, or at least for a couple dozen or so times, depending on their brightness. For the enclosure, I drew up a quick two-part heart, with a solid back and an open front, and printed that out. Then I realized the the enclosure should probably be able to house the battery and the ESP32 Thing as well, so rather than redesign and reprint it, I simply designed a base that could hold everything. I gave it a couple of little hearts and an infinity symbol to keep with the theme, and printed it in two colors, just because I can.
The printed parts sitting proudly on the bed of their printer. Dual extruders allow for two-color printing.
PUTTING IT TOGETHER
The final result came out pretty well. The heart is cute, infinity mirrors are always amazing, and I can now send my wife a quick light-up message letting her know I’m thinking of her, and will love her for infinity.
If you want a closer look at all of the parts and pieces, I’ve put them into a GitHub repo. Use them, change them around, have fun with them, and let someone know you love them in an exceptionally nerdy way, using the magic of Bluetooth and addressable LEDs!
The "I Heart U Infinity" in action. And yes, I do have a singerie in my home. The question is why don't you?
Interested in learning more about LEDs?
See our LED page for everything you need to know to start using these components in your project.





“at this point projects built in the App Inventor cannot be ported to iPhones” — bummer... so for me, it’s useless. :-( Oh well, thanks for the warning.
Agreed, it is a bummer. The team at MIT has been working on this issue for at least the past year, probably longer. (I recall reading an article on their push to get everything needed to create iPhone versions, but I really don't recall if that was two months ago or two years.) I've been an Android user pretty much forever for this very reason, but I really want to be able to share my apps cross-platform. I know that iPhone has a much stricter safety protocol as far as virus prevention in its apps, and I guess this is the price.
And, unfortunately, the Apple watch won't work with an Android phone.