Very soon after joining the engineering department, I had an idea. I thought it would be fun to do a much simpler riff on the gorgeous Living Wall by MIT Media Lab. I thought that mine would be approachable, something that anyone could look at and think 'Hey! Maybe I'll do that to my living room this weekend!'. I also thought it would be a fun way to experiment with magnetic and conductive paints, but above all... I thought it would be easy.
It has, in the ensuing months, become a magnificent educational experience, a hazerless hazing, and an objective lesson in hubris. Lesson learned - there are no easy projects! I'd like to take the opportunity to share some of the lessons I've learned about conductive paint - maybe other people out there have lessons to share as well!
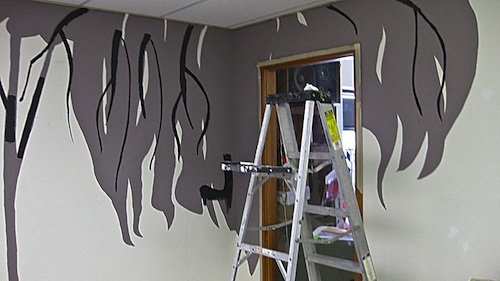
The original plan was this: I have a roommate studying graphic design. He was excited to create a two-color design that could be painted on my office walls. He took my garbled suggestions in stride, and presented me with a lovely design. We planned to paint it in four layers:
- Layer of latex paint for a background color
- Layer of magnetic paint to allow me to stick flowers, lanterns, and other pieces of whimsy to the design
- Second layer of latex paint to cover the magnetic paint and form the foreground of the scene
- Final layer of conductive paint that would allow me to plug the whole thing in (so that the decorations that were stuck to the magnetic paint could receive power to glow, move, or in any other way perform)
At first, the painting went according to plan. We tried to use a projector, but nothing would really give us the whole wall without distortion, so my roommate and I considered it a small setback, and just traced the design by hand on the wall with pencil. We painted the background and magnetic paint first. Be warned, if you're using magnetic paint under a layer of latex paint, make sure you use several thin layers, and be aware that you're still not going to be holding up a substantial amount of weight. We used about 4 layers of paint and exclusively rare earth magnets.
Next, we painted the second layer of latex paint and the conductive paint traces. Since I was feeling cocky and preemptively victorious, I went ahead and threw in paper leaves to add more dimension.
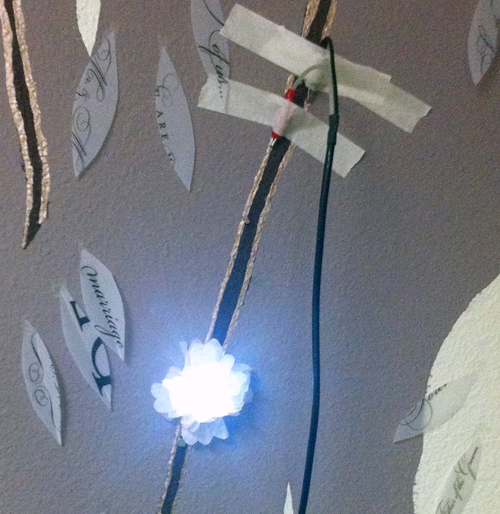
I'm including a detail of the conductive paint to emphasize something you may or may not know - in addition to being functional, it's really beautiful. I had to use several coats of CuPro-Cote conductive paint to get a reasonable resistance, but it is very reasonable - if you check your resistance carefully and apply more paint than needed, it's pretty easy to get down to around 5 ohms per foot. Furthermore, it goes a long way. I purchased a 4 ounce can, and after doing the traces for my entire tree, still had about half left. A quick test with the bench power supply demonstrated that the traces were definitely sufficient to power the LED flowers I made to test it.
The bad news? Conductive paint dries REALLY quickly. If you're painting from the can (I was), it will dry so quickly that you'll be constantly pushing a skin of dried paint off of the top of your paint with the brush. Use it quickly, and store it carefully! And my greatest problem? Latex paint is not a sufficient insulator between two coats of conductive paint. I painted all of my negative traces, painted over anywhere that the positive trace would have to cross with latex paint, then painted the positive traces. When it came time to finally hook up power and see it work? Nothing. The entire thing was shorted out, everywhere that the traces crossed. I tried a patch test to see if the latex paint would insulate if I used multiple coats and gave it 24 hours to cure, but that was no good either. I have to conclude for now that latex paint and conductive paint interact in a way that I hadn't anticipated. I used a Dremel tool to sand the paint off of those intersections (a difficult moment for Pete to walk in on), and am currently in the process of recreating those connections with copper tape (since it can't seep) and several layers of electrical tape to insulate.
This is where I would like to invite the community to leave their feedback if you are so inclined. Has anyone else had a similar experience with conductive paint? Does anyone know why this happens, and what other substances we can expect conductive paint to interact with this way? Is it all paints, or only latex? Feel free to share your own tales of hubris in the comments, and I'd love it if anyone can shed light on what's happening here, chemically. In the meantime, I hope that other people's experiments with conductive paint can benefit from my mistakes, and that everyone can appreciate my most important lesson: Calling it an 'easy' project is asking for trouble!


Three words, Mythbusters fans say it with me:
Small Scale Tests.
Hi Dia,
That is a very clever project, and a very imaginative way to make electronics come alive! I consider myself to be pretty good with electronics, but I don't think I have a single "artistic" bone in my body. I'm thankful that there are people like you to make the world a more interesting place :-)!
John
To solve the problem with insulating one layer of conductive paint from another you might try first this: Cover the portion of one conductive paint trace where another will cross it with electrical tape (or maybe scotch tape) and then paint over that with latex paint before the next layer of conductive.
Also perhaps you wouldn't have the problem if the insulating and second conductive paint layers were applied with an air brush. When using an air brush the solvent mostly evaporates before hitting the wall leaving ONLY the pigment. This way the lower layers of pigment won't be dissolved into the upper layers.
As one of the students who helped out on the original Living Wall, it's awesome to see someone else trying this out. Thanks for writing about it!
I don't think we were ever able to find a good way to insulate separate layers of conductive paint. Instead, we just designed the circuit so that the traces didn't have to cross on the wall. For example, you could have alternating stripes of power and ground, and connect them each to the power supply at the top or bottom of the wall.
Also, to increase stickiness (especially for microcontroller modules, where transient interruptions will cause a reset), we've sometimes attached magnets or screws to the surface to provide something for the magnetic components to stick to.
For the second version of the living wall (the one pictured on the page you linked to), we used a plastic coated steel "paper" as the base for the wall, since it's easier for magnets to stick to than the magnetic paint.
Good luck getting it all finished!
So this post is a bit old for commenting on, but necroposts make the internet go around.
Have you considered using a small bit of Sugru http://www.sparkfun.com/products/10787 to insulate between crossovers? You shouldn't need much, and with a bit of primer and paint it should blend into the wall fairly well.
Latex paint is porous, which might be part of the issue.
I would try a 2 part epoxy paint like the kind often used on industrial concrete floors.
Maybe a layer of primer first like Kilz if you still need the paint effect. Very cool demo. Great job, very inspiring!
This gives me an idea, expensive though it may be... I think I would start with a base of sheet metal, something magnetic. Provide conductive rails, like tracks, connected to the base (I'm thinking brass wire). Then add a second set, insulated from the base, aligned with the first. When they need to cross, cut the first set so there is no short. Paint as desired. Sand off the paint on the rails, and retouch as required.
Now you have a good source of power and a powerful magnetic attatchment.
The vision behind this is not just repositionable lights, but things that move! Tiny robots that move along the tracks, held to the wall by strong magnets, directed by signals piggybacked on their power rail.
Each robot has a series of contacts (think slot-cars) but, maybe eight, that are designed that they can only touch one rail at a time, add diodes, and now you have a reliable power/control supply.
Hope this gets somebody thinking...
The best way to apply the insulation and second conductive layer is SPIN COATING, though, I don't think it is applyable in this case :)
I agree with the airbrush technique. The problem with insulation is that when you are painting the second conductive layer you scratch the latex and -> short curcuit.
How about instead of conductive paint, you use 30GA wire wrap wire? You can paint it under with reasonable effort (two coats for me) and to keep it in place, just use a little dot of paint and hit it with a heatgun for a second to tack it in place.
You could easily do the 4 wires that a BLINKM mini requires, and then you would have a RGB LED wall art that you could control from a Arduino/whatever.
Just use Drywall mud as an insulator.
I was doing drywall work today and have dried taping mud on my pants. I also have a dmm sitting beside me. I put the two together and found no conductivity down to about 1/64" - 1/32" thickness. Throw a layer of mud between the connections and you are set. You also might want to seal the mud with a paint primer before you paint again to ensure the latex does not seep through the mud to the other connection.
You could also use electrical tape, and mud over it to hide the tape edge; but you cannot use tape alone. The latex paint will not stick to the tape, or any rubber based insulators mentioned here, without a primer.
I really appreciate a solution as seamless as this one will be, and the BONUS mental image of you checking the resistance on your pants made my day! Thanks!
The liquid rubber insulating compound works well (Liquid tape is the most popular brand I know), and you can thin it with MEK to get the viscosity down to reasonable levels ( I won't go into the experiment that required me to figure this out. :) )--but the aestetics may not be what you want. I have what I think will work for you---try some blong (clear) shellac. Use several thin coats (you thin it with methanol). I recall shellac, when dry, insulating. I believe that the clear Plasti-coat paint insulates well as well. In a pinch, use clear nail polish--I know that insulates (another long story). Hope this helps some--cool project!
If you haven't heard of or experimented with adhesive vinyl yet - I would suggest a google for 'vinyl wall art' for starters. My wife gets her supplies here...
http://www.silhouetteamerica.com/vinyl.aspx
Complex circuits could be done easily 'mixed media' style with conductive paint, adhesive copper foil, hynar wire, magnetic sheets, and vinyl.
I would be inclined to try a coat of shellac or shellac based sealer like Kilz between the layers. It uses alcohol as a solvent so it dries very quickly. Woodworkers and painters use it to keep incompatible finishes from interacting. It sticks to most everything and most any finish can be used over it. I've used it with oil and latex paint as well as oil based stain, water based stain, oil and water based polyurathanes, and laquer. I don't know what its electrical properties are, but it will at least keep your layers physically seperated.
I also agree. I've used straight shellac to do just this thing, painting alternate layers of conductive and insulation to make quick circuit boards and also repairs. And I too use shellac to coat copper windings for my coils (HV, Radio, Power and Inductors). In an emergency though, I've used nail polish. The polystyrene transparent stuff has a high dielectric coefficient and works with HV. I've also dabbed nail polish (any color) into breaks in medium power cables to protect from shorts and to seal from corrosion. The only problem with nail polish is, as a male I have more than once confronted a finger in my face telling me it proved that I am gay.
I'll second the idea of Shellac. Shellac is compatible with other paints and prevents bleeding. Things like electrical tape, kapton, etc. will prevent the second layer from adhering and look crummy. Rather than just do the crossovers, I might shellac all the traces with the exception of contact points (like a PCB solder mask), then you can paint over it with color as well as additional traces. Rather than Kilz, I'd use straight shellac. Cheap, easy, dries fast.
Oh yeah, of course it is an insulator. It's the same stuff they saturate motor windings and transformer coils with.
Brush on insulation would work, its thick stuff though. I think it comes in limited colors. Or you could use that spray on stuff that makes screen doors float.
Copper? expensive and someone will steal your wall for scrap. Try aluminum foil, cheap at the Wally World. The heavy duty stuff should have pretty low resistance. Or use the aluminum foil tape for duct insulation. You can also get foil backed gypboard; the whole backside of the wall could be ground. Or you could cut the traces into the foil and use multiple layers for a monster pcb.
LEDs on push pins or the RGB LEDs that have the color changing built in...just push them through the gypboard, and they would light up (maybe flash a bit if the connection is bad). I wonder if the boss will let me try that in the bedroom. It would be the first time she let me try anything in the bedroom (ok, second time, we do have one kid, ha).
http://sports.yahoo.com/mlb/blog/big_league_stew/post/Lights-out-Ump-halts-game-instructs-fans-to-di?urn=mlb-wp16203
Had to put this up after I saw it. I am very curious as to what they used.
Since you used copper tape to jump the traces that shorted, why not use copper foil tape for the whole thing? I've used the self adhesive tape that is used by stain glass makers in electronics projects. It comes in large rolls and is very inexpesive. It solders easily too. A touch of LED back lit stained glass added to your tree could be cool as well. Very cool project, thanks for sharing.
Ive had luck using acrylic paints in electronics projects. Its conductive while wet but ok when dry. I fully second the small scale tests comment. Perhaps using a heaterizer to fully dry the conductive paint woul solve blending issues.
I wish it were so simple- I think Renee might have the right of it on this one. After the first round of shorts, I tried test swatches where I let each layer of paint dry for several days- no amount of drying seems to impact the permeation.
5 ohms / ft. eh? I guess you could lay thtings out in such a way that the LEDs always have current limiting resistors at known points. But that is a lot of drop and these walls won't be "green", that is for sure. Copper tape is pretty expensive these days, but I think very thin stuff that is also very narrow would be as good as if not better than the paint and you can solder to it and what not. You could always pinstipe with paint over that if copper (or patina) isn't your color. then i'd use kapton or or some other thin electrically insulating tape to cover the cross-overs. paint won't stick to kapton, but lightly sanding it might help that. Some copper tape conducts through its adhesive, some is made not to.
Maybe someone could try different paints as insulators. Latex vs enamel vs... Perhaps the pigments are causing the conduction, Titanium dioxide is a white pigment, and lead has been used before. I wonder if there is a pigment-free paint out there? Once you find one, it would be interesting to find out the dielectric properties of it. Think: painted antennas!
Thanks for showing this. My wife is entranced with this and we are going to attempt something like it in our bedroom. We'll try and use conductive paint but we may cheat and use super fine magnet wire or copper tape as well.
I'm so excited to hear it! If it helps, my copper tape looks really nice, and has so far done a great job of staying secured to the wall. It's only been a couple of months, not a lifetime, but so far so good. Please send pictures!
Latex paint can be permeable to a lot of things, that's why you occasionally get moisture problems.
Perhaps the latex paint was permeable enough that it allowed both layers of conductive paint to come into contact?
Looks awesome, I've always wanted to play around with conductive paint!
An unrelated request - would you pass on to your web guys that they should include author information in the RSS feed? I was thinking to myself "This sounds like a Dia-type project, but it wasn't until I came to the website to read the comments that I realized it was actually you.
There is a brush on rubber insulator that should work better. It is commonly used by electricans to insulate cable splices. It looks great anyway!
This is awesome
Imagine making a wall Arduino that would be great!!!
Wallduino! Get some! :P
Definately would be cool. I have allways wondered what a computer CPU would look like if you made the PTH equivalent of the circuit on perf board! A large size arduino on a wall would be very cool.
A computer CPU realized in PTH components would, in fact, look exactly like this: http://www.bigmessowires.com/bmow1/
Awesome.
Or like this:
http://www.homebrewcpu.com/photo_gallery.htm
Also awesome.
That's pretty awesome! I never knew there was such as thing as magnetic or conductive paint, Looks great!