- Home
- Product Categories
- Robotics
- Magician Chassis

Magician Chassis
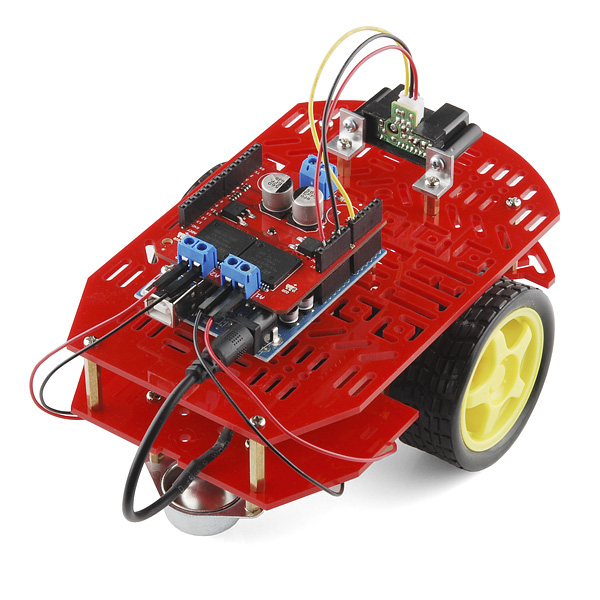
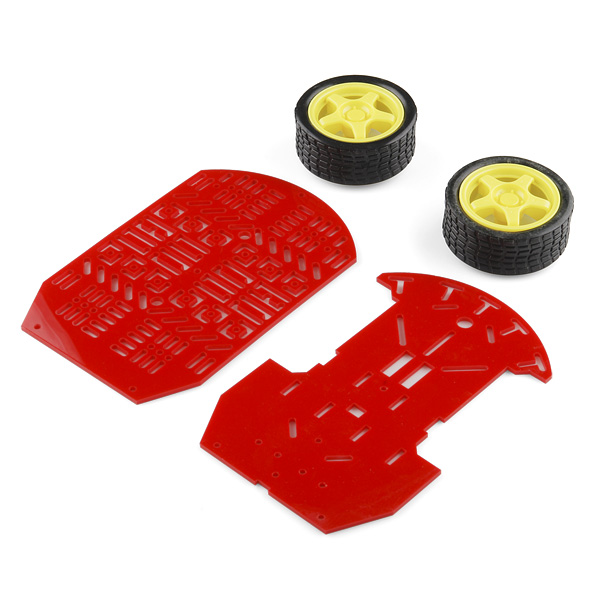
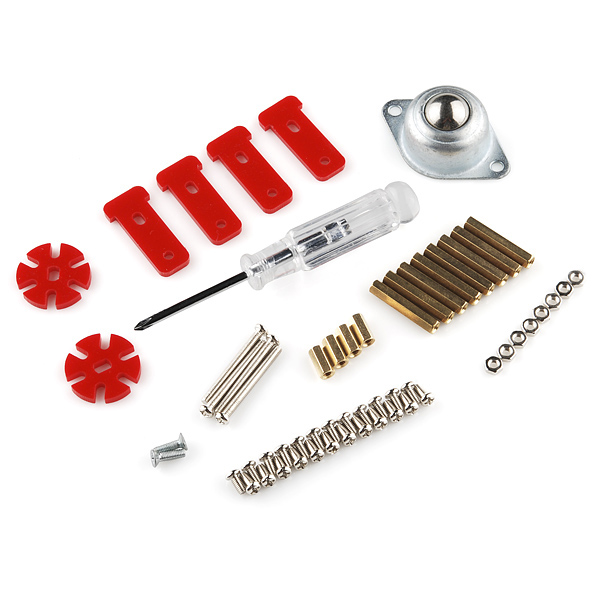
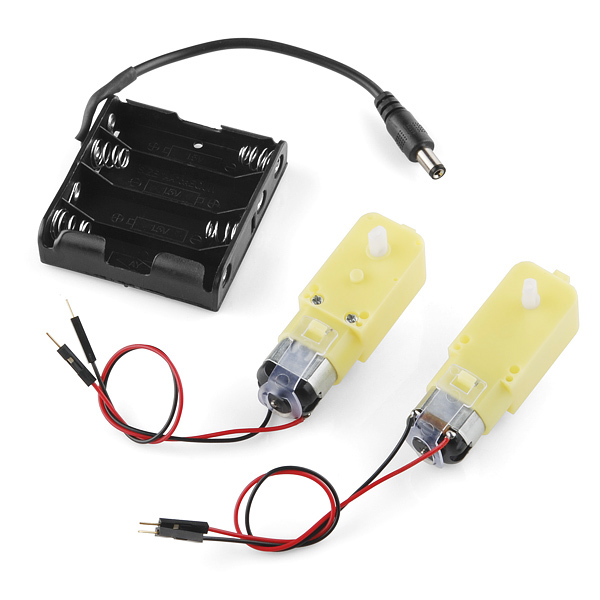
The Magician Chassis is our latest robot platform from Dagu. It features two gearmotors with 65mm wheels and a rear caster. The chassis plates are cut from acrylic with a wide variety of mounting holes for sensors, controllers, power, etc. Simply bolt the two pre-cut platforms together, attach the motors and caster and add your favorite robotics controller. This kit includes all of the parts needed to assemble the chassis as well as a 4xAA battery holder with barrel jack termination.
Note: The chassis requires assembly but has detailed instructions.
- Max Motor Voltage: 6VDC
- No Load Speed: 90±10rpm
- No Load Current:190mA(max.250mA)
- Torque: 800gf.cm
- Stall Current: ~1A
- 65mm Diameter Wheels (30mm Wide)
- Plastic Rims with Solid Rubber Tires
- 110 x 174mm
- Datasheet (Motors)
- Assembly Instructions
Magician Chassis Product Help and Resources
Core Skill: Robotics
This skill concerns mechanical and robotics knowledge. You may need to know how mechanical parts interact, how motors work, or how to use motor drivers and controllers.
Skill Level: Rookie - You will be required to know some basics about motors, basic motor drivers and how simple robotic motion can be accomplished.
See all skill levels
Core Skill: DIY
Whether it's for assembling a kit, hacking an enclosure, or creating your own parts; the DIY skill is all about knowing how to use tools and the techniques associated with them.
Skill Level: Noob - Basic assembly is required. You may need to provide your own basic tools like a screwdriver, hammer or scissors. Power tools or custom parts are not required. Instructions will be included and easy to follow. Sewing may be required, but only with included patterns.
See all skill levels
Comments
Looking for answers to technical questions?
We welcome your comments and suggestions below. However, if you are looking for solutions to technical questions please see our Technical Assistance page.
Customer Reviews
2.5 out of 5
Based on 2 ratings:
nice price, but limited use
You can't beat the price for a chassis, motors and wheels. However, the height of the top deck severely limits what you can put on the bottom deck. Ultimately, the kit needs taller standoffs so you can actually get your batteries in and out of the thing, and to allow you to mount other stuff on the bottom deck (unless you have little baby fingers). I know they've updated the kit, but I think the standoffs are still the same and thus it still needs improvement.
Good motors, poor chassis
The motors that com with the kit are really nice ones. The rest of the kit needs some better materials and attention to detail. The one I received had predrilled holes that were in the wrong place for mounting the front caster. One of the plates had broken in shipment (poor material? poor packaging?) but was easily reglued. With new holes for the front caster the student I gave the kit to was able to build a robot but then ran into the problem with battery placement that others have mentioned.
Our new Shadow chassis has some great improvements from the old Redbot chassis. You can find it here - https://www.sparkfun.com/products/13166
Here's what I built with it and a Raspberry Pi! Pivore
hi eveyone...i bought one of these and I have this problem with the wheels connected to them. One of the wheels wobble when it rotates but the other one stays firm...this effects when i try to move it straight where cause of this problem it does not go straight..can someone give a solution for this....help is greatly appreciated
So far I really like this kit. It's been a cinch to assemble, for the most part. What's really annoying me, though, is the battery holder that comes with it. I can't actually mount it the way it's shown in the instructions. In fact, the two screw holes on the holder don't line up with any appropriate places on the bottom plate. I'm going to have to drill a new hole in it both to securely mount it and prevent the screw heads from keeping the batteries from properly fitting.
The picture above of the built chassis has the battery mounted to the underside of the upper panel. This looks a lot more promising to me.
could i add line follower sensor to tis raspirobotboard?
Is there an SVG file available for the chassis pieces? I cracked the corner off of one panel and would like to laser cut a replacement.
.
I bough the kit and assembled. I was checking for continuity of the terminal of motors and seems that the terminal of motor are shorted internally.Both the motors seems to be shorted.
Please let us know how to proceed?
I bough the kit and assembled. I was checking for continuity of the terminal of motors and seems that the terminal of motor are shorted internally.Both the motors seems to be shorted.
Please let us know how to proceed?
Just bought one of these from my local electronics store. Built a simple robot using my Arduino Uno. Here are a few things I noticed.
1: When using the included nuts + bolts to attach the two motors, two of the nuts are almost impossible to screw on and I had to leave them off.
2: The two flat headed screws that are used to attach the battery clip to the chassis dig into the side of the battery clip and end up on an angle, It's still possible to attach the battery clip, albeit difficult.
3: The robot has a tendency to bank to the left. Even on a perfectly flat floor, it banks to the left, quite sharply so sometimes.
All in all, I would say that this is an alright chassis if you're just starting out with something like this, however, It's quite clear that many parts of it weren't thought out all that well, which leads to difficulties building and controlling it.
have some form of payment for purchases in Brazil without a credit card or paypal?
I created a BoosterPack to interface this to TI's LaunchPad ecosystem
43Oh!
Got everything hooked up, but the motors are spinning at entirely different speeds. Just have really simple code (basically just motor.drive(100);). Any suggestions?
This thing does not dive straight for me.
How do I go about coding this? I will have it connected by serial. What do i connect were? It will be ran of a Raspberry Pi. I would also like a web interface for move it forward, back and turn. PLEASE HELP. Thanks
You will need to have motor drivers to interface between the motors and your Pi. For a web interface, you'll also need some kind of wireless option attached to your Pi. I'd recommend checking out the forums and the Pi tutorials to get a better idea regarding the coding for all of this.
Very simple and easy to mount. This is a good start for those who want to build a simple robot! There is just one issue: the wheels. Sometimes they move, sometimes they don't. For example, when I tell my robot to move forward, one of the wheels move, the other doesn't. The same happens when moving backward, right and left. I don't see any contacts that could be making this happen. Also, it's important to mention that sometimes one wheels stops, sometimes the other one stops, so it is probably not just one motor's problem.
Does anyone know how to fix it?
Sparkfun Team should check the Kit again.. Some of the screws does not fit (missing or wrong). Batteryholder is a little bit problem :(
Pretty junky and poorly designed. Some parts are impossible to mount (e.g. there are two screw heads poking into where the battery holder's flat side is supposed to sit, it's even in the instructions, step 6), it's obvious not much effort was put into the design of this thing. The wheels are horribly out of alignment when mounted to the motor axles and wobble quite a bit when rotating.
It does work though, but I would not buy again.
there are other motors here with encoders that fit in this kit?
or something like this (https://www.sparkfun.com/products/9299) that fit on the kit?
Can't beat the price. Was pretty easy to assemble, even for me - no experience at all. However, I am unable to get this thing to go straight, even on a smooth hardwood floor. Sometimes it goes left, sometimes right. I don't see any obvious friction points, and I've tried varying the power to each wheel (via arduino/software). I even tried a dedicated power suppy (using adafruit motor shield). Any ideas/help would be greatly appreciated. I'm on the verge of throwing this thing into the trash.
To late but I would check the rubber on the wheels! If you line the rubber up right the car should work fine!
Can you provide any video link on how to assemble it .....i have brought it recently through your supplier in Bangladesh ,,,the product seems nice ...
Sorry for the late reply: It isn't a video, but we just added the Assembly Instructions (in PDF format) that come with the kit into the Documents section. Hope this helps! :D
Hey,,We would be needing this Magician Chasis for our project,I want to order ,..Since it is out of stock could you reserve me for 2 and I will be paying it ASAP...thanks.
Try clicking the "backorder" button up there to the right of the project description.
Bought 3 of these kits, one for me one for each of my boys. I designed a breadboard circuit that uses a picaxe 18m2 and a L293D motor controller to drive the motors. The picaxe also controls several sensors and LEDs. After hours of headache from it not working I've found I think I finally found the issue. The Picaxe has to have a different power supply than the motors. Each motor is drawing about 2 amps! It simply will not work when the Picaxe and motor controller are powered from the one 4 AA battery pack. Having to strap on a second 4 AA battery pack is going to be tricky, not to mention ugly. A simply and inexpensive robot project just got more complicated. Anybody else run into this problem?
Have you tried using Energizer Ultimate Lithium AA batteries? These can source 3A. See the specifications here.
Got mine assembled today, used a uno r3 and a motorshield r3, running 6v to the sheild 4xAA one 9v battery for the uno set the motors to high and it has a problem ony one does not run on high. One of the gearboxes is extremely tight it runs slower than the other. like its binding. This is the first time i ordered from sparkfun would hate to discontinue further orders because of faulty products? Other than that this is a nice kit lasercut panels are extremely nice and the included extra stand offs. But the gearbox issue kills it for me:( nobody wants a robot that goes in circles and kills nimh batterys in 5 min.. Please help resolve this issue. also i used freshly charged duracell 2450mAh nimH aa size batterys.
If you are still having problems please email us at techsupport@sparkfun.com.
The kit looks pretty nice once assembled, but this took me WAY longer than it should have. The motor mounts were very difficult to install without having to dremel anything off. It seems the secret is to not attach the outer mount to the chassis, but put the top screw in through it and through the other mount (which you install first), but don't put the screw far enough to completely exit the inner motor mount. Then push/bend the outer mount until it latches into place-- still not easy. Kind of hard to describe -- wish I took pics.
Also, with the default placement, it's pretty hard to get to your batteries.
I haven't tried to power it up with a board yet, but for the chassis alone I don't regret my purchase, I just wouldn't buy it again. The time spent assembling it correctly could have been spent making a chassis from scratch.
** Update ** Hooked it up to an arduino + motorshield for a quick test. Even with a pretty heavy Tenergy RC car battery, it moved pretty well. The rear caster turned the chassis a bit when moving over the grout on tiled floors, though. I'm about to replace it with a caster from home depot to see if it works out better.
Idk what better - that this completes christmas shopping for my girlfriend, or that I have a girlfriend that will love this (and an Arduino to run it) as a Christmas present ;) :D
Would the Ardumoto - Motor Driver Shield be able to drive the moters that come with this kit?
Pardon my (probably stupid) question, would it be possible to wire the motors directly to the Arduino's PWM outputs? I need to make a little robot, and I have to make it as simple as possible (just control the two motor's speed independently).
no, unless you want to destroy your arduino. you're going to need motor drivers, such as an H-bridge or that shield for the arduino
I got this in the mail today and started assembly right away. There where some things I noticed:
1 When putting the first motor in was that the bolt did not fit.
the mount I was putting the bold through fell about 5mm and I grabbed another for no particular reason. the bolt went through the hole and the motor more easily, it was still very snug but it fitted.
2 One nut was flush against the chassis-bottom and the other was turning freely.
3 The "Speed board holders" (weird name) are very lose fitting.
4 I found 8 M3 nuts in the pack of which 2 have a broken thread and did not screw on the bolts.
5 The mounting holes for the battery pack both in the battery pack and the chassis-bottom are to far apart for the M3*10 flatheads to fit nice and fluch (or the heads are to wide...)
after fumbling around with some parts I got it to fit nicely together and am not going to disassemble it any time soon. an overall grade for this in my opinion will be an 0x0D
for some reason I can't find my soldering gun so I can't put headers on the ROB-09457 that I ordered with this so it has yet to drive a centimeter. I am hoping to find it soon I am itching to get this platform driving on it's own in stead of me reliving my childhood and using it as a toy car.....
http://www.youtube.com/watch?v=FD8luwIzqnc
This is a decent value for a chassis, but the motors are junk. They are undergeared, no useful torque and no-load speed is too fast to be useful. Replace them with continuous rotation servos and you have a useful chassis. See build at http://find.botmag.com/091206 and http://find.botmag.com/111207
Decent value, but the 48:1 gearmotors are hopelessly underpowered. Replace them with 100:1 or more gearmotors or CR servos and then the "Magic" can start. See http://find.botmag.com/091206 for details on one PicAxe build.
Really badly underpowered. Will not operate in reverse and barely in forward on smooth vinyl floor with batteries and an arduino as the only payload. A complete waste of $15. I have two disappointed kids after I hyped it up to them after ordering:(
Could these motors be used? http://www.pololu.com/catalog/product/1120/pictures
Has anyone had an issue with the chassis pulling slightly to either direction while rolling?
If you look above, you'll find a number of people with comments to this effect. One suggestion was to make sure you assembled the kit such that the motors are both turning in the same direction.
Do the motors come with the jumpers soldered on, or will I need to solder on my own?
Two things I need to know robertC how can you control it and does it come with all shone on the pics How can you do a remote for it (ok three) all people can ansore
You add in your own microcontroller in order to control the bot. You could add in RF control to the microcontroller to create a remote for it. Take a look at our robot journals to get some ideas on different controllers you can use.
Can I control each wheel independently? Does each wheel have one motor? Thanks.
Each wheel does have its own motor, and depending on how you hooked it up to a controller, they could be driven independently.
Are there bad effects if I used a 9V battery?
The max motor voltage is 6v, so 9v will likely end up in damaged components.
Do you think it would be possible to hook two of these together to make a 4wd robot? ( without the casters )
what arduino code did you use in the new product post? if you know can you post it in the comments. also can you post a wiring diagram.
thanks, ean bezemer
any idea what kind of wheels will fit on those motors? the wheels that came with mine are not strait.
The Chassis i got from my Freeday 2012 order was relitivy poor quality the motor shaft isn't strait the barrel jack started to smoke and melted the connector and the ball caster is low quality
over all i wouldn't recommend this to anyone.
Hopefully you have already gotten this taken care of, but if you ever run into this issue, please contact us at techsupport@sparkfun.com so we can help you out.
What sensor did you use in the video? (http://www.youtube.com/watch?v=GVvijRf3bwI&feature=related)
What are the connectors used on the ends of the battery leads called, and where can I find them?
it's a barrel jack. we have a lot of things that work with it. check it out.
Oops. I meant the connectors on the ends of the motor leads.
ah. they are basic molex connectors. like these
they're essentially just jumper wires. you can use them in the arduino directly, or into a female 0.1" spaced header.
I like the flexibility of this chassis in a complete package, so I bought one to test, but the motors just don't have the poop to bear much of a load - a disappointing showstopper for our swarm robot project. I'd be willing to pay twice this price and buy 20 of them if the motors were stronger. What a shame.
i've created a little blog entry about getting started with this chassis. I'm hoping to keep adding more to it.
http://niltoid.blogspot.com
I have one of these chassis, and while I was happy with the assembly, I can't get it to drive straight at all! It always turns a couple of degrees in either direction. Are there any modifications that will help with this? Is there anything I could have done wrong that might have led to this?
bob brings up an interesting reason for the deviation which i didn't consider. i thought it was mainly due to the omni wheel getting stuck. truth is, your robot will never move exactly the way your code suggests because of countless reasons. i'm going to try to make it more accurate by adding wheel encoding (somehow) and a magnetometer or compass.
The included motors turn faster in one direction than in the other (I think this is pretty common with small hobby motors). Make sure you have your motors mounted so that each of them is turning the same direction. If you go with the intuitively obvious (ie, both with the same side facing outward) you'll end up with considerably different speeds for each wheel.
If that still isn't getting your robot driving straight enough, you'll need to add an offset in your control application. For example, drive one motor at a max of 255, drive the other slightly slower (240 or 245). Adjust until it's perfectly straight.
I just tested our new shipment of Magician Chassis and they do not exhibit a problem with the motor mounts. It's a snug fit, but everything works just fine. I didn't have to shave anything down or widen any holes.
Correct me if i'm wrong, stall current is a maximum?
If the stall current is 1A. How many AA'S can I use to run
these motors. If I use a L293DNE Does the voltage Split in half?
Purchased two of these for evaluation for potential use in a class. Assembled both today, and drove them with an Arduino using a Pololu #713 PWM driver. With both motors set to the same speed, one drove in a 2ft diam circle to the right, the other approx the same diameter to the left! You can feel the difference in friction in the two motors. I guess I should've read the "no-load speed" spec of 90 +/- 10 rpm!
Other robot chassis with the same drive system have gone almost in a straight line.
Looks like I won't be purchasing another 40 of these for the class! It's actually a disappointment.
We built 8 of them here OK. I had one that did about the same thing and I noticed the drive wheel and the red slotted wheel on the inside were pushed on a bit close to the red base on the slow motor (but not touching as far as I could see). Moved them away a bit and it fixed it. They must rub against it and slow down the motor if they look close once it starts moving and has a load on it.
I got mine just yesterday and my experience is the same. The motors are clearly be the weakest part of the kit, as not only they show some annoying dispersion in the separation of the mounting holes, but also run at different speeds and torque; it´s simply not possible to drive it in a straight line. It is to me a cheap but useless kit. Better to spend the extra buck and go for other platforms like the Rover 5.
They shouldn't do that. You might have something bad with your controller, or setup. All the ones we've tested have driven straight.
just finished building one I ordered before Christmas, circles to the left with both motors having the same speed value, tried with the motor driver https://www.sparkfun.com/products/9457 and the seeedstudio motorshield, other than spend time trying to work out the ratio between the motors, is there anything else I can try?
Bummer. Contact techsupport or customer service and they can take care of you.
I don't think it's the motors as much as the front caster. It doesn't roll uniform and is quite cheap. Others have suggested replacing with skids or some other platform that is more stable. Mine also rolls to the left (or right when reversing) and I noticed that it tends to do it more when there is less friction (it runs in almost a circle when on the kitchen floor, but pretty straight on a medium shag rug). I am not driving mine with the AA batteries either, I'm using a 7.4V 1000mah LiPoly battery I bought from you guys. It works great and really drives that sucker through just about anything.
I ordered the kit with some QRE Sensor. The Kit has a proper cutout for the QRE, but then the height is way above ground.
Trying to use it the other way and keeping motor on top and roller without stand, the top won't fit together, have to buy more hardware to use this kit.
Also the motor mount was not proper, had to press the motor really hard to get through the holes.
Price is the only positive about this kit. Really disappointed otherwise.
Also the battery holder provided is 4 cell, but the mounting holes and assembly instructions indicate 3 battery back.
I think you might have built it wrong. The motor mounts are EXTREMELY loose. In fact, I had to use tape to hold them in place when I put everything together. You might not have used the right holes. Also, the roller is only meant to go as shown in the instructions. It would need extra hardware to be configured in another way.
Can you please provide more details of the hardware needed? Also can I swap the roller for another one??
I need to use this for my classes where my students use line(QRE) sensor. The height makes it impossible to use them wither way.
The slot is cut out for that but the sensor won't work at that height. It needs cover to work.
I have to agree with iRoboticist here. The mounts wouldn't fit as shipped for me. I had to file down the mounts in order to get all of the holes aligned. I spent a lot of time trying to get them to line up and both were at least 1/16th out of alignment. Neither would line up such that both screws could be inserted.
That's odd. Like I said, ours fell in and were anything BUT snug. Maybe there's a wide range of tolerances. I can check stock and see what the deal is. If either of you have pictures, I'd like to see if they're in the right place or not. It seems odd.
Reporting in that mine were super snug, I was just barely able to fit it together, and there isn't enough clearance to put on the bottom nut, so I probably should have filed mine a bit too.
Also the battery compartment was 4 cell with the holes completely not lined up, although I'll probably use it with velcro anyways, otherwise it looks like changing batteries will be a pain.
Here are some images:
Location of the mounts
Misalignment of the motor holes:
Image 1
Image 2
I ended up filing the part of the motor mount highlighted in blue to get everything to align correctly:
Image
ah, ok. that's different than what I thought. Let me check into it.
our samples and the demo units all line up almost perfectly. strange.
So, what's the result?
still checking into it. it was a busy week with open house and such.
any better batch on the next stock-in?
Yes, see my other comment. The new shipment looks fine. I assembled one and it's good.
Maybe I just got a bad kit, but I can't get either motor aligned such that I can screw in both screws. On one, I can get the top screw in, but the bottom motor hole is so close to the base that the nut won't fit.
On the other motor, I can't even get the top screw all the way through. The motor mounts just don't align right. As such, I can't use the kit.
Disappointing, but I guess expected for such an inexpensive kit. Cheap doesn't help if it doesn't work though.
One of the holes on the mount can move up and down a little bit. I found if I screwed one in too full tightness the other didn't fit very well, but was able to wiggle both in once the first one I put in was a loosened. Though, the tolerance was pretty tight on mine.
Here is a video of a student project using two mbeds with Xbee for control of the robot
You Tube video showing remote control of magician robot
More info at
http://mbed.org/users/ikhorosh/notebook/xbee-remote-robot/
Are the wheels directly screwed to the motors? I know those 65mm wheels from Dagu often come with brass mounting adaptor that use a hex grub screw to attach to the motor shaft, and then a screw connects the wheel to the brass adaptor.
The wheels just press on, it is a plastic to plastic fit. The roller caster "omni wheel" is junky, at least in my kit, and binds up.
our wheel worked fine. has anyone tried using some wd-40 or something on it? ours rolled well even on thin carpet.
Yes I tried oiling it with no improvement. I kinda feel like knocking the caster apart for science, something makes it jam tight in there.
I have used that type of caster wheel before on robots. That style of caster works best on clean flat floors. Over time they tend to pick up dust, grit, and other things off the floor and then will get a bit harder to move until it works out of it.
In a very dirty environment, you can also use an R/C model airplane tail wheel kit. It will probably cost as much as the robot kit.
very odd. ours was good. sorry about that. I played with a few of them and they seemed pretty good. they are worth every penny, that's for sure.
The "omni wheel" is not good. It doesn't roll smoothly at all, it catches and completely jams up. It seems to be an inappropriate component for the task. This catching and jamming messes up robot movement. Replacing it with a home-made skid helps, it is more predictable.
I just ordered mine. I've been looking for something like this to get my son and here it is. Can't wait for it to come in the mail.
6v motors in this Lithium Polymer age? That is probably the other thing stopping me from buying one of these.
I really don't use AAs or NiMH anymore.
It creeps me out how much the general design/parts used are so similar to what I came up with from scratch haha
I'm drooling over this chassis
Yes, the kids on my Electronics Class will love this! :-) Txs!
I noticed in the video you said your demo had a Motor Driver Shield on it but it seems to be your Monster Motor Driver Shield.
I was wondering do you need to use Monster or can you just use your regular Motor Driver Shield.
I just put one together with a regular Ardumoto and it works fine, you can get more power out of the Monster Moto, but since we're powering it with 3AAs the Monster Moto would be a bit of overkill.
One question - is it easy to attach some sort of quadrature encoder to the wheels? (I'm probably asking the question, "Does the motor shaft extend out the back of the transmission housing?")
actually, yes. check the 3rd picture. see those flower-looking discs? those fit on the other end of the motor shaft (the motors have 2 shafts), and they are setup for use with something like this:
http://www.sparkfun.com/products/9299
I haven't tested it yet, but that's the idea they had in mind.
I was able to get similar behavior with the QRD1114 optical detectors (http://www.sparkfun.com/products/246). Printed out a couple of discs about the same diameter as the flower-looking ones that came with the kit - my discs, however, had alternating black and white sectors. I then hot-glued the QRD1114s next to the motors (there's just enough room for that) and it works very well. I blatantly stole the idea from the Rover 5 innards as seen on other Web sites :)
Do note, however, that I don't have a proper quadrature encoder, in the sense that I can't tell wheel rotation direction from the encoder alone. That said, given that I'm, you know, driving the wheels myself through code, I figured I don't really need direction, just encoder ticks to know if I arrived where I was heading, distance-wise :)
i bought 2 of these with the chassis. unfortunately they don't fit because they're too wide. might work with some modification however. basically i'm thinking of cutting a section out them down the middle and gluing them back together.
An encoder option for this would be awesome. Combine with a 3DOF ( 1 gyro + 2 accel ) IMU and you can have some very accurate "gyrodometry" position estimation relatively cheaply.
That price is insane(ly inexpensive)!
So how is this a magician chassis? Do magicians use it in magic shows or something?
ILLUSIONIST! - Gob
well, try connecting sensors to the top plate. you will soon realize that the hole placement is magic, it always seems to be just right.
but seriously, I'm not sure about the name. that's what they call it, so we called it that.
With all those holes in the acrylic, would this survive a Drop Test?
how far do you want it dropped from. ask and you shall receive.
4 feet (workbench height) onto a hard surface ;)
Hmm, a back story might help explain...
This is the standard drop test we used to use for lego bots at the Robot Camp. Though, we called it "Shoop Testing" as Robin Shoop, the camp director, loved to try to break the kids' bots.. supposedly to check for sound construction. http://www.education.rec.ri.cmu.edu/
Also, one acrylic plate based product I recently purchased, from another company, easily fell apart.
Have fun with the test!
That seems pointless. Try dropping a car from 4ft (that is not designed for that kind of impact) and see what happens.
video coming right up.
Magician Chassis Drop Test
You have a high workbench.
It does break. It's relatively durable, but the thin acrylic isn't immune to a good drop.
Solarbotics performs their own Drop Test, in response: http://www.youtube.com/watch?feature=player_embedded&v=MJT3_D_cZsc Why aren't we using quality materials, folks? Personally, I would pay an extra buck to ensure the robustness of my $100+ robot.. which I hope to be able to use again and again and again,...
It's not SF's problem. Complain to Dagu about it.
So a 30 30 or HALO (not the video game) is out of the question, darn.
Guys, you continue to amaze me with your.. customer service and willingness to please / break things.
Don't get me wrong. This still looks like a GREAT LITTLE PLATFORM, especially for a $15 kit. You could expect to put in ~$35+ and 4 hours of work to make a similar one from scratch.
Just don't plan on any high jumps or parachute drops with this baby. Keep it on the road.
On another note, has anyone figured out how to laser cut Lexan? It does now come in tinted colors. You could drop test a good Lexan bot frame from 100 feet. It's also a great material to machine / work with. I
"to machine / work with. I"? I what? I am being fangoriously devoured by a vicious monster?
I think the LynxMotion stuff is made out of laser-cut polycarbonate/Lexan. I don't think it's so much a matter of it being impossible as it is a matter of it creating highly toxic fumes (feel free to correct me if I'm wrong).
I do not know how true it is but I rember hearing about someone using a 40W IR laser to cut it. (it might have been 400W)
What are you going to do with that poor robot now?
I really hope you don't just throw it out! 0_o
If Sparkfun is okay with it, I'll give that poor robot a good home...
are you kidding! throw it out? no way. we'll glue it back together, use some maker beam, etc.
It wouldn't be the SFE way to throw it out!
Ok good!!!
Yup, it isn't robot abuse... it's robot training ;)
No reason you couldn't sure up that bottom plate with a steel bracket or a piece of MakerBeam. Especially since it's an inexpensive chassis to begin with!