×
SparkFun will be closed on Tuesday, December 24th, and Wednesday, December 25th, in observance of the Christmas holiday. Any orders qualifying for same day shipping placed after 2:00 p.m. (MST) on Monday, December 23rd, will be processed on Thursday, December 26th, when we return to regular business hours. Wishing you a safe and happy holiday from all of us at SparkFun!
Please note - we will not be available for Local Pick up orders from December 24th-December 27th. If you place an order for Local Pick-Up we will have those ready on Monday, December 30th.
High Altitude Sensing Board
Replacement: None. This was a one-off board and we are not building any more of them. This page is for reference only.
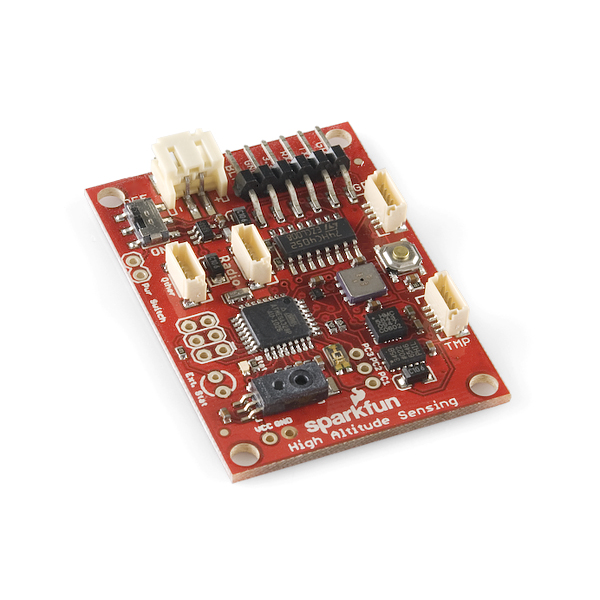
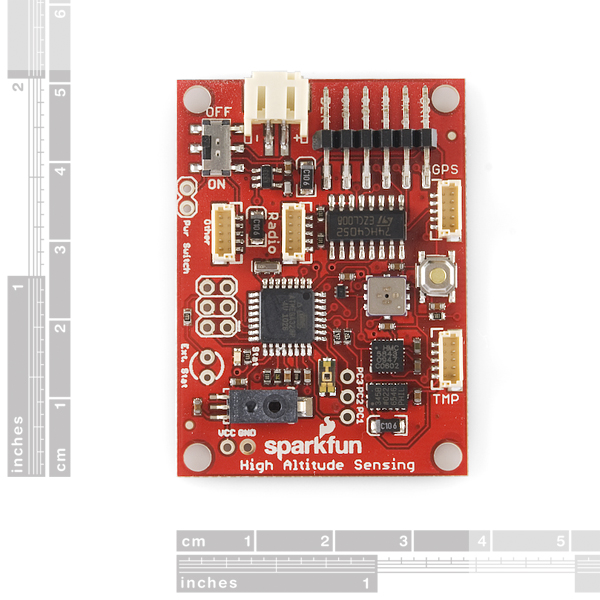
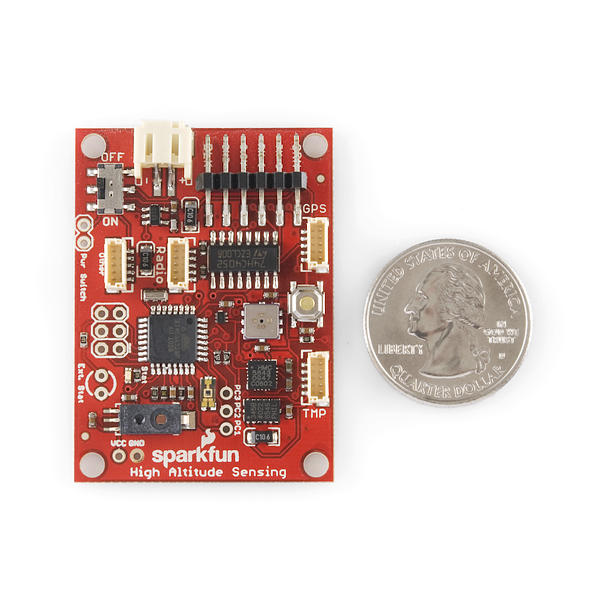
This board was originally built and designed for the high altitude balloon project (HAB). This was the main sensor board and we have affectionately named it the 'every sensor we know' board. It has a humidity, magneto, pressure, temperature, light, and acceleration sensor. In addition, it has an ATmega328 at the heart with connections for a GPS module, radio, and an external temperature sensor.
For more information, check out the HAB tutorial.
- Schematic
- Eagle Files
- Source Code
- Datasheet (TEMT6000)
- Datasheet (HIH-4030)
- Datasheet (BMP085)
- Datasheet (HMC5843)
- Datasheet (ADXL345)
Comments
Looking for answers to technical questions?
We welcome your comments and suggestions below. However, if you are looking for solutions to technical questions please see our Technical Assistance page.
Customer Reviews
No reviews yet.


You have a minor typo in the "Documents:" area...
It should list "Datasheet (HMC5843)".
The link was correct to the pdf file.
Thanks.
Thanks, good find.
Where's the 3 axis Gyro?
Or don't you know this sensor?
Given that this is an application-specific design for a balloon, the accelerometric and magneto data are probably plenty. Unless something is seriously wrong, this thing shouldn't be spinning or swinging fast enough that periodic tilt-compensated magnetic heading checks wouldn't give you a pretty good sense of angular rate. But with an ITG-3200, this really would be an ideal general purpose telemetry board.
The way Nate spaced the ADXL345 and HMC5483 really illustrates just how tiny the next triaxial accel/gyro/mag board could be without the analog ST gyros and their associated peripheral components. Maybe with those same tiny molex connectors to break out SPI and unwired GPIOs and ADC channels. And a fusion of the OpenLog and an all-TWI 9-DOF, would be fantastic. Another thought is to use the AT90USB instead of the 328, allowing one to mount the SD card as mass-storage.
TZ, without the intermediate serial connection, what kind of sample frequency do you think one could get from a 328 handling the three TWI sensors and also writing the samples to SD? In such an application, Arduino compatibility aside, could you then run the 328 at 16MHz from 3.3v, as with the OpenLog?
Sorry about the ?ber-digression.
Anyone know where I could get one of these, even though they are retired? Or is anyone willing to sell theirs?
You could grab the Eagle files and send them to the fab, then solder it together yourself. Everything you need is there.
What kind of cable connects this to a radio? Does it send some type of tty signal right off the bat?
How can I add an anemometer to this board? Is it possible?
There are three analog pins that are broken out as PC1, PC2 and PC3. They can also function as digital input pins, so you could use one with an anemometer like the one in Sparkfun's Weather Meters Kit.
Ok. thx. For digital inputs, Do I need to reprogram the atmel of the HAS?
I'm a newish electronics student trying to use this board in a high altitude balloon project and have some very very basic questions. First and foremost is: what is the best way to communicate with this board? I ultimately want to log data to an SD card, but first would like to find some way that I can access the data from the board on a computer.
Many thanks in advance!
Matt
At the Dallas Makerspace we've been using an FTDI basic breakout (3.3 volt!) to read the data in real-time from a computer. Once we launch our balloon we'll use an OpenLog to record the data to an SD card.
Thanks for the response. Apologies for very basic questions, but I'm trying to figure out what my shopping list needs to be in order to use this sensor board in the lab and at altitude.
Need:
- HAB board
- Openlog board
- FTDI basic breakout
- SD card
Do I need something like the Arduino Pro or Mini? Many many thanks again and in advance for all your help.
Thanks,
Matt
Here's what we bought:
* High Altitude Sensing Board
* LS20031 GPS
* TMP102 Temperature Sensor (for external temperature)
* OpenLog Data Recorder
* Interface Cable for EM408 - 1 Foot (buy a couple of these, they are really handy)
* FTDI basic breakout
* SD card (I think we're using a 2 or 4GB card)
Check out our project page for more info.
This is exactly what I did for my launch and it worked beautifully. The OpenLog has a pinout that mates with the Arduino Pro (and Pro Mini) so it's incredibly easy to do.
The BMP085 is only rated to about 9000m (29,528 feet). That is about half of the height I would expect from a near space balloon. Has anyone confirmed that this pressure sensor reads properly beyond the 9000m pressure level?
Hi, Folks. I did it! Here is my Blog: http://swisshab.blogspot.com/
Mainly SparkFun Stuff.
Does this come with a DataLogger? If not, how would one hook-up the OpenLog to this?
It doesn't come with an OpenLog, you'll have to buy one. I took a female 6-pin header, bent the pins about 90 degrees and soldered them to an OpenLog. Be sure to do this with the SD card slot and header on the bottom.
The BMP085 seems to work over its specs . I had in the log of my flight last sunday readings of 34hPa, that is around 21'000. I guess the specs are written that way because the engineers had no enough immagination to think about such an use of that sensor. I had more troubles with the venus GPS that stopped to work at 5000m.
The specs on the BMP085 give it at under 30,000 ft at it's highest range. 300hPA equals aprox 29,000 feet. Not even close to 100,000ft. Is my math off or is the High not really that high in the advertisement of this sensor/product? I don't want to rely on GPS to give me the final altitude but a sensor on-board that I will query the data later.
It would be a good idea to put the OpenLog device to the related products. For a newbie it's hard to understand the implicit needed hardware for such a project.
Well, that will work indeed. Than another question. It seems that I get nice readings (using terminal of my arduino software). But... I can't switch to other modes. Only just after the boot I can select the different sensors, if I wait too long I just get the barometric readings (and quite some timeouts), how can I switch from one sensor to another?!
What kind of cables do I use for those extra sensors? They look like some kind of USB.
This will work:
http://www.sparkfun.com/commerce/product_info.php?products_id=9129
The code in the function used to get the relative humidity does not appear to take the temperature into account? Could someone please explain if I am wrong?
Great board!
Keep in mind: the pressure sensor is spec'ed only up to 29,500 feet MSL.
According to the schematics, the board also includes a Pressure sensor (BMP085) which is not called out in the description above. It appears that the sensor is installed in the picture as well.
It was noted in the schematic and datasheets, now noted in the description as well.